In the light of recent Microsoft actions related to the Windows 10 operating system, many owners of personal computers and laptops are seriously thinking about switching to alternative operating systems. There are several (non-proprietary, with a friendly interface): Linux Mint, Ubuntu and Antergos (fork of Arch Linux). The most acceptable for an untrained user is precisely Ubuntu. At first, its interface may be a little puzzling, but it is organized wisely. Therefore, difficulties with the use does not arise. This begs the logical question: "How to install Ubuntu on a PC or laptop?" The answer will be given in this material. But first, a little about the operating system itself.
What is Ubuntu?
Ubuntu is a free operating system from the Linux family, which is distributed free of charge and does not require any microtransactions when used. The basis of Ubuntu is the Linux kernel with some modifications. By default, several DEs can be used as the working environment. For example, Ubuntu version 16.04 (the most popular and stable at the moment) uses the Unity environment. However, there are numerous forks of Ubuntu. Each with its own environment: Kubuntu (KDE), Lubuntu (LXDE), Xubuntu (Xfce) and others. The choice of a specific fork depends on your needs and the power of your PC. If the computer is powerful, then you can install any edition of the operating system. If the PC is quite old, with a weak processor and a tiny amount of RAM, then your choice is the lightweight distributions of Lubuntu or Xubuntu.
A feature of ubunt-like operating systems is that they are developed by a free community of programmers under the sensitive and unobtrusive control of Canonical. Any user can modify the operating system and send their developments to the developers. His research (if they seem sensible) will certainly be accepted. And this is precisely the main difference between Linux and Windows. Linux is run by a whole community of specially trained people from different countries. And Windows rivets a bunch of Microsoft programmers. Hence bugs and glitches, because it is impossible to run a new system on computers of various users. However, it is time to address the main topic of the material. How to install ubuntu on computer? We will find out soon.
Benefits of Ubuntu
The list of advantages of Ubuntu over Windows is very long. To begin with, this operating system uses exclusively free software. This means that you do not have to pay for its use. After installing updates, the OS does not require a reboot. But the main advantage of Ubuntu is stability. It refers to a tuned and forgot OS. If you don’t specifically pick something in the system, then it will last a long time. Many argue that Ubuntu is not a game system. Running toys on it is impossible. This is not true. Thanks to the Wine layer and its advanced version of Wine-Staging, you can run almost all games and programs under Windows. So the question arises: "Why do we need an operating system from Microsoft in this case?" In this regard, the interest in how to install Ubuntu is understandable.
Ubuntu system requirements
So, with the definition, we figured out and realized what the Ubuntu operating system is. The requirements for the computer in this OS are democratic. Modern versions willingly work on PCs with any dual-core processors, 512 megabytes of RAM and any video card. Of course, we are talking about lightweight distributions. The most interesting thing is that the system requires no more than 10 gigabytes of free space on your hard drive. This means that the age of the hard drive does not matter. Even a 40 gigabyte hard drive will do. Truly, Ubuntu is the most undemanding operating system of all existing. Now let's move on to creating bootable media.
Creating a bootable flash drive with Ubuntu
So, you decided to install "Ubuntu", guided by their own motives. Suppose you have already downloaded the distribution image. If not, then it can be found on the official website for free. For computers with 64-bit architecture, it is recommended to download the version of Desktop AMD64, and for 32-bit PCs (if there are any) - Desktop i386. Ubuntu installation always starts with choosing a program to create a bootable USB flash drive. Under Windows, the most appropriate utility is Rufus. Only this program can adequately record Linux distributions. Moreover, nothing needs to be changed in the utility settings. You can leave everything as it is. You just need to insert the USB flash drive into the socket and select the downloaded distribution image in Rufus. Then you just need to click on the "Start" button. The program will start recording. It will end in about five minutes. Now you can restart the computer and go to the BIOS settings.
BIOS Settings
This is a very important step, since not every BIOS version responds adequately to bootable media with Linux. Most of the problems are observed when UEFI and SecureBoot are on. So, after a reboot, you immediately need to enter the BIOS settings. Different computers can use different keys. But most often it is F1, F2, Enter or Del. Then you need to set the boot priority (Boot Priority) and select our flash drive as the first boot device. You must also disable SecureBoot and enable Legacy boot mode. After that, you need to press F10 and restart the computer. Downloading Ubuntu will begin immediately after starting the computer. Moreover, the installer will first offer options: either immediately launch the installation manager, or start the operating system in Live-mode (to "feel" it). Better to choose the second.
Installer Launch
After the Ubuntu desktop has loaded, you can conduct a short tour of the operating system. View all the menus, examine the list of installed applications, delve into the settings. All this can be done in live mode. You can also connect to the Internet and open a browser to search for any information.
But the possibilities of such a system are limited. How to install ubuntu from live mode? Very simple. There is a shortcut on the operating system’s desktop with the inscription “Installing Ubuntu.” You need to double-click on it. An installation wizard will appear that prompts you to select the installation language. Select “Russian” and click “Next.” The next step, the installer will offer to connect to the network and select the installation options for the proprietary software, we’ll connect to the network, but ignore the software installation, because an unexpected error may occur (especially when using laptops with hybrid graphics).
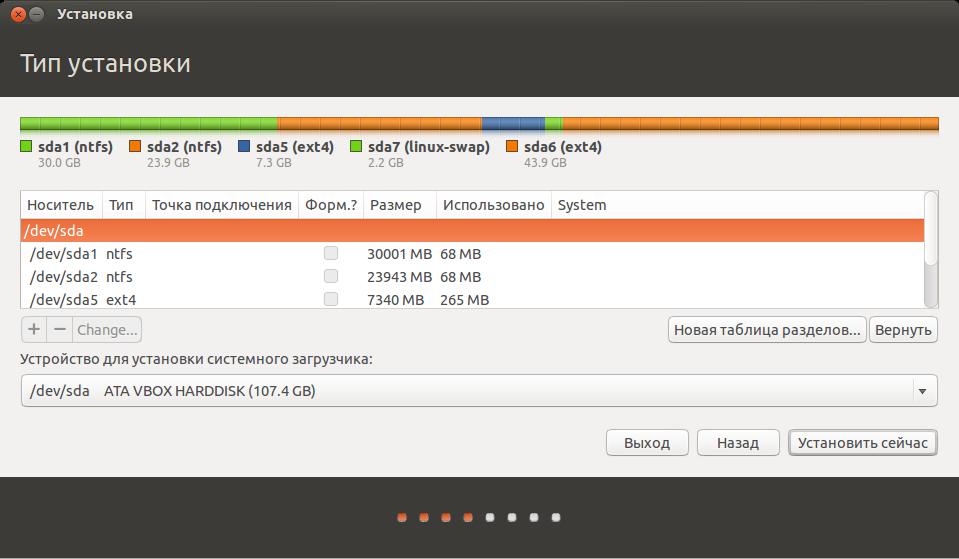
Disk layout
This is a very important step. Starting Ubuntu (and all subsequent operation of the operating system) depends entirely on this step. As for the correct layout of disks among experts, there is still no consensus. One thing is clear: a beginner should not go into the manual partitioning of disks. If you need to install Ubuntu next to Windows, then there is a special item in the markup manager for this. If Windows is not needed for nothing, you can select the option “Erase the Windows disk and install“ Ubuntu. ”It will be much easier. The installer will split the disk into the required volumes and enable swapping (if required). But if you do If you decide to do this manually, then keep in mind that the OS itself requires an Ext4 format partition with a size of 10 gigabytes with a mount point “/.” For the swap partition, you need to select the “swap” type and size depending on the amount of RAM (twice as much better). Everything else will remain under the partition with the mount point "/ home" and the form Ext4 as well. After a successful hard drive partitioning click "Next" and continue to change settings.
Layout selection, user and password creation
The next step, the installer will offer to choose the country of residence and the keyboard layout. For the first case, select "Russia", but as the default layout, select English. This is because Ubuntu doesn’t configure layout switching out of the box. And without English, it will not be possible to set a username and password. After choosing the location and layout, click the "Next" button.
Now a window will appear asking you to create a new user and come up with a username and password. You can choose any login, but there are some recommendations for the password. The fact is that in Ubuntu version 16.04 (and in any other) the lion's share of applications is installed exclusively using a password. Therefore, you need to choose a password that can be easily remembered and quickly dialed. But it does not have to be very simple. Also in this window you can select the login parameters (automatic or with a password) and decide whether to encrypt the home folder. This is up to you. After clicking on the "Next" button, the process of installing the operating system and downloading the necessary localizations will begin.
We figured out how to install Ubuntu. Step-by-step instructions for such a plan will help everyone. Now, after the installation is complete, click "Restart". Now you need to disassemble the main actions that are absolutely necessary to perform after installing the system.
Install required updates
This is also a necessary step, since without updates it will not be possible to install a lot of equipment correctly. A message about the need for updates will appear immediately after starting the full version of the operating system. You just need to click on the "Install" button and confirm your action by entering a password.
The installation time for updates depends on the amount of downloaded packages and the speed of the Internet connection. But the process does not interfere with the normal operation of the system. In addition, after installing all the updates, you do not need to restart the computer (hello, Windows). Rebooting may be required only after installing the necessary drivers. So, how to install Ubuntu on a computer, we have already figured out. Now you need to understand how to install the necessary applications.
Installing applications in Ubuntu
Now about installing programs on Ubuntu. The desktop does not contain any understandable information. There is nothing at all. But there is a sidebar on which there is a certain number of shortcuts. And here you need to select the button that says "Application Store". To run this item you will have to enter a password. After opening the store window, you will see application categories and a search bar. If you know the name of the program, it will be enough to drive the name into the search - and the program will give you the number of available packages with a similar name.
If not, you'll have to search by category. When the desired application is found, you will need to double-click on the name and in the window that appears, click the "Install" button. The installation process will begin immediately. His progress can be seen in the status bar, at the bottom of the window. All other applications are installed in the same way. You can also use the terminal and certain commands for installation. But for beginners, this is too complicated.
Conclusion
So, we have figured out how to install Ubuntu on a PC or laptop. There is nothing complicated in this. The main thing is to clearly follow the instructions and not engage in amateur activities. As a result, your computer will appreciate the speed and adequate operation. Over time, Ubuntu can easily become your main and only operating system.