Not to mention the fact that the use of optical disks for the installation of operating systems is becoming a thing of the past, and compact removable USB devices in the form of external USB-HDDs or the most common flash drives are gaining more and more popularity, one cannot fail to note the fact that some computer devices (e.g. netbooks) generally do not have optical drives as such. For them, installing Windows 7 from a USB flash drive becomes especially relevant. If you understand, the installation process cannot be called particularly complicated, however, in the course of some operations, some important nuances must be taken into account, without which the installation can be performed incorrectly or not at all.
Choosing the version of the operating system and downloading the distribution kit
First, let us dwell on one of the most important issues that may arise in connection with the installation of Windows 7 from a USB flash drive to a computer or laptop related to the choice of the “seven” modification.
In principle, our main preference is given to the maximum version, while other developments have not received much distribution. Particular attention should be paid to the installation distribution as an ISO image. It is best to download it from the official Microsoft website, despite the fact that during the installation of Windows 7 from a USB flash drive to a laptop or desktop PC, a license key for system activation may be required at some stage. How to activate the system will be discussed separately. In the meantime, based on purely practical considerations, we can advise you not to get involved in downloading all kinds of repacks created by some “craftsmen" and posted on the Internet in the public domain. They can be changed, say, the default themes, sound schemes and much more. In addition, some important functions, supposedly not needed by the average user, in truncated distributions may be disabled or absent altogether.
Finally, the presence of viruses in such distributions is not ruled out. So, if you still decided on such an unprecedented step, initially do not be too lazy to check the downloaded package for viruses, using some kind of portable scanner.
Finally, study the system requirements and make sure that your computer or laptop fully meets them. Usually it’s enough to have a configuration based on a 2-core mid-range processor with 1 GB of RAM for the 32-bit version of the OS or 2 GB if you plan to install from a Windows 7 64 bit USB flash drive. As for free disk space, a system partition of about 100 GB is enough. But for the sake of fidelity, it is better to install a little more, because by default the programs will be installed exactly in the system partition, and for the normal operation of Windows itself in the system partition it is necessary to have unallocated space at the level of ten percent of the total volume. This is not a required but recommended condition.
Saving Important Information
At the preparatory stage, before installing from the Windows 7 “Maximum” flash drive or another version, pay special attention to the important files stored in the “My Documents” folder if another operating system is present on the computer. If necessary, copy or transfer the necessary files to removable external media or to a logical partition (for example, drive D, if any).
Do I need to partition the disk?
This issue requires special explanation. In principle, if you only have drive C, creating a logical partition is not necessary at all, since you can also perform partitioning during the installation of Windows 7 from a USB flash drive to a laptop or desktop PC. The preliminary creation of a new partition may be required only if it is necessary to copy large volumes of important information, and there is no suitable external drive with the required volume at hand. To do this, you can use the program AOMEI Partition Assistant, in which creating a logical drive looks the most simple.
Configuring a flash drive for installing Windows 7: what programs to use, some formatting nuances
With the preliminary actions sorted out. The next important step is to create bootable media with a distribution kit written to it from the downloaded image. If you do not make the media bootable, even when setting it first in the boot devices in BIOS, Windows 7 will not install from the USB flash drive because it cannot be started from it (there will be no bootloader files on the media).
Note: a flash drive must have a volume of 4-6 GB or more, because when there is not enough space, the entire distribution kit will simply not fit on it.
To perform such operations, it is best to use special programs like UltraISO, Rufus, WinSetUpFromUSB, USB / DVD Download Tool and others, since in the Windows systems themselves, except for the command line, no tools are provided for this.
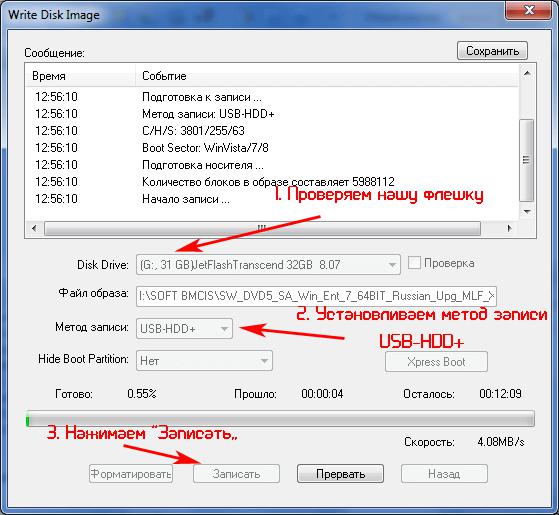
The principle of operation of all such utilities consists only in selecting their media, specifying the path to the image file stored on the hard disk, and formatting with the choice of the preferred file system. And here the subtleties begin. Typically, programs suggest using the NTFS file system, exposing it in the default settings. However, her choice is not always advisable. Yes, of course, if you write some kind of repack to the media containing files larger than 4 GB (you never know what enthusiasts can cram in such packages), you cannot use FAT32, because this file system does not work with files of such sizes. As a result of the recording, they will be ignored. On the other hand, if you install 64 bits from a Windows 7 USB flash drive, but the primary I / O system is not an outdated BIOS, but UEFI, the last drive formatted in NTFS will not be accepted. So keep that in mind.
Creating a bootable flash drive via the command line
If you don’t have any special applications at hand that allow you to quickly and easily create bootable media, you can use the diskpart tool, which works exclusively from the command line, although this is somewhat more complicated and requires special attention.
Nevertheless, if we talk about installing Windows 7 from a USB flash drive, the consistent use of the commands shown in the image above is believed to give the most effective result and almost completely eliminates the appearance of errors at any stage. The main thing is to choose your media and your preferred file system when formatting.
Install Windows 7 from a flash drive. BIOS: installing a boot device
So, all preliminary steps are completed. We proceed directly to the installation. The first step is to enter the BIOS settings.
Installing Windows 7 from a USB flash drive, as already mentioned, will not start if it is not installed as the first device in the boot priorities. But there are pitfalls too. First of all, pay attention to the fact that the drive must be inserted into the appropriate port before turning on the stationary computer terminal or laptop (netbook). But even if the removable device is detected, installing Windows 7 from a USB flash drive through BIOS settings may not start. And all because there can be two recognized devices in the parameters of the primary system: one contains a boot record of the MBR type, the second contains EFII. Thus, if the download and start are not performed, and the computer reports that the selected device is not a system device, just change the device from one to the other (although in fact it is one, but with two boot entries).
Removing from removable media and starting installation
We believe that all the required parameters are set correctly, and installing Windows 7 from a flash drive (ASUS, for example, or any other manufacturer) started without problems.
At the initial stage, the standard procedure for choosing a language and regional standards for currency units, time format and keyboard layout follows. There should not be any difficulties.
Next, we agree with the terms of the license and proceed to the choice of installation type. In general, it is recommended that you use the full installation option, rather than the upgrade.
The step of selecting a drive, creating logical partitions, and formatting
Next, during the installation of Windows 7 from a USB flash drive, one of the most important steps will follow - choosing the desired partition with its subsequent formatting. Select the desired drive, but in no case use the installation in a hidden partition!
After that, click the disk settings button and click the formatting link below the section list.
If at this stage it is additionally required to create a logical partition, first delete all disks and partitions in the selection window, then use the partition button to partition the disk (separately create a system partition where the OS will be installed with its size in megabytes, and then similarly, make a virtual partition without changing the size, since it will correspond to the remainder of the unallocated area after allocating space for the operating system). You will only need to set the size manually if you need to create more than one logical partition (maximum four).
Note: all created logical partitions must be formatted on a par with the system one.
Installation complete
This is followed by a standard installation process, during which you can relax and have a cup of coffee. In time, this takes an average of about fifteen minutes. It all depends on the speed of reading information from a USB flash drive and the speed of writing to a hard drive. The computer may restart several times (a warning will be issued by the installer itself).
When the system is fully installed and launched for the first time, it remains to perform a few simple steps. First of all, you need to set the settings for your account by entering the username and, if necessary, the password that will be used to log into the system. Please note that this is a local registration, not a Microsoft account.
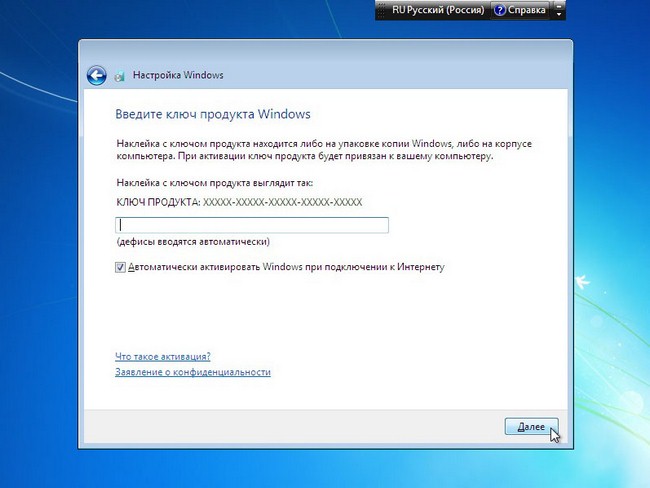
At the next stage, the customizer will prompt you to enter a license key to activate the system. If you don’t have such data, you can skip this step, but it is mandatory to uncheck the box for automatic activation when connecting to the Internet, because during verification it may be revealed that the distribution kit is illegal (meaning installation from a custom repack). Recommended settings can be left unchanged. Then you will need to set the time and configure the network, indicating in the type of "Home". When the “Desktop” appears with the system logo, the installation of Windows 7 from the USB flash drive can be considered completed. But do not rush to rejoice.
What to do if drivers for some devices are not installed?
Yes, the system has been installed, but the drivers for some specific devices may not be available, if only because the native Windows database is too small and simply does not contain such control software in the set.
Check if all components are working properly. To do this, call the “Device Manager” (devmgmt.msc) and make sure that no component is marked with a yellow triangle with an exclamation mark. If such devices exist, it does not make sense to reinstall or update drivers using the system tools.
In this case, it is better to download and install programs like DriverPack Solution or Driver Booster, which after scanning all devices via the Internet will install the missing drivers and update existing ones.
If this does not work, no reinstalling Windows 7 via a USB flash drive or installing other applications to update drivers will help. In such a situation, there is only one way out - go to the properties of the equipment in the “Device Manager” and on the details tab view the information on the VEN and DEV identifiers, selecting the display of the equipment ID from the list. The longest line must be copied, and then set to search for a driver on the Internet on specialized sites. After loading the driver in the form of an EXE or INF file, you will need to install it yourself (for EXE files, run as administrator, for INF objects, the installation item in the RMB menu).
How to activate the system if there is no license key?
With the installation of Windows 7 from a flash drive figured out. In theory, if you follow the above recommendations, there should not be any special problems or difficulties. As for activation, in our situation we will have to use the semi-legal way - special activation utilities. It is best to download the KMSAuto Net portable applet, copy it to the logical partition and run as admin.
In the application window, you will need to click the activation button and select why it will be produced (Windows or Office). For the system, the whole process will take only a couple of minutes, but at one stage it will be necessary to agree with the introduction of a permanent re-activation task every ten days. Please note that the created task from the "Scheduler", as well as the activator file itself, cannot be deleted, since in their absence Windows will ask for the license key again.
If the application is blocked for some reason, it must be included in the exclusion lists of the installed antivirus and firewall.
Note: immediately after installing Windows 7 from a flash drive, the office suite and antivirus will not be on the computer. Activator should be added to the antivirus exceptions after its installation, and then only on condition that a message is issued about blocking the detected unwanted software. As one of the additional solutions, you can simply change the properties of the KMSAuto Net.exe file by setting the Read-Only attribute for it.
Conclusion
This, in fact, can be finished. If you make brief conclusions, it can be noted that, in general, installing the seventh version of Windows, although it has several pitfalls, is nevertheless quite simple. The main attention should be focused on creating bootable media, correctly installing the first device in boot priorities and choosing the right system partition. The installation process itself is standard and is performed without user intervention. For activation, it is not necessary to use the described utility. You can download similar applets like KMSpico. All such programs work on the same principle, generating unused license keys.