If you use e-mail every day and get tired of constantly entering your contact information at the end of the letter, then it's time to create an automatic signature once and for all for your letters. How to do this will now be described.
What is the signature in the letter, and why is it needed
Let's start with a little background. Yandex is the largest company that almost all Internet users today know. The Yandex company provides an innovative and long-existing email service. Today, there is hardly a person who does not have his own email. Any operation on the Internet, even trifling registration on any Internet resource requires an electronic mail box (e-mail).
Mail is used today for various purposes, some use it for work, communicating with partners, and some simply correspond with friends on comprehensive topics. But many do not know that in order to set the pace of a good tone in an email, you must use a signature. How to make a signature in Yandex Mail will be described more specifically below.
The signature in the letter is a kind of business card of a person, which is attached to each letter. In the signature you can reflect all the necessary information both about yourself and about your company. A letter will look much more beautiful if you attach information to it in the form of your name and contact details, and a letter will look even more beautiful if you come up with a graphic signature, for example, in the form of a banner or logo of your company. Let's consider both options for creating a signature, both simple text and graphic.
Create a text signature in a letter
We assume that you have already completed the registration process on Yandex, and an email address has been provided to you. If this procedure has already been completed, then you have done half the action! It remains only to find out where and how to make a signature to the letter in the electronic "Yandex mail".
To begin the process of creating a signature, you must go directly to the email interface itself and click on the gear icon, which is displayed in the upper right corner of the mail interface. When you click on the gear, an additional functional menu will open, in it you must select "Personal data".
On the page that opens, you need to find the “Your Signatures” section - this is the very section in which the signature is edited and created. Now the last step is left - this is the input of all the necessary data, and it is these data that will be attached to each sent letter.
Text editor for creating a signature
The editor for entering text has an intuitive visual design. But still we will analyze it in more detail, since making a beautiful signature in Yandex mail is not such an easy task.
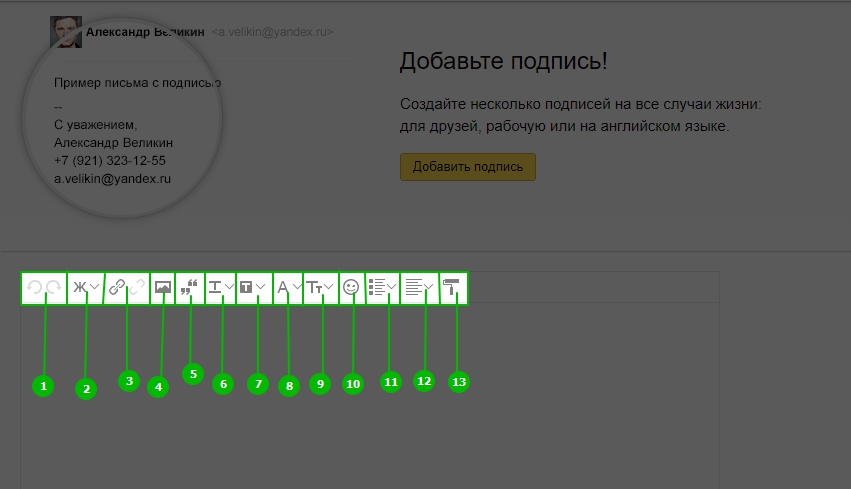
- Cancel and repeat the action. “Cancel” returns one step back, and “repeat” - returns back one step forward.
- Selection. Allows you to apply the following styles to the text: bold, italics, underlined, crossed out.
- Work with links. This element allows you to insert / modify and delete the link, which is located both in the letter itself (which is sent) and in the signature. Thanks to this element, you can make a signature in Yandex mail in the form of a link, that is, clicking on a specific signature element will go to the url specified in the link.
- Image uploads. This is perhaps the most interesting element in the work panel, because thanks to it, a graphic signature is created. You can use any image as a graphic signature, and moreover, you can make the image clickable if you apply the link element to it. An example of setting a graphic signature will be discussed a bit below.
- Quote. It is used if it is necessary to quote the words of the interlocutor or to indicate a phrase taken from the Internet.
- Text color. Any word or even a letter can be given its own unique color from the color palette, but you should not get too carried away by decorating your signature in Yandex mail, as a rule, this affects the signature more negatively than positively.
- Background color. This color is adjusted to fit the text, while the text becomes highlighted, like a marker. It is usually used to indicate important words.
- Font. Changing the font allows you to make your signature distinctive from the font of the body of the letter. Recommended for use if the signature consists only of text.
- Font size. In this element, you can set the size of the signature text from 8pt to 72pt. It is important to remember that the standard is 12pt, so you should not make a signature above this value.
- Emoticons Emoticons tightly entered into any correspondence and they can also be used in your signature to give her a little emotionality.
- List. The list is used in cases where you need to list something. In the editor, it can be either marked or numbered.
- Text alignment. This element is designed to align the signature elements to the left / right edge of the page and to the center.
- Remove formatting. Removes any of the above operations applied to the text. To use this tool, the text must first be selected and only then use formatting.
How to make an image signature in Yandex mail
To add a graphic signature, you need to know the full address (URL) of this image on the Internet. If you insert your personal graphic element, then you can use any services on the Internet for storing images. After uploading an image to such a service, a full link will be provided for viewing, and we need it. This link must be inserted into the window that opens when you click on the "add image" element.
You don’t need to talk about how to automatically sign in Yandex mail, because by default, each new letter automatically places the signature you created. Now the last step is left - saving the signature.
Be sure to attach the signature to your mail (put a tick), indicate the required e-mail from the drop-down list, select the signature position and confirm its creation by clicking on the “Add Signature” button. All! Done! You now have a personal signature.