The colorful flickering of banners, "live" pictures, avatars and other multimedia chips on the pages of many sites cannot but arouse the inquisitive "user" to learn how to create animations. But the World Wide Web turned out to be so tenacious that many users who stick to it sometimes forget or even don’t know about all the features of their own computer and rarely look (if they look at all) into the Microsoft Office folder in the Start menu. But there, besides such high-profile and popular services as Word, Excel, Outlook, etc., there is a really powerful (as the name says) PowerPoint application.
PowerPoint Animation
This program is famous for its rich arsenal of easy-to-use, but effective tools for creating presentations, and these features of the application are "a lot of songs folded", but talking about how to create animations in Powerpoint is much less common. The fact is that this function is just designed to revive presentations, and in addition, there are a lot of services on the Web where you can quickly and easily "cook up" an animated picture. Nevertheless, the PowerPoint abilities in this regard, bribing with its simplicity and effects, are worthy of attention, especially since there are ways to save the animation (not presentations!), Despite the fact that the application does not provide this.

The easiest way to explain is how to create animations using the do-it-yourself tutorial. To demonstrate the fundamental capabilities of the program, it will be enough to create a primitive animation by rolling a kolobok, the role of which we propose to play one of the standard figures of the application.
Open PowerPoint and, if you are greeted with the inscription "First Slide", click in the working field and arrange the title page of the future animation (first slide) by creating a title on the "Home" page and then going to the "Design" page to design the background. Here you can select one of the proposed themes, adjust colors, fonts and effects, select "Background Styles" or refuse to display the background image included in the selected theme by ticking the "Hide background pictures" checkbox. If you click the diagonal arrow to the right of the inscription "Background", the "Background format" window opens, where you can choose the type of fill, texture or image. Just don’t need to click the “Apply to All” button if we want the animation frames to have a different background.
Just above the first slide, click on the small triangle on the "Create Slide" button and select "Empty Slide" (Blank), then arrange the background as described above.
Next, Insert> Shapes> Smiley Face emoticon (kolobok), click on the workspace and transform the shape to the desired size. By going to the "Home" page, the kolobok can be repainted ("Fill"), contour and add an effect. Now specifically on how to create animations, step by step.
Set the figure at the start of the movement to the "start" position, right-click on the "Slides" tab on the right and select "Duplicate Slide", then slightly move the "bun" in the direction of movement, slightly scrolling it clockwise. This will be the first phase of the full cycle of the object. Then duplicate again, but already a copy, transfer the figure to the next phase of movement with rotation, and so on. It will depend on the number of takes and the displacement step, the “bun” will roll smoothly and smoothly, or it will “tear the claws” from the grandmother, jumping and twitching like a bitten fox.
Go to the "Animation" page and select the transition speed between frames by selecting "Automatically after" and setting the time (in seconds). If less than a second, you need to insert a comma after the right pair of zeros and enter the desired value.
If you click the "Configure Animation" button, the panel of the same name opens on the right, where you can add an effect to an object by first selecting it and choosing a display mode.
When you’ve finished “shooting a clip,” go to the “Slide Show” page and turn on the “From Begin” button to view it.
Now the file can be “Saved” in one of the formats available in PowerPoint, including with the gif extension, but in the latter case it will be just a set of static images, and we are interested in how to create gif animations. The way out is ridiculously simple - you can use converter programs, for example, "Powerpoint PPT to AVI GIF Converter". This tool easily converts .PPTX files to GIF and AVI formats.
If you have installed Camtasia Studio for recording images from the screen, especially if it is included as an add-on in the package of your application, the problem of creating gif animations resolves itself. However, despite the mass and variety of effects in Powerpoint, the creative possibilities here are somewhat limited, so many users have a natural desire to figure out how to create animations in Photoshop.
Animation in ImageReady
Surely not everyone has switched to the latest modifications of Photoshop and use the "older" versions with the ImageReady program, which was delivered from Photoshop to CS3, and then was withdrawn as unnecessary as a separate application, due to the inclusion of its functions in the "main" "editor. Therefore, it seems advisable to first deal with the animation in ImageReady, especially since the application can be launched directly from Photoshop by clicking the lowest button on the toolbar. If an image was opened in Photoshop, we will see it in the ImageReady window and note that the interface has not changed much, but an Animation panel has appeared below, on which there is one frame with a thumbnail of the loaded image, if it is single-layer. You can also open this panel in the Window menu by selecting the Show Animation line.
One image layer - one frame, and if there are several layers, there will be the same number of frames that can become a cartoon. Thus, the simplest way to create an animation is to prepare a multi-layer drawing, where each layer will contain one of the phases of the object’s sequential transformation, be it movement, change in shape, color, transparency, content or something else. You can not move the object, but only change its appearance.
After finishing work on the “script” in the layers palette, click the arrow button in the upper right corner of the panel and, selecting the line “Make Frames From Layers”, turn each layer into a separate frame, where the lowest layer will be the first, and the last is the highest.
Now you can turn on the Play / Stop animation button at full volume and view the result. The delay time on the screen for each frame can be changed by clicking on the tiny triangle next to the value label in sec. It is advisable that at least some time be indicated, because the scroll speed of "0" each browser understands in its own way.
In the list of animation scrolling modes with the name of one of them (Forever), under the first frame on the left, you can select Once (Other) or Other, where the number of cycles is indicated.
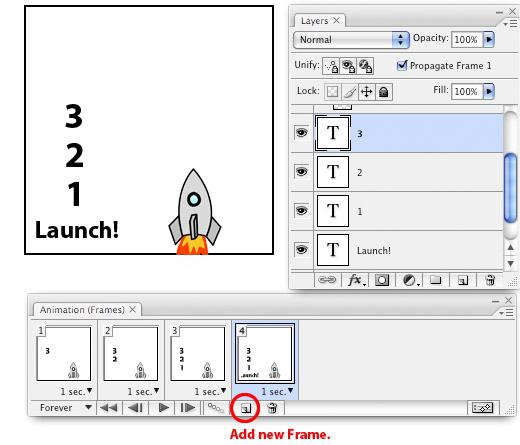
By clicking on one of the frames created from a multi-layer drawing in the animation panel, we can adjust it on the canvas, since the eye will be open in this layer panel only in this layer (but this does not mean that you cannot show others, adding details if necessary to the selected frame). This feature makes it possible to create animations by drawing frame by frame. Open a file, create a new frame in it (duplicate the current layer button), and in a new layer in the word panel (if Make Frames From Layers was selected) draw, for example, a triple. Duplicate the frame with the number, go to a new layer and, closing the eye with the previous layer with a triple, draw a twos. Duplicate the frame with a deuce, go to a new layer, close the eye to the previous one and draw a unity. Set the delay time and turn on the "start time countdown".
In ImageReady, you can create animations from pre-prepared drawings by selecting the Folder as Frames command from the File> Import menu, in which all files are distributed across layers and frames in the order in which they were stacked folder. Therefore, in order not to shuffle the frames in the animation palette, you need to number them. In addition, the result is better when all files are the same size and resolution.
The program still knows how to create intermediate frames of animation itself, if it is offered drawings of the initial and final state of the object. To do this, there is a Tween button (Animate frame using intermediate frames), which enables the process taking into account the parameters selected in the dialog box.
Animation without layers
You can make an animation without creating new layers at all. Let's say we have a single layer drawing. Uncheck the Make Frames From Layers command, create a new frame (button with a bent leaf duplicate the current layer / duplicate the current layer), go to it and drag the object somewhere on the canvas (position) or change the opacity (opacity), or add an effect (effects), or select all at once. Then click Tween, specify the number of frames, put, where necessary, checkmarks and OK. Animation is ready, you can run.
If one of the elements of the picture should be motionless, for example, a background, then in the layer palette in each frame you need to open the eye and the lower layer, in addition to one of the top ones.
To create a GIF animation, select the Save Optimized As command in the File menu and, specifying the location, save the file, but first it is advisable to go to the Optimized, 2-Up, 4-Up tabs in the upper left of the ImageReady main window and by connecting the Optimize palette (in the upper right ), try to reduce the size of the GIF file.
Video Based Animation
Starting with the CS3 version, in addition to the animation panel and ImageReady functions that assimilated with the program, in Photoshop there is one more opportunity for solving such problems as creating animations, but based on video files. This feature is enabled by the Video Frames to Layers command in the File> Import menu.
We select a video file for GIF-animation, the parameters of which we are offered to determine in the dialog box that opens. Here we tell the program which part of the video file should be included in the processing, choosing either "From beginning to end" (From Beginning To End), or "Selected range only". Then we set the number of frames to be left (Leave each / Limit to every) and check the box “Make Frame Animation”. To select a range, use the cropping elements located below the video.
Click OK, and before us opens the image of the first frame of the future GIF-movie, and the original video file (or fragment) is already divided in sequential order into layers in the layers panel and into frames in the familiar navigation panel (Animation). We play, make adjustments if necessary, and save the animation by selecting the "Save for Web ..." command (Save for Web ...) in the File menu and adjusting the file parameters for its optimization.
Scripts for animation
To implement tasks such as creating gif-animation, you can use the Load files into stack command in the menu File> Scripts. In the dialog box that opens, select either files individually or a folder with pre-prepared images using the "Browse (B) ..." button. You can use a video file, as in the import option, but in this case you will have to first convert the video to images, but after the conversion, the files will be sequentially named, in any case, the Free Video To JPG Converter program does this.
Further development of the script in some details depends on the version of Photoshop, but in any case, only one (first) frame will appear on the animation panel or the Timeline in CS6. Select (with the Shift key) all the layers in the layers palette, expand the drop-down menu in the upper right corner of the animation panel (timeline) and select Create Frame Animation (Create frames from layers). Without wasting time scrolling, open the drop-down menu again and select the command Reverse Frames, because when loading frames, like layers, are distributed from the last to the first. Next you need to “Select All Frames” and set the delay time for all at once. Now we lose and, if everything suits, we save the animation by selecting the "Save for Web ..." command (Save for Web ...) in the File menu.
In the Photoshop CS6 version, the timeline became known as the timeline in the same Window menu. A new command, Create Video Timeline, appeared here, along which the panel really transforms into a typical video editor timeline, where all frames are distributed across tracks. In each frame, using key points, you can change in time a number of parameters, of which the default are "Position", "Opacity" and "Style". For frame-by-frame animation, the timeline is transformed using the "Create Frame Animation" command.