Undoubtedly, most users are aware of such a wonderful feature as RDP connection, which is called Remote Desktop in almost all known operating systems. Very often, such a connection is used to gain access via the Internet, for example, to a home terminal from the office, not to mention other possible situations. Further, it is proposed to consider several basic and simplest methods for creating and using remote connection via RDP based on access organization in Windows-systems. In other words, suppose initially that the user needs access to a stationary terminal or laptop running an operating system of this family from different devices. The reverse connection can also be configured, and the actions performed are not particularly different from those described below.
RDP connection: what is this technology?
To begin with, let's briefly dwell on some important theoretical information, without which understanding of actions when accessing remote computers or mobile devices would be incomplete.
Despite the fact that the technology itself is called connecting to the "Desktop" (RDP stands for Remote Desktop), access to the operating system interface is not limited. When creating a virtual connection between two devices, one of them acts as such a remote control, that is, from one terminal or mobile device you can control all the parameters of the computer that is being accessed, use installed programs, etc.
How does remote access work?
But this was only the simplest explanation. If you dig a little deeper, when creating an RDP connection in Windows or in any other stationary or mobile system, it is important to pay attention to one interesting nuance. For example, when you start some resource-intensive application or program, the version of which for the operating system of the control device does not exist in nature, it will be executed exclusively on the remote terminal, and with the use of its main equipment like a processor, RAM, etc. can only make sound reproduction, image transmission quality from one computer to another and general use of the clipboard. But all these parameters can be reconfigured quite simply, which will be discussed later.
Connection creation options
As for creating a connection between two remote devices, special software tools called RDP clients are usually used for this. Despite the huge variety of such software, in Windows systems of the latest generations (even in the outdated version of XP), you can establish a connection between two devices using the built-in tools. But some third-party programs look a cut above. Therefore, we will focus on three tools to quickly create a connection:
- Windows tools
- Google Chrome RDP client (not to be confused with the browser of the same name);
- TeamViewer program.
Windows Prerequisites
If the user does not have additional utilities installed on the computer, you can always use your own system tools. In all versions, it is called the remote "Desktop." But to use it on the computer to which you intend to access, you need to make some important settings related to opening access.
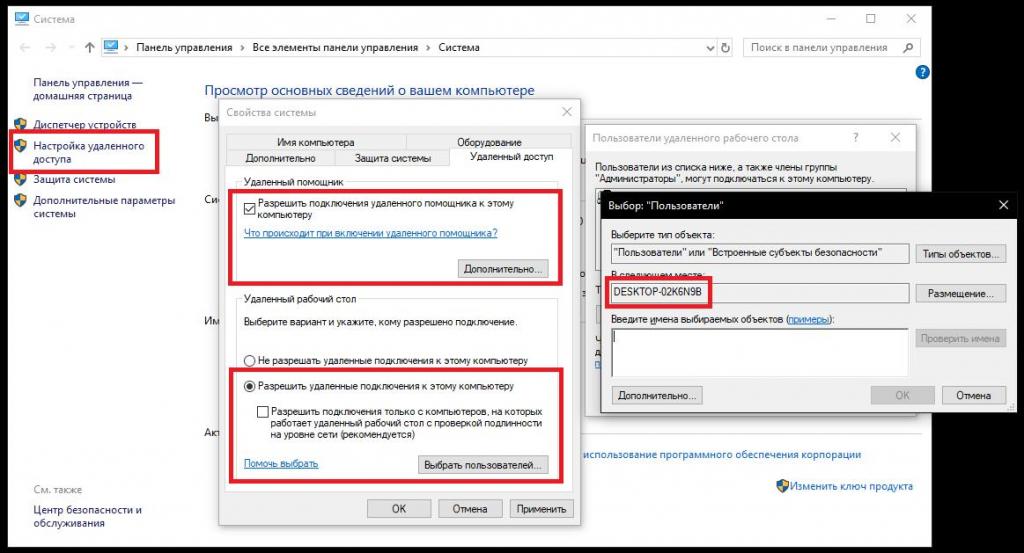
To do this, through the properties item called on the computer icon, click on the remote access settings link and activate the permission items (including the assistant) on the same tab. Please note that in the latest modifications of the system, at the very bottom there may be an item for issuing invitations only for terminals with Vista operating systems and above. If you are connecting via RDP from a computer with Windows XP, you must uncheck the box, otherwise an error will be generated when trying to connect. If necessary, you can independently add users for whom access will be allowed, as well as set the duration of the active invitation. For this, buttons for additional options are provided. The computer properties have the full name of the terminal. It needs to be remembered or written down.
Creating and Configuring RDP Connection in Windows 10 and Below
Now on the terminal, which will act as the controlling device, you need to start the remote access client by selecting it in the main menu or finding it through a search query. Do not rush to immediately establish a connection, but configure some parameters.
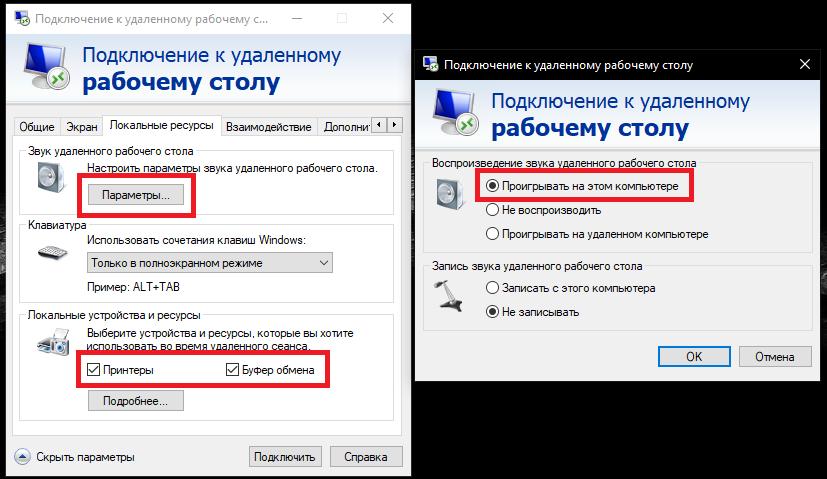
First of all, you can use the resource tab and set the sound to play on your own device, and not on the remote terminal. You can also experiment with the graphics settings, although by default it will be suggested to use the maximum quality and depth. Finally, it is advisable to check the boxes at the points where local resources are activated in the form of a printer and clipboard. Here you can save the RDP connection file in the selected location, so as not to enter data at each session. Next, in the PC name field, enter the name of the remote terminal and the password, which must be set on the remote terminal to enter the account. Without a password, an error will be generated when trying to connect. After that, you can activate the connection.
If, when trying to access, a connection error via RDP appears, pay attention to additional settings, where you can uncheck the item for automatically detecting parameters and use the manual configuration of gateway server options.
It is also advisable to remove the warning display in case of connection failures and set instead to automatically reconnect without warning. If the system reports that the computers are on different networks, you should completely disable the scan at the network level.
If for some reason you no longer need the established connection, you can delete RDP connections quite simply by getting rid of the saved configuration files, or by blocking access to the remote PC.
Prerequisites for using Chrome RDP
More convenient is the use of the Chrome remote access client from Google.
For it to work on the computer to which access will be made, the browser of the same name must be installed, in the latest versions of which the RDP client is installed and activated initially, but in the form of an additional extension. You also need to install a browser on the control terminal, but in the case of Android-based systems, just download the corresponding application from the Play Market and install it on your smartphone or tablet.
Access activation
Now on the remote PC in the address bar of the Chrome browser you need to register the combination chrome: // apps, go to the extension and install the client for Windows.
After its launch, you need to click the button for issuing permissions for your terminal, and then click the "Share" button. Next, it will be proposed to create a PIN code containing at least six characters, after which a code will be generated that is proposed to be transmitted to the user of another device. By and large, it is not needed at all. An exception can sometimes be situations where access is not through one, but through different wireless networks.
Creating a connection to a remote computer
Finally, on the monitoring device, launch the installed client, enter the PIN code combination, and after a few seconds the remote terminal interface will appear on the device’s screen. Please note that on a remote PC, it is advisable to change the power supply scheme and disable the use of sleep or hibernation mode, since "falling asleep" can interrupt the communication session at the most inopportune moment.
Connect using TeamViewer
One of the most popular programs for connecting via RDP is considered TeamViewer. It must be installed on all devices that are supposed to be connected by remote access. Everything is simple here.
Your computer’s ID and personal password are displayed on the left side of the window and are intended for transfer to other users for connection. On the right is a field for entering an identifier if you want to connect to someone else's PC. In addition, you can immediately choose the action option when establishing a connection (either control a remote terminal, or just transfer files). As already clear, to establish a connection, simply enter the necessary data and activate it. By and large, you do not need to do any additional settings at all.
Features of the work of some programs on the example of FL Studio
Finally, a few words about using programs installed on a remote PC. In applications for working with multimedia, in particular with sound, some problems may arise. For example, in the FL Studio sequencer, it is very often absent when playing sound, even though playback on the monitoring terminal is turned on. In this case, you need to go to the program settings, and then select the remote sound driver in the list of available devices. In addition, a MIDI keyboard connected to it may sometimes not work on a computer or mobile device. In this case, install additional MIDI and ASIO drivers or virtual adapters on the monitoring device yourself.
Which technique is better?
Based on the foregoing, we can conclude: if we are talking about access settings using the above tools, the easiest way is to use the TeamViewer utility. The Chrome client option looks a little more complicated. But it is undesirable to use your own Windows tool, since it does not always ensure the proper quality of communication. Moreover, differing operating systems can often conflict with each other. This method of remote connection is recommended to be used only if there is nothing else at hand.