Owners of modern digital gadgets - smartphones, tablets, as well as high-tech smart TVs, can create a real media server at home, with which you can access various types of multimedia content from different devices. How to use the corresponding opportunity in practice?
The principle of the home media server
What is a home media server? This is a system in which various devices connected to a network - computers, televisions (if they support the corresponding functions), mobile gadgets and other modern devices, can interact and exchange multimedia content. Another noteworthy technology that can be used through a home media server is IPTV. That is, having built the appropriate network infrastructure, the user will be able to organize something like a mini-television studio at home.
How is a home media server arranged ? As a rule, its structure assumes the presence of a main module responsible for storing files and media data, access to which can be organized from devices connected to a common network. As a rule, this is a PC or laptop. In the hardware, they are used to place files and organize the procedures for sharing them; in the software, they provide the necessary functionality of a media server.
Features of DLNA Standards
The work of media servers can be ensured by using a variety of technologies and standards. Among the most common in the global IT market is DLNA. This is a set of standardized algorithms supported by most modern models of Smart TVs, smartphones, tablets, set-top boxes, etc. DLNA capabilities are sufficient to solve most problems associated with the distribution of media content. This standard, moreover, does not involve complex configuration. All this, in fact, makes DLNA technologies in demand among users of digital devices around the world.
How to install the appropriate multimedia content management system? How to use a home media server built on the basis of DLNA algorithms? We will study these questions sequentially.
Create and configure a home media server
The first thing we have to do is create our own home media server. The instruction, with the help of which a similar task can be solved, involves the following main steps:
- preparation of hardware components;
- selection of software;
- network configuration.
Consider the relevant aspects of creating a media server in more detail.
Options "iron"
First of all, it is necessary to prepare the hardware, that is, the hardware of the future media server. As we noted above, the corresponding system for distributing multimedia content assumes the presence of a main module - in the form of a computer or laptop. The performance requirements of the corresponding device will not be strict: to perform the corresponding function of a media server, you can give a device that may be outdated to run modern games and therefore the least frequently used by digital enthusiasts living in an apartment.
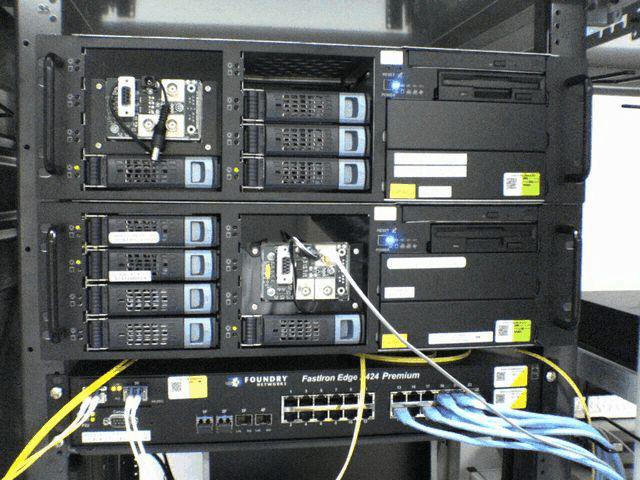
It is enough that the computer had a processor with a frequency of about 1-1.5 GHz, RAM with a volume of about 1-2 GB. In principle, it is possible to organize the operation of the network with lower performance characteristics. The size of the hard drive in this case depends on the actual needs of the user. If a person plans to use a media server for storing high-quality films and distributing them over the network, you will probably have to equip a PC or laptop, used as the main element of the corresponding infrastructure, with a hard drive of about 500-1000 GB.
Wi-Fi Equipment
It is imperative that the device in question supports Wi-Fi connections. Of course, it’s quite realistic to organize a functional media server using wired connections - but this is less convenient and usually takes longer. Most models of modern laptops have a built-in Wi-Fi-module. As for the “desktops”, this is not always the case, but the corresponding hardware component can always be purchased separately. It is inexpensive - about 700-800 rubles. Special efforts associated with the installation will not be required - it will be enough to insert the Wi-Fi module into the PCI slot and install, if necessary, the drivers attached to it.

In order for all devices included in the home network infrastructure to communicate via Wi-Fi, you will also need a router. Theoretically, of course, you can connect one device to another directly - the corresponding wireless standard supports this function, but in this case the connection channel will not be as stable as when using a router, and in addition, in most cases it will be less secure due to limited support strong encryption algorithms. By the way, many modern providers provide Wi-Fi routers, so it is possible that the user already has the corresponding software component. If not, you need to get it, and it must support the standard used to connect to the Internet - for example, fiber optic connection, Ethernet or ADSL.
Note that the devices that are supposed to gain access to the multimedia content distributed by the home media server must support the DLNA standard. But more often than not there are no problems with this - if we are talking, for example, about modern TV models LG, Samsung, Philips with support for Smart TV. Regarding smartphones and tablets - their modern models also, as a rule, integrate with media servers without problems.
Software
Another part of the home media server infrastructure is software. It should be installed on a PC or laptop, used as the main module of the corresponding system. Software for such purposes is available in a very wide range of varieties. It can be classified on two grounds - programs created by brands that manufacture multimedia devices (for example, TVs), as well as solutions that are issued by third-party developers. So, in order, for example, to create a media server for Smart TV when using Samsung TVs, you can use the Samsung Allshare program. Similar solutions are issued by other brands of manufacturers of digital technology.
Benefits of Home Media Server
Among the most popular types of software from independent developers is the program Home Media Server, or "Home Media Server". Instructions for using this software do not imply difficulties in mastering. The necessary settings for the home network and media content management algorithms are implemented in the HMS interfaces quickly and easily. Also, this program is characterized by great functionality and stability in work.
HMS is a one-stop solution. Using it, you can integrate virtually any brand of TV and home media server - for Philips, Samsung, LG and other leading brands of digital technology manufacturers it does not matter what type of software the network owner uses. The program in question is fully compatible with the DLNA standards that we mentioned above. HMS features allow you to organize general access from various devices to files, as well as television broadcasts in IPTV format.
TVersity Features
Another popular program used by many users to ensure the operation of a home media server is TVersity. What is its specificity? First of all, it can be noted that it is available in paid and free versions. The difference between them is not very big in terms of software functionality. The main distinguishing feature of the paid version is the availability of a subscription to some Internet channels.
Among the notable features of TVersity is the optimization of media sharing in terms of home network bandwidth . So, the transcoder, which is used by the program, can produce video with a given bit rate indicator - so that the corresponding media stream is displayed on the screens of the receiving devices continuously, even if the network is slow. There is no problem with how to set up a media server using this software. Instructions for using the capabilities of TVersity are quickly mastered even by beginners in creating home networks.
XMBC Benefits
Another noteworthy program is XMBC. It was originally created for use with Xbox consoles. However, now it is a popular cross-platform solution that can be installed on PCs running Windows, Linux, Mac, on mobile platforms. This program is noteworthy in that it can provide shared access not only to media files located on the hard drive of the PC used as the main module, but also to online media. Using XMBC, users can access the pages of popular social networks, watch the weather forecast. Many users are also impressed by the fact that XMBC supports a large number of themes. For this program, a special application xbmcRemote is released, with which you can configure your smartphone or tablet as a remote control for devices connected to your home media server.
Plex Media Server Specifics
Another noteworthy program is the Plex Media Server. Many users characterize it as one of the easiest solutions to master. Plex is also stable and versatile: with its help, you can connect a variety of devices to a network. The universality of the program is also expressed in the fact that it is equipped with algorithms for transcoding media streams. This feature allows you to avoid problems with recognizing content on different devices. Another major advantage of Plex is cross-platform.
LinuxMCE features
There is actually a separate operating system that allows you to organize the management of home media servers - LinuxMCE. It can be noted that its functionality is not limited to supporting DLNA standards. This operating system allows you to combine in a single network not only televisions, smartphones and computers, but also other electronic devices, such as cameras, IP phones.
Which of the above solutions is best suited for managing your home media server? Each of them has indisputable advantages; very few have significant disadvantages. Most likely, the question will not be in the quality and capabilities of a particular type of software, but in the user's willingness to master them, as well as in his practical needs for specific program functions. So, if he needs basic capabilities - the organization of shared access to video files, Internet television - a media server can be created under the control of HMS - a simple and affordable program to use. If you plan to create a powerful infrastructure that involves connecting a large number of digital devices to your home network, you can pay attention to XBMC or even LinuxMCE.
Practical use of media server features
So, we decided on what hardware and software components are needed to organize the network. We continue to consider algorithms that reflect how to create and configure a media content distribution system, as well as how to use a home media server.
It can be noted that the use of the capabilities of programs - at least those that we examined above, does not imply significant difficulties. The first thing to do is install the appropriate software on the computer. The further algorithm of our actions will depend on what functions we want to use. Among the most demanded of them among the owners of digital devices is the organization of general access to media files from different devices, as well as viewing with the help of devices included in the network, television broadcasts using IPTV technology.
Let us consider how to configure a home server for solving the above problems using the example of HMS program interfaces .
Sharing media content in HMS
Among the main advantages of the HMS program, as we noted above, is versatility. With its help, virtually any device can be combined into an infrastructure, the central part of which is a home media server. For Philips, Samsung, LG and other brands - it does not matter what type of software is on the main network module.
To solve the problem of organizing sharing access to media files - videos, photos, music - we launch the program, after we select from the list of devices displayed in the main window, the one with which the files are supposed to be launched on the media server. For example, it may be a TV with support for Smart TV technology .
After this, you should specify the media resources that are to be distributed among the devices connected to the network. You need to go to the HMS settings, select the "Directory List", then - "Media Resources", and then, by clicking the "Add" button, specify the address of the corresponding files. As soon as these actions are completed, you must click the Scan button, and then activate its automatic implementation, so that the relevant content is displayed on the TV in a timely manner.
How to use a media server using TV? Very simple. It is necessary to load an interface using the TV remote control, in which it is supposed to indicate the source of the TV picture — it can be the antenna itself, an Internet channel, a flash drive, or, in our case, a media server created using the DLNA standard. The corresponding item should be displayed on the TV menu, and those files that we marked in the HSM as to be shared will be available for launch. Modern TVs, as a rule, can easily recognize a home media server. For LG, Samsung, Philips, and other brands, supporting standards like DLNA is the norm.
Using IPTV on your home network
Another common problem solved by home network owners is to broadcast television using IPTV technology. The most important condition here is that the user has a subscription to the corresponding service of the provider (it is usually paid). Using HMS interfaces, setting up a media server in terms of using IPTV is also very simple.
It will be necessary to download and install the VLC Media Player program on the PC - with it, work will be carried out with the appropriate content. It is necessary to bind it to the HMS interfaces by going to Settings, then selecting Media Resources, after selecting Internet Resources and specifying the folder into which the VLC program is installed.
After that, you need to upload the TV channel playlist in the m3u format to the HMS - many providers allow you to download these files from their sites. After that, we again go to “Settings” and check the option “Internet TV” in the item “Transcoding profile”. After that, you need to restart the media server. Then you can start watching channels in IPTV format using a TV.