Removable USB drives in the form of the most common flash drives are clearly pushing optical CD / DVD discs out of the market. It is not surprising, because the latter are subject to too much physical impact. Therefore, it is very often necessary to install or restore Windows operating systems from distributions written specifically to USB devices. How to make a bootable USB flash drive for Windows 7 or any other modification of the system using several of the most common methods will be described in more detail below. In conclusion, some practical recommendations on the use of a particular method for different situations will be given.
Bootable flash drive. What is it and what is it for?
Consideration of the basic issues regarding how to make a bootable USB flash drive will begin with an understanding of why such bootable media may be needed and what information can be stored on it. As we have already said, the main purpose of the bootable flash drive can be called installing or restoring the system if it does not start from the hard drive. At the same time, the installation distribution may be recorded on the media both for installation and for rollback (there are also recovery tools in it). Only for recovery can special tools be used, equipped with bootloaders, in which the OS installation tools are missing.
Among users ignorant of these issues, there is sometimes an erroneous opinion that, it’s enough, just copy the desired image files to the media, and that’s the end. Alas, with a simple movement of the flash drive files, whatever one may say, it will not become bootable (except for one option, which will be described separately). In other words, in order to be able to start from the created media, it is necessary that special boot files and boot sectors be present on it.
Please note that when creating such media (say, to install Windows 10), the flash drive will definitely contain an autorun file (autorun.inf) and bootloader files (bootmgr and bootmgr.efi) designed to select the boot device in the primary BIOS / UEFI systems and installation of modifications with different architecture (x86 / x64).
However, these are far from all situations where you may need bootable media of this type. So, for example, if anyone remembers when the free upgrade of Windows systems of the seventh and eighth versions was announced, only system update files could be written to a USB flash drive using the MCT program, designed for those users who did not want to wait in line for an official online update.
No less common are situations with anti-virus software like Kaspersky Rescue Disk, which, thanks to the built-in bootloader, allows you to start even before Windows starts and check your computer or laptop for any possible threats, including the detection of those virus applets that can deeply substantiate even in RAM, and not just on the hard drive, in the boot or hidden areas of a conventional hard drive or SSD.
How to make a bootable USB flash drive. The main lines of action
Now a few words about what methods can be used to create bootable media of this type. There are not many of them, but using any of them, apart from the command line actions that ordinary users do not like, looks very simple.
And these methods are as follows:
- distribution download using the MCT utility;
- direct copying of installation files and bootloader;
- the use of ready-made ISO images or other formats;
- use of the command console with the toolkit of the diskpart utility integrated into the system;
- Creating a bootable flash drive using third-party programs.
Using the upgrade utility for Windows 10 (Media creation Tool)
So, for starters, consider one of the simplest methods and dwell on how to make a bootable USB flash drive for Windows 10. As already clear, we need a small utility, abbreviated as MCT. You can download it directly from the official Microsoft Internet resource or from the technical support site. How to make a bootable USB flash drive for the 10th version of the system? Easy peasy! The program is presented in the form of a single executable file, after the launch of which (necessarily on behalf of the administrator), an initial window with a choice of action will appear. Use should not be an upgrade point, but the creation of bootable media.
After that, the window of recommended parameters can be left unattended and go to the choice of media type, where the USB device is marked. Then, the continue button is pressed, after which formatting starts (if something was recorded on the device) and copying the installation files to the selected device.
Note: You must have an active Internet connection to download and save Windows installation files. Download time directly depends on the connection speed and recording parameters on the selected drive.
How to make a bootable USB flash drive from an ISO image with direct copy of files?
In some cases, if you have a ready-made image of the installed version of the system, you can do much easier. And it’s not necessary to use any third-party programs to work with ISO files or other formats of this type. The proposed solution can be applied only if UEFI rather than an outdated BIOS is used as the primary input / output system on a computer or laptop.
How to make a bootable USB flash drive for the 7th version of the operating system? To do this, you need a USB drive with a capacity of about 6 GB formatted in FAT32 (NTFS cannot be used, since the primary UEFI system on bootable media does not recognize this file system).
The existing image file, even if it is associated with a program for automatic launch and processing, through the PCM menu, you need to open it using any existing archive application (for example, WinRAR even as a portable version) and unzip the files to any convenient place on drive, and then copy them to a USB drive. It is not recommended to unpack the image directly to a USB flash drive, because during the direct data transfer, unexpected failures may occur and information may be damaged.
Command line toolkit
Now let's see how to make a bootable USB flash drive with the XP version of the system and higher using the diskpart tool, which, so to speak, is “sewn” into Windows and can be used exclusively from the command console. The command line itself is launched without fail with administrator rights (for Windows 7 and above).
In the console, the above commands should be set one by one, after which the selected media will become bootable. An ordinary user, in principle, does not need a description of each action. It is enough just to enter all the lines in the indicated order, but pay special attention to the choice of your carrier indicated by the corresponding letter or number (in reality, these values may differ from those shown in the example above). If you get lost in the numbers of disks and partitions, you can determine your drive by the size indicated to the right of its number.
Rufus program for beginners
One of the easiest decisions on how to make a bootable USB flash drive for any version of Windows is to use a small but quite functional program Rufus, which is perfect for most novice users who are not particularly familiar with the intricacies of the actions performed.
In the application itself, you just need to select your drive, if several are connected, the type of the boot partition (MBR for UEFI and BIOS is recommended), in the type of recording method, set the creation of the disk from the image and specify the path to the file stored on the hard disk. Other parameters, including even formatting, can be left unchanged. The whole process of writing files to a USB flash drive on average can take from five to ten minutes.
UltraISO package and the like
Now let's try to figure out how to make a bootable USB flash drive in UltraISO. As you can already understand from the name of the application, it is intended specifically for working with images, and the ISO format is used by default in the program, although the utility can work with all other common types of images.
So, how to make a bootable USB flash drive from an ISO image? It goes without saying that we need the system image itself, which first needs to be opened through the corresponding file menu command.
Then go to the boot menu, which is located on the main panel at the top, select the option to record the hard disk image, then select your drive in the Disk Drive field and set the HDD + USB recording method. After setting all the parameters, it remains to confirm your actions and wait for the end of the process of creating bootable media.
USB / DVD Download Tool
Before us is another rather interesting program. Let's see how to make a bootable USB flash drive for Windows 7 or other versions of the system using it. In general, there is nothing particularly complicated in the application, since the principles of this software product are not much different from most similar utilities.
All use of the program comes down to four stages:
- image file selection;
- USB device selection;
- cleaning the drive with deleting information (you will have to agree with warnings twice).
At the end of the process, the program will display an appropriate message stating that the bootable media has been successfully created.
Creating a multiboot flash drive using the WinSetupFromUSB applet
Finally, let's see how to make a bootable USB flash drive using the specified applet. This program, according to many experts, is one of the most powerful, because it can create multi-bootable media on which distributions of different systems can be recorded, and not only all versions of Windows, but also versions of Linux are on the list of supported OSs. The program allows you to make a bootable USB flash drive, as they say, in two accounts.
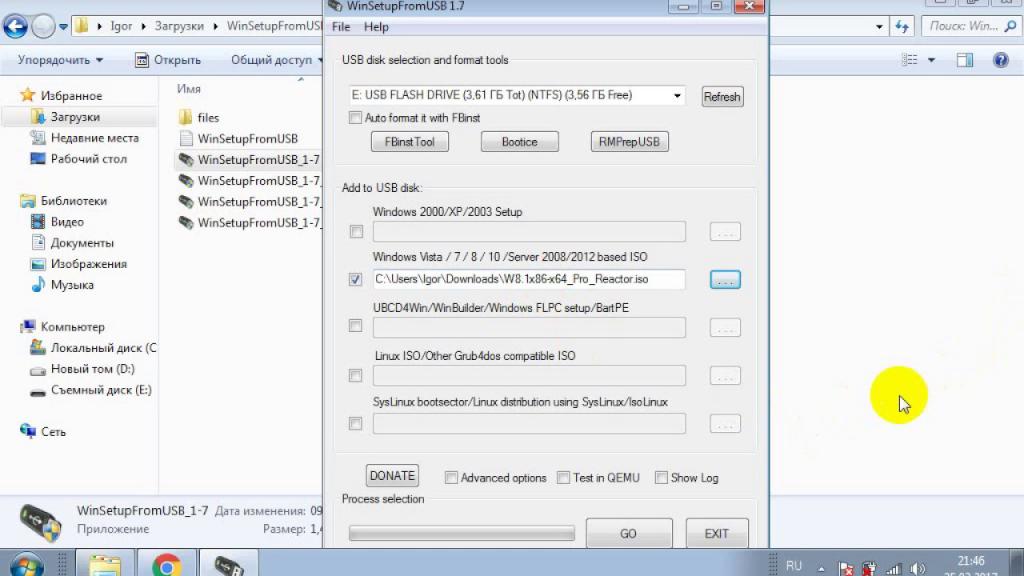
The user, as usual, needs to select his device, set the parameters of the recorded distributions with the location of the saved images, accept the formatting and activate the start of the creation of the boot device. But in this application, if you use additional options, you can use the special QEMU testing tool to control the result. Its activation will only lead to the fact that after the recordings of distributions to the USB-drive are completed, the program will automatically check for their integrity and possible errors that could occur during the creation of a bootable USB flash drive.
Last few tips
How to make a bootable USB flash drive through the Command Prompt console (command line) or using the most popular utilities, in theory, is already clear. It remains to give some practical advice that will be useful to novice users.
First and foremost, the created boot device must be set first in boot priority in the BIOS / UEFI parameters before use. At the same time, when entering the settings of the primary systems, the USB flash drive must be inserted into the appropriate port before turning on the computer or laptop. Otherwise, it may not be decided.
If booting from a USB device if you have primary UEFI input / output systems on your computer is not possible, look at the device settings. Usually, the desired flash drive there can be assigned two attributes. One device displays as USB Flash MBR and the other as USB Flash EFI. To fix the problem, simply change one device to another in the boot sequence, save the changes and restart.
Only one question has remained unresolved, which undoubtedly worries the vast majority of users of all levels of training, related to which of the described methods is best used and how to make a bootable USB flash drive as quick and easy as possible? Frankly, advising one thing is difficult enough. But, if you approach this issue from a practical point of view, the use of narrowly targeted programs designed specifically for creating bootable USB devices looks the easiest. True, sometimes formatting problems may occur, since some applications do not provide the right to choose the file system to users, immediately using NTFS. In the case of primary UEFI systems, such devices are not detected. Therefore, in such a situation, it is better to format in advance on your own, choosing FAT32 as the file system.
Upon completion of all the processes associated with the preparation of the medium and the subsequent recording of the necessary information on it, as a control shot, so to speak, do not be lazy to check the removable device for possible errors, using at least Windows tools if this is the case in the programs used no function. Pay special attention to the fact that when formatting in FAT32, written distributions should not contain files larger than 4 GB, since volumes beyond this limit are not recognized by this file system on removable drives. As a result, the distribution kit cannot be launched at startup from the device, or the installation of the system at a certain stage will be interrupted due to the alleged absence of the components necessary for its continuation.
Separately, it is worth mentioning that, despite the huge number of specialized programs that allow the process of creating bootable drives to be simplified as much as possible, the use of diskpart tools still looks the most acceptable, since in this case the appearance of errors and failures is completely and completely excluded. As already mentioned, many ordinary users do not like the command line, and meanwhile, if you learn the basic basics of working with it, you can subsequently use the console to eliminate even critical problems when Windows does not work (does not boot) or constantly produces errors during operation and failures that are usually impossible to resolve using conventional methods (for example, using recovery or starting in safe mode).