Lovers of complex braids are invited to familiarize themselves with unusual options for hairstyles, which are based on braiding. Step-by-step weaving will help to quickly deal with the nuances of this exciting hobby and give the joy of creativity to the craftswoman. A few rather unusual braids and their variations will be useful to every home hairdresser.
Step-by-step braiding of braids - a photo of the unusual “socket” technique
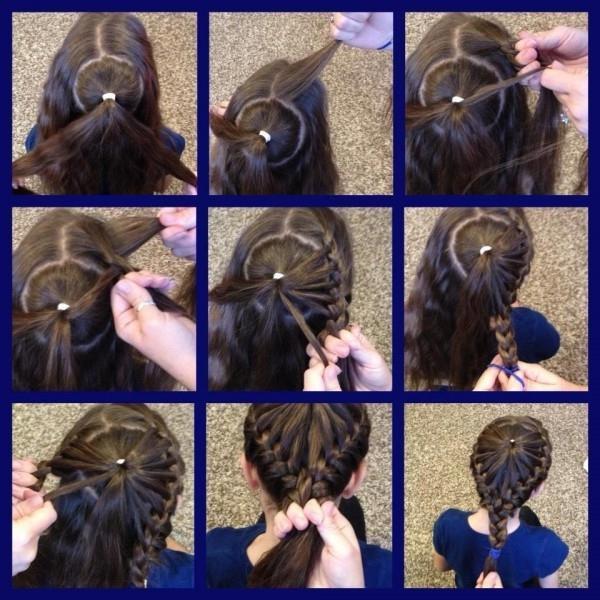
- Using a comb, we separate the round zone at the crown - it looks like a small skullcap. Tie a tight tail. We will use the hair from this zone when we start braiding.
- Step-by-step weaving consists of the following stages: we divide the parietal part of the hair with a straight parting, form a spikelet first on the left side. Look carefully at the photo. It is clearly seen on it that for weaving a spikelet on one side we use free strands, and on the opposite right side we take from the tail. This rather complex element is required several times to feel how thick the strands should be so that the hair is enough for the entire wicker “socket”. Repeat all this for another spikelet, work in a mirror image. Try to achieve full symmetry.
- After you finish braiding braids (step-by-step braiding is described above), connect all the hair either into a common braid or into a “tail”. This hairstyle is very elegant and many mothers like to make it to their little daughters for the holidays. She looks great with bows and flowers.
Original braiding - step weaving based on 4 strands
This hairstyle looks like a masterpiece of hairdressing. The secret of her perfection is that four strands are used for such weaving, though very thin.
- Divide all hair with a vertical parting into two parts. We will work alternately first with one side, and then in mirror image with the other part.
- Weave a spikelet, crossing very small locks, as shown in the photo. A roller should form. Gently pull the strands from the beginning of weaving to the end.
- Continue weaving braids from four strands. When finished, fluff the pigtail to give it a three-dimensional appearance. Secure the end with an elastic band.
- Repeat all operations in the same way for the other side. At the end, both braids are tucked together, connecting into a common low knot. Due to weaving, the hairstyle looks very unusual - it seems that it was made by a famous stylist.
Complex braiding
Experienced craftswomen may not need step-by-step instructions - just look at the photo of the model and it becomes clear that these two braids are woven on the basis of classical technology.
The only difference due to which the openwork cloth is obtained is two additional thin strands that are freely connected to the braid through one step of weaving the main braid. At each turn, such locks are released from the total mass of hair, and after a step they are attached to the braid (by this moment two other lateral locks are already released). This alternation leads to the effect of lace.
Another option for such a lace braid is double braiding (step-by-step weaving can also be replaced with an intuitive representation). Additional lateral strands from the first braid are released and connected to the second braid during its formation, and they look as a result, like one wide braid.