Any computer equipment and software, as you know, over time becomes outdated and ceases to meet current requirements. This applies equally to primary BIOS / UEFI systems, whose software is integrated into a special chip on the motherboard. When installing new equipment (hardware), BIOS flashing may sometimes be required. On a laptop, on a stationary computer terminal, this procedure will be performed, it does not matter. Technology is almost always the same. Some users unfamiliar with the basics of such techniques believe (and not without reason) that this process is unsafe and difficult. If you can agree with the first statement, then you can argue about the second. In fact, flashing the BIOS of the motherboard is not so troublesome. But for the correct implementation of such a procedure, special attention should be paid to some important details and nuances, which depends on the manufacturer of the motherboard and the programs and methods used for flashing.
Why do I need a BIOS flashing?
In general, if you do not plan to upgrade your computer , and the entire system is stable, updating the BIOS version makes no sense.
But when new equipment is installed on the computer, which the primary system may not support only because of its obsolescence (the device’s BIOS simply does not recognize it), BIOS flashing becomes an urgent problem. Although many users find this process difficult, nevertheless, anyone working with a computer will be able to perform such actions on their own. It takes no more than 10 minutes.
Flashing the BIOS of the motherboard: prerequisites
First, pay attention to several mandatory conditions, non-compliance with which can lead to disastrous consequences.
Download files and programs for updating primary systems should only be from the official resources of motherboard manufacturers. In the case of installing unofficial firmware, no one will be able to guarantee that the process will be successful, and the system will work as expected after that.
The second thing you should pay attention to is uninterrupted power during the update. Care must be taken that there are no power surges or spontaneous disconnection of the computer or laptop from the mains.
General rules for updating all firmware
The BIOS flashing for almost all motherboard models implies the use of the same scheme:
- Download update files
- Creating a bootable drive (USB devices only)
- boot from media;
- firmware installation;
- system reboot.
For standard BIOS systems, in most cases, DOS mode is used. However, for some BIOS versions, as well as for more modern UEFI systems, a special BIOS flashing program created by the motherboard manufacturer can be used, which can run even under Windows operating systems without the need to create bootable media.
How to find out the motherboard modification and current BIOS version?
The very first thing to do is to determine which model of the motherboard is installed in the computer system, and also find out the version of the primary BIOS system (it may be current and does not need updating).
You can view information about the board and BIOS version in the system information section , which is called from the Run console using the msinfo32 command.
For the motherboard, you can use specialized utilities like CPU-Z (formerly Everest). For a device defined in this way, on the manufacturer’s website you need to find the latest firmware and save the files to your hard drive.
Preparing bootable media (general methodology)
In the case of using bootable media when updating from under Windows is not provided, the first step is to create it. Normal recording of downloaded files will not work.
To simplify the work, you can use the Rufus utility, which is very easy to learn and creates a bootable USB flash drive in a couple of minutes. Almost nothing needs to be changed in the parameters. Only in the file system should FAT32 be specified, and in the recording method use the MS-DOS mode, be sure to check the box next to the creation line of the bootable media. If this is not done, then the device will not be recognized as bootable upon rebooting. Then, in order to install the update, in some cases it will be necessary to additionally copy the control program and the firmware file to the media.
Next, we will consider the BIOS update process with examples for motherboards from several well-known manufacturers. Although in general they are very similar to each other, nevertheless, each of them has its own nuances. We assume that the boot priority from the USB drive in the BIOS settings is already set.
Asus
Flashing BIOS "Asus" can be done in several ways. Among the preferred utilities, it is worth highlighting two programs - AFUDOS and ASUSTeK EZ Flash 2.
When using the first utility, you should create bootable media and pay attention to the presence of the afudos.exe program file and the firmware itself (for example, p4c800b.rom).
Flashing the BIOS of ASUS is as follows. Boot from a flash drive. Since the media was recorded for DOS mode, the initial line C: \> appears on the black screen, in which you need to register the command / i p4c800b.rom and press the enter key. Upon completion of the update, a reboot will occur, during which you just need to remove the media from the USB port so that the system starts from the hard drive.
Flashing the BIOS of the ASUS motherboard when using the second utility is slightly different from the previous version.
Despite the fact that most firmware on the official ASUS website has the .rom extension, sometimes CAB files can also be found. There is nothing wrong with this, since they are used for UEFI systems.
For firmware, you need to enter the UEFI settings at reboot, go to Advanced Mode (advanced settings) and select ASUSTeK EZ Flash 2 in the Tool’s service (tools) section. Next, from the list again select the media with the program (line of the same name), after which will show the desired firmware file on the right. We select it and twice agree with the warning (first to check the file, then to start the firmware process).
At the end of the process, a reboot notification will appear, and at the beginning of the restart, a proposal will be issued about the initial setup. Press F1 and set the desired parameters. Otherwise, we simply exit the settings without saving the changes.
Gigabyte
Flashing BIOS Gigabyte-systems is quite different from other processes. First of all, this is due to the fact that you can use the online update to install the firmware. But first, consider using the Q-Flash utility, which is believed to be the best for updating Gigabyte motherboard firmware.
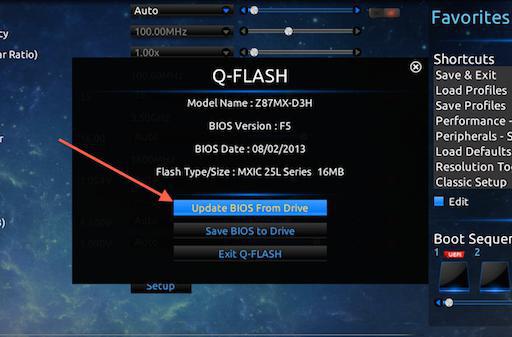
First you need to enter the BIOS settings and use the option to reset all settings to Load Optimized default. After that, you need to save the changes, restart the computer and enter the BIOS settings again. Further, to launch the Q-Flash utility, the F8 key is pressed, and the start is confirmed by pressing the Y and Enter keys. To begin with, it is recommended to save the current version using the Save Bios option, after which you need to use Update Bios. Next, you will be asked to indicate the source from which you want to update. As a medium, you should select HDD 2.0 (this is how the flash drive is displayed in the settings). Then everything is as usual: we select the firmware file present on the media and agree with all the warnings.
For the Internet update, you can use the @BIOS utility specially developed by Gigabyte's specialists, which runs on Windows. In this case, it is highly recommended to disable the Hyper-Threading mode in the primary system settings, as well as deactivate anti-virus and other resident applications in order to avoid errors or failures during the update process.
After starting the program, you can immediately save the current BIOS version by clicking on the Save Current BIOS button, and then select the Internet Update online update mode, click Update New BIOS and select one of the servers in the list. After that, you will be asked to indicate the model of the installed motherboard, and the program will automatically download all the necessary components and activate the update process.
Msi
Flashing BIOS MSI, as is the case with ASUS, can be done either from under Windows, or from under DOS. For DOS mode, a BIOS-embedded tool called BIOS-MFLASH is used. But the MSI Live Update 5 or 6 application can also be used as the initial control utility. It is noteworthy in that it can also be used to update all installed MSI drivers, as well as flash the BIOS of the corresponding graphics accelerators. We’ll start with him.
In the main window, you just need to check the necessary items. Select the MB BIOS component and click the scan button below (Scan). If a new version of the firmware is detected, use the Download and Install button, after which the update process will start.
First you will need to select the update environment. To simplify matters, check the item In Windows mode, in the next window, click the close button of all programs that appear in the list (Close all listed programs), click the continue button (Next) and in the next window click the start button of the process.
For DOS-mode, select it from the window of the running update process, after which we indicate the medium and agree to the destruction of all the data present on it (the process will take no more than a minute, after which a message will be issued about the successful creation of a bootable drive). When rebooting, it remains only to follow the instructions of a kind of "Wizard".
In the case of an update using the built-in MFLASH mechanism, you will have to download the firmware manually, create bootable media and perform the same actions in the BIOS, as described above (in the tool menu, select the media and firmware file).
Acer
Flashing BIOS of Acer-systems is surprisingly made much easier. You do not even need to create bootable media, although you will still have to format it in FAT32.
To install the update, a special utility called Insyde Flash is used, which is copied to removable media. At the same time, you need to copy the firmware file downloaded from the official website to the main program directory on a USB flash drive, with the extension .fd and corresponding not only to the motherboard, but also to the laptop model. Please note that the device should contain only one firmware file, otherwise the application will offer to reflash only one of several. After starting the utility with the power on, the offer to install the update will be issued immediately.
The second way is just as simple. First you need to completely turn off the laptop, unplug the cord from the outlet and wait for the moment when the power indicator stops blinking. Next, plug the cord into the outlet, insert the USB flash drive into the appropriate port, hold down the Fn and Esc keys and press the power button. As soon as the indicator starts flashing, release the pressed keys. After that, the reading of information from the drive will begin (this can be seen by the blinking of the LED on the device itself). At the end of the update process, the laptop will reboot itself.
Video cards
Since GeForce and Radeon are dominant in the video card market, BIOS flashing will be considered on their example.
At the initial stage, for your card on the manufacturer’s website, you need to download new firmware and management programs. If there are several video cards in the system, only one should be left at the time of the update by inserting it into the PCI-Express slot.
For GeForce cards, NVFlash (from two files) is used, for Radeon - ATIFlash utility (one file). Next, you need to create a bootable USB-drive for DOS-mode, and then copy the files of programs and firmware.
When starting from a USB flash drive, you should make sure that the card is single-processor, otherwise the proposed method will not work. For NVIDIA, the nvflash --list command is used, for ATI - atiflash –i. If information on two cards is issued, then the adapter has two processors, and the proposed firmware method cannot be used (it is better to refer to the manufacturer’s website and find the instructions there).
At the next stage, the BIOS flashing of the GeForce video card involves disabling protection. This is done with the line nvflash –protectoff.
Next, to start the BIOS update process for the GeForce cards, use the nvflash -4 -5 -6 newbios.rom command (the ROM file name must match the name of the loaded firmware), atiflash –p –f 0 newbios.rom for Radeon cards. After that, we wait for the completion of the process and overload the system in normal mode.
Brief Summary
That's all for flashing primary I / O systems. Based on the foregoing, we can conclude that the best option is to install the update exclusively in DOS mode, although you can use special utilities to simplify the work. But they work only if there are UEFI systems, and for standard BIOS versions they are not suitable. You need to be extremely careful with video cards, because improper installation of the update or the slightest violations during the flashing process can lead to the failure of the graphics adapter.