The modern world of technology implies the presence of a tablet or computer device in almost everyone. So, in one house several computers, laptops and laptops can be used at once. Their synchronization greatly facilitates the work. Transferring information from one computer device to another now poses no problem. To do this, you don’t need to transfer to another device and reset all the necessary information to removable media, it is enough to have an Internet or Wi-Fi connection on both devices and correctly configure the software. To synchronize computers, you will need to create a shared access to the Windows 7 folder. What information do you need to know about safe setup?
Why open public access to folders and files
In offices of small, big business and quite often at home, there is a need to synchronize information between computers, use one printing device for several computers and other important functions. To do this, it is extremely important to share the folder. Windows 7, Linux, XP - the most common operating systems among modern users. Depending on the purpose and place of application of computer technology, one or another type of software is used. So, Linux is most often installed on desktop computers in offices, because it is free basic software. In laptops, the 7th or 8th version of Microsoft Windows is most often used. As a result of this, there is a need to properly configure public access.
Most often, inexperienced users have a problem in opening access to folders in Windows 7. "Why is this so?" - you ask. The fact is that dramatic changes were made to this version of the OS when working with shared access and networks. This was organized specifically for the security of a computer device, but there were difficulties.
Understanding Operating System Folder Access
Setting up Windows 7 for sharing means following certain rules:
- In order for fraudsters and unauthorized users to accidentally connect to your computer, you must first set a password. This will protect the data on the devices to which you share.
- Sharing files and folders means working on the same computer network - WorkGroup. All devices must be configured as members of this workgroup. If your computer is connected to another network, then you will not be able to share the Windows 7 folder. The only exception is when you use a laptop and connect to the corporate domain via Wi-Fi, but for this your computer device must be configured as its element.
- Windows 7 Explorer should recognize the devices connected to it. Only in this case, the configuration of their connection is considered correct.
The role of home groups in local data sharing
Home groups were developed by Microsoft with the aim of sharing data, files, multifunction printing devices with multiple computers connected to the network. Despite the fact that through them it is easiest to synchronize devices, to share a Windows 7 folder through WiFi and through a cable connection, Home Groups have some of their drawbacks. Compared with the working group, there is much lower data transfer rate. In addition, there are a number of limitations. This article is about Windows 7, but if you have a home group selected, you cannot connect an XP computer to it. It is also important to mention that existing versions of Windows 7, such as such as the "Initial" and "Home Basic", cannot implement the creation of such a network cell. But they can be connected to a group created using any other version of Windows. If the network was first connected to your PC, Windows 7 automatically opens a window offering connection or creating a home group.
If you are determined to join the home group, in order to not be denied access to Windows 7, you need to perform some actions to change the secondary public access settings. There are several types of parameters:
- Private network.
- Guest or public network.
- All networks.
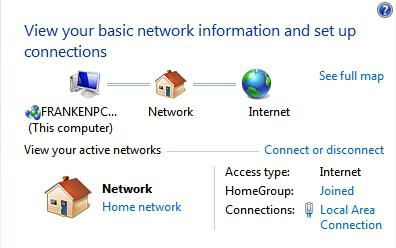
For those who initially did not have time to choose a home group as the base group in your network, there is the possibility of setting it up and searching manually. To do this, follow this path: "Start" -> "Control Panel" -> "Network and Internet". In network management and public access there is a section for changing network parameters.
Setting up sharing of selected files and directories
In the 7th version of Windows, to add a folder or specific files to the shared file, you need to call up the menu by right-clicking on the file or directory shortcut (RMB) and select one of the existing items. Setting up Windows 7 sharing means choosing items such as a home group with the ability to read, write, or read only, preventing users from opening this folder with files.
If you want to add only the file to shared access, then you need to click RMB on the file shortcut, select the shared point, then go to additional settings. Given the selected profile, go through the options and select the necessary settings with checkmarks. In the windows that open, the purpose of a parameter is described in detail.
Setting up public access to the system directory
No matter what type of access you choose, whether through a workgroup or a home group, you can always use file access on your computer through the General folder. It is created automatically when connected to a group and is located in the hierarchy of your computer device in this way: C: \ "Users" \ "General". In the Windows 7 Explorer, click Share With. In the section for public access to directories should include their sharing. This way you can share the folder. Windows 7 defines this directory as public, but it is recommended to add it to the library by pressing the right touchpad button on its name and selecting the necessary item.
Cloud method for providing public access
This method of providing public access is also good because it helps to back up files, which greatly simplifies the work with data. It can be Google Drive or One Drive from Microsoft Corporation, where you can put all the necessary information and use it from anywhere in the world. The disadvantage is in the monthly fee if the file size is larger than the limit.
Windows 7: accessing a file and instructions for opening it
To change the settings of public access to the file, you must perform certain actions.
There are several ways to share files:
- The first is the simplest. It is necessary to call the file parameters window by clicking on its name on the right button of the touchpad or mouse, in the window that appears, select the item "Sharing" and click on the access with the ability to read or read and write.
- Windows 7 can share files with another way. You need to go to the sharing and network management system, select a group and control public access there. And already in the settings specify the necessary parameters.
Ways to share data publicly
Taking into account the goals, each user chooses his own method of connecting access to the data of his computer device:
- If you use a home network to transfer data, then you do not need to set additional restrictions on each folder. You can easily access the printer and files of a personal device while sitting on another device from your home network.
- Windows 7 can be shared with the public folders located on drive C in the Users directory, in the General folder. There you can make the necessary settings and set a ban on access to certain directories and documents.
- Also, public access can be achieved through cloud storage. This method does not require a connection to the home network, just connect from anywhere in the world through a browser to the Internet and synchronize files and documents on different devices with the ability to backup.
- By creating your own hierarchy of directories, you can manually control access to the files and directories of your personal computer device.
Cannot share Windows 7 folder: resolving the problem
However, unexpected troubles do occur. For example, even if all the necessary parameters are correctly configured, a message stating that Windows 7 is denied access is displayed on the computer screen. What should be done in this case? Some in the second round begin to check the correctness of the set parameters, some are looking for other methods to solve the problem.
Most often, they try to share files on drive D on a computer, but, as you know, access is automatically opened to drive C. To avoid such problems, first of all, right-click on the touchpad or mouse and click on the drive’s shortcut and add it to the list of allowed . The remaining actions are performed according to the group network to which you are connected.