Without such an important device as a printer, nowhere. It greatly simplifies life, allowing you to print all kinds of information. But what to do when Windows cannot connect to the printer, and the document needs to be printed as quickly as possible? This article will examine in detail this problem and how to solve it.
Why Windows cannot connect to the printer
If it were not for the computer and the printer connected to it, we would still write manually, spending a lot of time and effort on it. And if everything is clear with a PC - it doesn’t work, that means you cannot create a document, then with a printing press everything is different. We turn to her when everything is ready, and all that remains is to transfer the information from the monitor screen to paper. There may be several reasons why the printer does not connect to the computer:
- The device is not physically connected to the PC.
- The printer is not installed.
- No drivers.
Check connection
The first step is to check if the printer is turned on and the LED is on. If not, then turn it on, check the network connection, and is there any electricity at all. This may sound ridiculous, but often Windows cannot connect to the printer for this very reason.
Next, we check the physical connection to the computer, i.e. by cable. If the cable is connected, you should pull it out and reconnect. It is possible that he was not fully inserted. Maybe the problem is in the cable itself: it burned out or broke. Therefore, it is best to take somewhere the same wire from a working device and connect it to ours. If the machine worked, then the problem was precisely in the cord.
Install the printer
Often Windows cannot connect to the printer because it is simply deleted or faulty. The cause may be a virus or a malfunction in the driver. In this case, the latter may remain. Therefore, we go to the "Start", then - "Devices and Printers." We look if there is one in the list. In the case when it is not there, click “Add a printer” and “Add local”.
Click “Next” and select from the list the manufacturer first, then the model. Click next, after which the printer icon should appear. If it is, but there is an exclamation mark on it, delete this setting and set it again.
We put drivers
In any Windows there is a set of drivers for many printers. One has only to connect the printing device to the PC, as he immediately starts looking for the necessary driver in the database and installs it, after which you can immediately start printing. But since operating systems were released relatively long ago, such software is not available on all models, especially new ones. Therefore, Windows cannot connect to the printer, because the system cannot deliver the driver on its own. Do not exclude cases where drivers were simply corrupted for some reason. You can see this by right-clicking on the “My Computer” icon. In the "System Properties" click on the menu on the left side ("Device Manager"). We open the list of “Other devices” and see that the printer driver is faulty (there is an exclamation point).
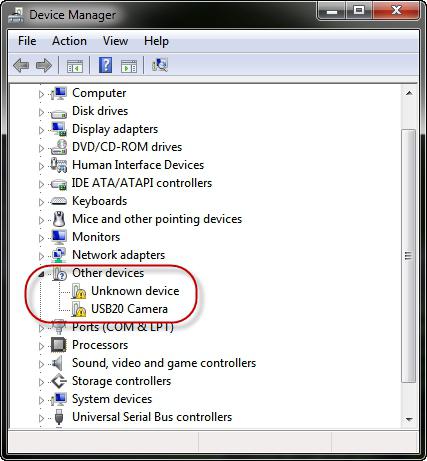
Select it and delete it. If this list does not exist at all, then the reason why Windows cannot connect to the printer is because the driver is simply not installed. In both cases, you need to install it.
If the printing device was purchased relatively recently, then a software disc must be included with it. Everything is simple - we find this disk and install its contents. If there is no disk, it doesn’t matter, download the necessary "firewood" from the Internet. We go to the manufacturer’s website, go to the "Support" or "Service" section, select "Download drivers." Next, from the list by brand (in most cases, you can find it in front of the name of the printer model) we find the desired one, download the files and install them.
Often, drivers for old printers for Windows 7 are presented not as an installer, but as an archive with many obscure files. They are installed as follows: click on “Start” / “Devices and Printers”. Click on “Installation” / “Add local” / “Next” / “Install from disk”.
Click "Browse", select the unzipped driver folder and click "OK." Now everything is installed, the printer is working.