Ever wonder how artists manage to turn a flat canvas into a three-dimensional image? If you add light and dark shades of the same color, the objects on the canvas seem to come to life, gaining a bulge. And why not repeat a similar trick with flat, volumeless hair? And salon hairdressers adopted the techniques of painters. They dye their customers hair not in one but in several colors at once. This procedure is called coloring, in French, ombre (ombre - shadow). It differs from highlighting in that at least three shades (and sometimes more) are involved in painting. Salon masters can so distribute colors that they will sparkle with unimaginable shades of overflow from a simple turn of the head. But this does not mean that you should rush to the hairdresser for the procedure of painting in the style of "ombre". This article will tell you how to make coloring at home. Photos will help to figure this out. And read the step-by-step instructions below.
Color selection
As we already mentioned, coloring requires at least three shades. But you can limit yourself to two - in the event that the natural (or acquired) hair color suits you. Then you need to get 2 paints: one - half a ton lighter than the base shade, the second - half a darker. Of course, you need to have a certain artistic taste and be clearly aware of what result you want to achieve. Colors should flow smoothly into each other if you want to create a natural overflow effect. But they can be radically different from their own. The last way of coloring is very popular with young girls to emphasize a granular haircut.
In preparation for the procedure, you need to take into account the shape of the head and hairstyle. Skin tone and eye color also matter. If the hair is dark, you will need a bleach. Reading this entire list, you probably think: is it possible to make coloring at home, is it possible to carry out such a complex procedure on your own head? If you follow the instructions, everything will work out.
Basic colorizing methods
Now that you have purchased hair dyes, you need to decide exactly how you will carry out the procedure. There are two main colorization technologies: longitudinal and transverse. The first involves staining individual strands - from roots to tips. If you are thinking about how to make coloring at home yourself, without outside help, you should choose this simplest technique.
Cross staining involves applying a darker shade at the roots, and light at the ends. Such coloring is good because the effect lasts for a long time. The regrown hair at the roots creates, as it were, another tier in the gradation of flowers. But cross-coloring is more difficult to carry out at home, especially without the help of a girlfriend. After all, at least three mixtures must be applied to each lock.
Preparation for the procedure
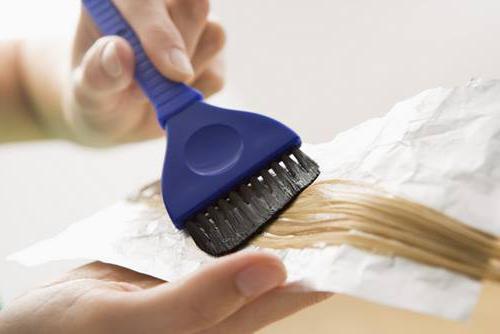
Needless to say, your head should be unwashed for at least three days? Why is this needed? The sebaceous glands of the skin secrete fat, which will serve as a protective shell for the hair, protecting them from excessively aggressive chemical effects when stained. Also, at the last washing of the head, do not use balms and foams for styling, as they can affect the staining result. Have you already purchased coloring tools? It is important that the paints of three shades were released by the same company and belong to the same brand. Read the instructions carefully. If necessary, take an ingredient tolerance test. Before you do the coloring at home, prepare everything you need. The set of paints includes gloves and balm. We will also need: brushes, foil, oily cream or petroleum jelly, hair clips and a special comb that will allow you to easily separate the small locks. We will mix paints in three separate bowls (it is desirable that they be of different colors, so as not to mix up the shades).
Getting to the procedure
Dress in something that is not a pity to throw it away, since the probability of dripping onto your shoulders and chest when painting your hair is too great. Divide the foil into pieces. Their size should correspond to the length of your hair. Strictly adhering to the instructions that come with the paints, dilute the composition in three separate bowls. Before you do the coloring, carefully comb your hair. On the forehead, temples, on the neck near the back of the head, lubricate the skin along the hairline with petroleum jelly or oily cream. This is necessary so that the composition does not stain the skin. Separate the comb strands that will be colorized. Remove the remaining hair with clips.
How to make coloring at home
Consider the longitudinal method as the simplest. We start work from the back of the head. Separate a thin lock, not more than half a centimeter, with a comb. Put it on a piece of foil and apply one tone of paint with a brush. Fold the aluminum in half, fix it, pressing it with your fingers to stay on your hair. But air must flow into the hair, so do not crumple the foil. Separate the second lock. With her we do exactly the same, only apply a second shade. Then we color the next curl - in the third tone. Having finished the occipital part, we pass to the parietal, and then to the forehead and temples.
And now, advice on how to make coloring at home and not burn your hair. Act quickly and confidently. Do not hold the paint for more than forty minutes. You need to colorize all the selected strands before the first one has to be washed off. From time to time we check the effect of the paint. Then we wash it off - each lock separately. We apply a caring balm on the hair.
How to make coloring at home using the transverse method
With this technique, we do not divide the hair into longitudinal locks, but into parts. The lower one starts from the tips and continues to the earlobe. We will paint this part in the lightest shade. And if you are a blonde, you can make a reverse ombre - with dark tips. We fix this part with clamps. We retreat from the first part one centimeter of unpainted hair. The second transverse section starts from the middle of the ear and continues to the level of the eyebrows. Again, leave half or a whole centimeter unpainted. The third part is everything else.
We start work from the bottom section. We apply a clarifier (or paint) on the ends of the hair, with a brush we distribute the composition up. One thing is important here - smooth lines of transition from one color to another. When reaching the upper border of the lower section, wrap the hair with foil. Take care of the middle part, coloring it in the base color. Apply a darker shade to the top. If the bang is short, you can not colorize it.
How to achieve a smooth overflow of shades
The transverse method requires special skill. After all, the same strand is painted in three colors. How to make hair coloring at home high-quality so that the three sections do not have clear boundaries, and the shades flow smoothly into each other? To do this, we leave a centimeter of unpainted hair between the three parts of the hair. After about a quarter of an hour, check the bottom section. If the ends of the curls lighten sufficiently, we smear the composition with the unpainted boundary strip. We do the same with the zone between the second and third sections. It is important to make the border as blurry as possible, otherwise instead of an overflow of shades you will get the effect of regrown colored hair.
California Coloring
This ombre style looks perfect on light and blond straight hair. It involves dyeing in one tone, while the roots of the hair remain intact. This creates the effect of "tips burnt out in the sun." How to make home-style coloring in California? This method is similar to the classic cross. But first we lighten the tips. They are exposed to paint the longest. Choose a shade one and a half to two tones lighter than natural hair. After fifteen minutes, apply the paint two and a half centimeters up. Then move higher again. The upper section will thus be little time under the influence of paint, and will not lighten too much.