In this article, we will consider the process of disassembling and cleaning a laptop in order to prevent common problems in its operation and extend the life of the device. For example, take the standard Lenovo brand laptop, model G580. So, how to disassemble the Lenovo laptop and clean it? Is it possible to complete this operation fully at home?
How can I clean Lenovo (laptop). How to disassemble the device
Why disassemble and clean your laptop? A laptop is like a vacuum cleaner: it sucks in air, passing it through a radiator to cool the processor. Together with air, house dust also enters the radiator, thereby polluting the radiator and impairing its efficiency. When the laptop overheats, it starts to function unstably. Throttling first appears - this is the processor’s security system. In other words, when the processor overheats, it starts lowering the operating frequency in order to reduce heat generation. If this does not work, then the laptop just turns off. A constant and regular overheating process will certainly lead sooner or later to the need for costly repairs.
For example, take an arbitrary device - a Lenovo G580 laptop , consider how to disassemble and clean it. This will prevent problems in the device and extend the life of the laptop.
Preparation of necessary tools
Before disassembling the Lenovo G580 laptop, you should prepare the necessary tools and materials for the process. You will need:
- small slotted (Phillips) screwdriver (for delicate work);
- a tool for opening a laptop (a dental shovel or just an unnecessary plastic card may come up);
- the capacity in which we will fold the mounting screws;
- as well as thermal paste (it can be purchased at a computer store or in the departments of radio components).
Note: it is better not to save on thermal grease, because this is the main heat carrier from the processor to the radiator.
Workflow sequence
Why it is necessary to carry out preventive work with a computer is understandable. Now consider the Lenovo G580 / Lenovo (laptop): how to disassemble and clean this device correctly.
- So, first you need to remove the battery and unscrew the two bolts of the rear cover, then slide the cover and remove it.
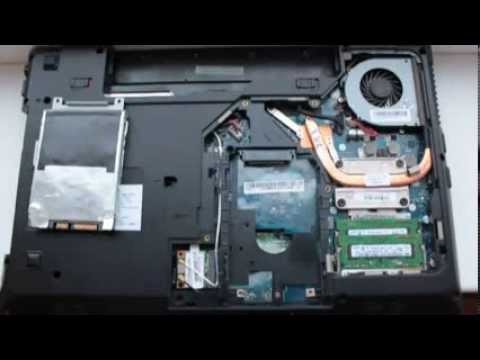
- Next, we see the contents of the laptop. Here it is necessary to unscrew the bolts holding the hard disk, which must be moved and pulled out, and after that - unscrew the fastening screw of the CD drive and pull it out.
- Next in line is disconnecting coaxial cables from the wireless module. To do this, remove the fastening screw and remove the module from the connector that contains Lenovo (laptop).
- How to disassemble further and remove the keyboard? We continue to adhere to the sequence of such actions: now we unscrew all visible bolts on the bottom of the laptop and turn the device over. Now you can easily remove the keyboard. To do this, you need something subtle: a medical spatula will do. On the upper end of the keyboard there are recesses through which spring-loaded fasteners are visible. They should be pressed with a tool and gently lift the keyboard. This opens access to the keyboard loop: carefully unfasten it and disconnect the keyboard. In the same way, disconnect the cables from the touchpad and from the power button.
- Under the keyboard, we find further bolts connecting the laptop. They need to be unscrewed. At this stage, we proceed directly to the opening of the laptop. To do this, with a spatula or a plastic card, carefully snap off all the latches along the perimeter and raise the top cover.
- Next in line is the motherboard. It is necessary to remove it, having previously disconnected the cables of the peripheral connectors, speaker wires, the charging connector cable, the loop cable and unscrewing a couple of bolts securing the board to the laptop case. After removing the board, the case can be cleaned from dust and removed to the side. But that is not all.
- After the work done, you need to take on the motherboard: disconnect the fan cable, unscrew the bolts of the cooling system and carefully separate it from the board itself.
- We start cleaning the cooling system: the processor and other microcircuits need to be cleaned from the old thermal paste. If it is difficult to remove, you can use solvents.
- In the next step, unscrew all the screws of the fan cover to clean the radiator from dust. Also, for prevention, you can remove the fan blades and grease the bushing with machine oil (in no case vegetable oil!).
- After cleaning and lubrication, the cooling system must be assembled, thermal grease applied to the microcircuits where it was previously. The thermal paste layer should be even and thin. Then we should install our cooling system back onto the board, tighten all the bolts in the order indicated on the system itself, and connect the fan to the board.
- Finally, you can start assembling the laptop in the reverse order of disassembly. After the end of this process, you need to turn on the device and check the operation of the cooling system using diagnostic programs. To this end, we run a system stability test and check the result.
And finally ...
Thus, we examined the sequential actions and the main issues that arise during the process of working with the Lenovo device (laptop): how to disassemble it, clean it and assemble it. Be careful and careful! Good luck!