Laying tiles is an integral part of bathroom renovation. Many people think that laying tiles is a difficult task that is beyond the power of everyone. I want to assure you that this is not so. When studying the material of this article, the process of laying tiles will seem to you not only simple, but also interesting.
Laying
tiles in the bathroom, due to space limitations, is considered a more time-consuming process compared to
laying tiles in the kitchen. Before you start laying tile, you must carefully prepare both the surface and the room as a whole. The preparation of the premises includes: dismantling the old and installing new plumbing, if necessary, replacing the electrical wires, and installing a new electrical wiring.
Do-it-yourself tile laying can start both from the floor and from the walls. It all depends on the readiness of the floor, if, for example, it is not ready in the bathroom, that is, it has not been poured and leveled, then it will be better to start laying the tiles from the floor. First of all, it is necessary to complete its screed, so as not to waste the extra adhesive composition. A prerequisite for laying tiles is that the surface before laying must be cleaned of debris and primed.
Laying
tiles on the floor, as a rule, starts from the corner. First of all, we adjust the tile from the corner to each other and see how it fits to the wall. With perfectly even walls, the tiles will not have to be trimmed, but if it is curved, it would be better to make a small gap between the wall and it, in order to prevent further tile consumption at the seams. Then we apply a layer of special adhesive on it and level it with a notched trowel. If necessary, for example, unevenness on the floor, it is allowed to apply the adhesive directly to the floor. In this case, the furrows of the adhesive composition that the notched trowel leaves on the tile and on the surface should be perpendicular to each other. After applying the glue, we press the tile to the floor, and without fail we check its position using the level. The use of plastic crosses makes it possible to withstand the same width of the seams. Also, do not forget to remove excess adhesive from the tile and from the seams, since after drying it is poorly removed.
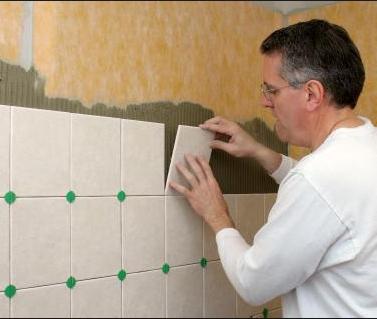
Laying tiles on the walls also requires preliminary surface preparation. In the presence of differences of more than 5 mm on the surface, the walls must be leveled, differences of less than 5 mm are aligned during installation by increasing the thickness of the adhesive layer. Laying tiles on the wall begins with the bottom and most visible angle so that it is trimmed in places that are not too striking. Throughout the process of laying tiles, you should constantly check its position with the help of a level.
Seams are filled in a day with special grout using a rubber spatula. Fill the joints with grout as deep as possible, in order to prevent further voids in them.
If necessary, make cuts in the tile (socket, switch, etc.), you will need a special winning nozzle on the drill. Tile trimming is done using a tile cutter. Also, for laying tile, you will need a rubber mallet.