The drainage system solves the problem of safe disposal of rain and melt water from the target object, which can be considered as an industrial building or a private house. Hazards can be associated with the contacts of liquids and building structures. Systematic soil erosion in the foundation zone, for example, can provoke destructive processes if the installation of the drainage system in time is not completed in accordance with applicable regulations.
What is the drain formed from?
In the simplest versions, the design includes a group of gutters and pipes for draining water into the reservoirs. Mounting hardware in the form of brackets, holders, clamps and elbows is used for the technical device and fastening. Complex sections are equipped with corner joints, tees, drain funnels and cornices. To increase the efficiency of the gutter and minimize the frequency of preventive maintenance, cleaning devices will help. These include nets, revisions, traps for dirt and leaves, hatches and protective panels for gutters.
Extended equipment complicates the installation of the drainage system, sometimes reducing structural reliability, but the channels will be spared from internal blockages and congestion. Moreover, in most systems it is allowed to retrofit auxiliary devices only at the stage of assembly and fastening, so during the operation it will not be possible to integrate some functional components.
Do not forget the aesthetic component, as the drain stands out against the background of the facade composition. As decorative elements, chains, gargoyles, original protective pads, etc. can be foreseen in advance.
How to choose the gutter?
The classic form factor, which is used in the drainage systems of private houses, has a semicircular section. This is a practical gutter for installation, it is easy to integrate it into roof-pitched structures and dismantle it. But there are alternative solutions with rectangular and complex profiles that simulate a cornice. These options should be addressed if you plan to customize the installation of the drainage system. The roof in this case can act as an overlay on the rafters structure, providing additional fixation of the gutter holders. But such a configuration should be calculated even before laying the roofing, since the gutters of the gutter will be directly connected to the bearing base of the roof.
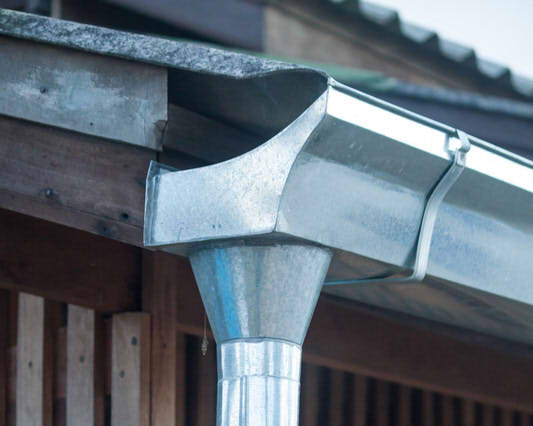
Considered in the selection and the mechanism of connection of the gutter with the pipe. Usually, the reduction of two circuits is realized through a transition node - a funnel or a drain. Direct fixation can be carried out due to cylindrical pads-clamps or a tin box of a rectangular shape. In the interest of increasing the aesthetic attractiveness of the connecting unit, non-standard installation of the drainage system can also be performed. The price of sets with adjustable grip-sliding, for example, is 3-3.5 thousand rubles. In a separate order, such accessories are available for 100-150 rubles.
What materials to prefer?
Polyvinyl chloride (PVC) and plastic plumbing products in general over the past few years have seriously supplanted metal counterparts. In the case of drains, this process is especially noticeable. PVC gutters during manufacture are covered with layers of acrylic and titanium dioxide, which increases the mechanical stability of products, protection from sunlight and chemical reactions. A variety of color solutions is also considered a plastic plus, which allows organically introducing gutters and pipes into any facade compositions, maintaining a stylistic correspondence.
Do not stand still and developers of metal structures. On the market you can find attractive options in galvanized steel, copper and aluminum. What is the advantage of a metal gutter system? Installation in this case can be strengthened by the introduction of rivets, rigid brackets and clamps. The fastening is done by integrating the bearing elements directly into the structural parts by soldering and introducing flange joints, which is not possible in the case of plastic.
Which brackets to use for gutters?
To install the gutter, hooks (brackets) are used, acting as load-bearing elements. At the first stage of selection, it is determined which part of the roof will be fixed to the hardware:
- To the eaves overhang panel (windbreaker), which is guided along the roof slope along the edge.
- Rafter legs or battens.
- Plank closure of the attic.
Now you can go to the varieties of hooks, thanks to which the gutter system is mounted to the roof:
- Curved flat brackets, fixed to the plank flooring or lathing. If the step of placing the rafter leg has a fairly close distance, then you can perform fastening to this design.
- Curved flat hooks for lateral installation. Fastening is carried out to the side of the rafter legs, but for this you should initially align the bracket.
- Front hooks screwed to the wind board. Among the advantages of this installation of the drainage system, it is worth highlighting the possibility of regulating the fasteners. But taking into account this feature, it is important to pre-calculate the angles of the edges of the rafters.
- Universal brackets. A win-win option in terms of fastening options, thanks to which it is possible to fix the gutter to a continuous flooring, crate, rafters or wind panel.
General rules for mounting brackets
Depending on the size of the fastener and the characteristics of the gutter, fixation points should be placed with a step exposure of 40–70 cm. An increase in this distance during operation can result in deformation of the drain under pressure from snow, water and ice. You can minimize installation difficulties with the front brackets. As already noted, they are screwed (or nailed) to the wind panels without any restrictions on the layout and indentation on a solid surface.
If the configuration of the lateral installation to the rafters is selected, then the first and last hardware for the slope should be screwed in taking into account the optimal slope. As the instruction notes, the installation of the gutter system with fastening to the rafter leg on the side can be done if the corresponding slope of the gutter to the drain is guaranteed. Each subsequent bracket should be several millimeters lower than the previous one.
In choosing a gutter mounting scheme, it is important to take into account one more nuance. On steep slopes there is a great risk of arbitrary sliding of snow masses. In order to prevent the construction of the gutter as a result of such a cliff, it is necessary to foresee a place for placement of snow removal in advance.
Calculation of the technological curvature of the drain
The aforementioned slope is set in the direction from the drain to the funnel. The angle is determined by the length of the ramp and the cross section of the channel - a slope of about 5-20 mm is made for 1 m. For example, if the length along the horizontal slope is 8 m, then the difference in height levels between the extreme points of installation of the brackets will be on average 4 cm. If the slope has an eaves overhang and reaches 12 m in length, then the gutters of the gutter system will be installed with two slopes in different sides. In other words, from the center, water flows are distributed along 6-meter drainage lines with opposite but symmetrical slopes.
Placing funnels for draining
The number of drain points is determined by the area of the roof edge. A pipe will be installed on each funnel, through which water will go to a conditional drive. According to the instruction, the throughput of one funnel should be enough to service about 120 m 2 of slope area, which also corresponds to 10 linear meters along the edge of the gutter.
To integrate the funnel, a special hole in the channel is created. Its parameters and placement configuration may vary depending on the characteristics of the structure. For example, when installing the Grand Line gutter system, it is recommended to form V-shaped holes in the gutters with a width of 100-120 mm. In order to maintain reliability, the distance from the upper edge of the channel to the cutout should not exceed 15 mm. The funnel is built into the prepared hole and fixed by the sealed side in the locking mechanism.
Install pipe holders
From the funnel, the drain channel passes to the pipe, which also requires special fastening. A typical holder has two parts of fixation - a clamp for holding the pipe and a hardware (nail, screw or rod with a dowel and plate) for rigid mounting to the wall. The capture points should be located under each node connecting two segments of the channel. If long pipes are mounted, then the frequency of placement of the fasteners is determined by a step of 180-200 cm.
The most difficult and critical operation at this stage will be the power installation of the drainage system. It’s not so easy to integrate fixing equipment into a brick or concrete wall with your own hands - at least it will require the use of a powerful drill / driver. Using this power tool, holes are drilled at the designated points for the subsequent insertion of a dowel, screw or bracket. At the next stage, supporting devices with clamps for gripping the pipes are wound.
Assembly of the main components of the drain
It is recommended to start the assembly from the funnel by installing the gutters on the supporting brackets and connecting them with locking locks. It is better to trim the excess parts with scissors for metal, immediately scraping and the edges for a more tight bond. The angular parts of the gutter are set according to marks and notches with the same shutter speed according to the calculated slope. At the ends are fixed plugs, the joints of which it is desirable to seal with waterproof adhesive compositions.
Pipes are also mounted from the funnel. Prepared fasteners are latched or tightened with couplings. If you are installing a plastic drainage system, you should leave a compensating gap of 10 mm between the pipe wall and the clamp. It will be needed during periods of temperature changes, when the plastic undergoes thermal expansion.
Installation Tips
Problems in the design of gutters usually arise when laying gutters with funnels on the lucarnes, above a terrace or entrance. The hinged structures in such areas are difficult to hide, which is why the facade look spoils. What can be the optimal installation of the drainage system in such situations? The solution will be to install a pipe on a decorative pillar that will support a protruding visor or canopy. On a vertical support, you can let climbers with the capture of the pipe and a complete disguise of the structure.
Drainage organization
The construction of a water collection and drainage system is only part of the story. In the future, without the preparation of drainage channels, there will be a threat of erosion of the foundation, and this should not be allowed. It has already been noted that the collected water through pipes can be sent to special storage tanks, but this is an impractical and temporary solution. The traditional correct installation of the drainage system according to the instructions provides for interfacing with a drainage network on the site or sewer system. To do this, you need to connect the lower outlet of the drain pipe to the intake channels or the storm water inlet, from which it will be possible to organize redistribution into a septic tank or other cleaning system.
Conclusion
Self-installation of the drainage system in a private house will not be difficult if you correctly approach the selection of materials with a full set of accessories and the correct calculation of the layout of their placement. How much can you save on installing a drainage system? The price for work averages 5-10 thousand rubles. When calculating the cost, the length of the channel with gutters and pipes, which can be 10-20 m, is mainly taken into account. But also do not forget about additional functional elements. For example, snow blowers, storm water inlets and filtering devices as such are not parts of the drain, but their inclusion in the general infrastructure can significantly increase the numbers in the design estimate.