To keep the house warm, you need to mount the heating system correctly. It can have a different design. But the main guide of the heating system is the batteries that give off heat. At first glance, it seems that installing and connecting radiators with your own hands is an insurmountable task. But in reality this is not so. One need only take as a basis some of the recommendations highlighted in this article.
How to make a choice?
To determine exactly which devices are suitable for a house or apartment, you need to know their efficiency, as well as the operating mode. According to the masters, it is important to pay attention to internal resistance. In this case, if the technical capabilities are lower than the pressure in the heating circuit, there is a probability of violation of the integrity of the structure with all the ensuing consequences.
The next important factor is the permitted heating temperature. The maximum indicator is indicated, after which a malfunction occurs:
- If it is an autonomous system, the threshold reaches 95 degrees.
- If centralized using plastic equipment - up to 90 degrees.
- Centralized, but when using steel pipes, up to 120 degrees Celsius.
If there is a violation, then some elements melt and, therefore, depressurization.
Permissible battery clogging
This indicator is of interest to many, since water is not maximally purified. There is a methodology for calculating permissible errors, but it is difficult to do without filters. They are removable, which allows them to be removed and cleaned. So there is no violation of integrity and other malfunctions.
Where is the battery mounted?
When installing heating radiators, their location is taken into account. In addition, it will also be decided that it is more suitable for effective work. Masters believe that structures should be in the coldest places. This will reduce the risks of unnecessarily lowering the room temperature and the presence of draft. Do not forget that radiators will need maintenance. It should provide free access to them. When installing radiators with your own hands, the following places are selected:
- Under the windowsills. This is a very common option. In this case, you can hide part of the structure and at the same time prevent drafts, since it is from the windowsills that cold air most often goes.
- On any interior space.
- Unprotected corners of the room. This is required so that heat is not blown out.
- Bathrooms, bathtubs that have an interface with a load-bearing wall.
- Halls of private houses, due to the opening of doors.
- Entrances of apartment buildings, etc.
Modern heating appliances can have various sizes, so they are located anywhere. When installing heating radiators, there are special fasteners, so that installation is simplified. It is believed that already at the planning level of the house it is worth marking the entire heating system.
What do radiators look like?
On sale you can find several areas:
- Radiators
- Convectors.
- Registers
It is clear that the first is the most common and applicable form. It consists of separate sections that work independently. Depending on the area of the room, docking occurs. It is carried out using connecting devices. As a result, the battery becomes universal. But before you assemble the desired size design, the required power and heat level are calculated. From this a certain amount is put. But the horizontal basis of this design is the upper and lower collectors.
Today you can find on sale solid radiators, they are less versatile, but have their own advantages. The first is maximum reliability, as they are connected by welding or casting. In any case, external data can be diverse.
The next representative is a convector. This is a one-piece design, available in several variations. Exist:
- Wall mounted.
- Floor standing.
- Skirting boards.
And the last one is the registers. They consist of horizontal pipes and are not collapsible. But most often they use radiators.
What material to choose?
Before you begin installing radiators, it is worth exploring the market and understand what offers are available. Most often, products are distinguished by the type of material. This includes:
- Cast iron. First appeared on the market. It is a reliable alloy that can withstand severe loads. The service life exceeds 40 years. However, they are heavy. But due to this, after turning off the heating, they keep heat for a long time.
- Steel. They have a low heat transfer rate if compared with the first representative. General view - a construction of steel pipes with a decent service life.
- Aluminum. Good and resistant material, which allows you to use a different indicator of heating. Heat transfer is maximum. But the products do not tolerate water hammer. It is necessary to install water filters so that the heater does not fail.
- Bimetallic. Installation of bimetallic radiators is carried out according to the standard scheme. What it is? Inside is steel, and outside is aluminum. As a result, the work is characterized in the same way as for integral coolants made of such materials. The cost is quite high.
- Copper. The main plus is the maximum heat transfer. These designs are suitable for any room. A big minus is a very high price.
- Plastic. They appeared not so long ago, but are more suitable for autonomous heating. They have a short life. Sensitive to many indicators, in particular to temperature. It should not be higher than 80 degrees.
Once the battery is selected, the time comes to calculate the heat transfer power. If you do not, then the room will be cold or you will incur extra waste.
Heat power calculation
There are special formulas to understand how to make heating. They are always based on 1 square meter, after which it comes to understanding how many heating radiators are needed. If you keep accurate data, you should not forget which side the room is facing, whether the wall is external, etc.
Also, the masters say that we should not forget about the level of insulation of the walls of the house and weather conditions in the region of residence. Pay attention to the number of storeys, ceilings, sizes of window openings, and what quality they are. After receiving the number, a coefficient of 1.15 is applied to it for the error and the ability to regulate the microclimate. Everyone will cope with this task, having initial knowledge in mathematics.
How to connect batteries?
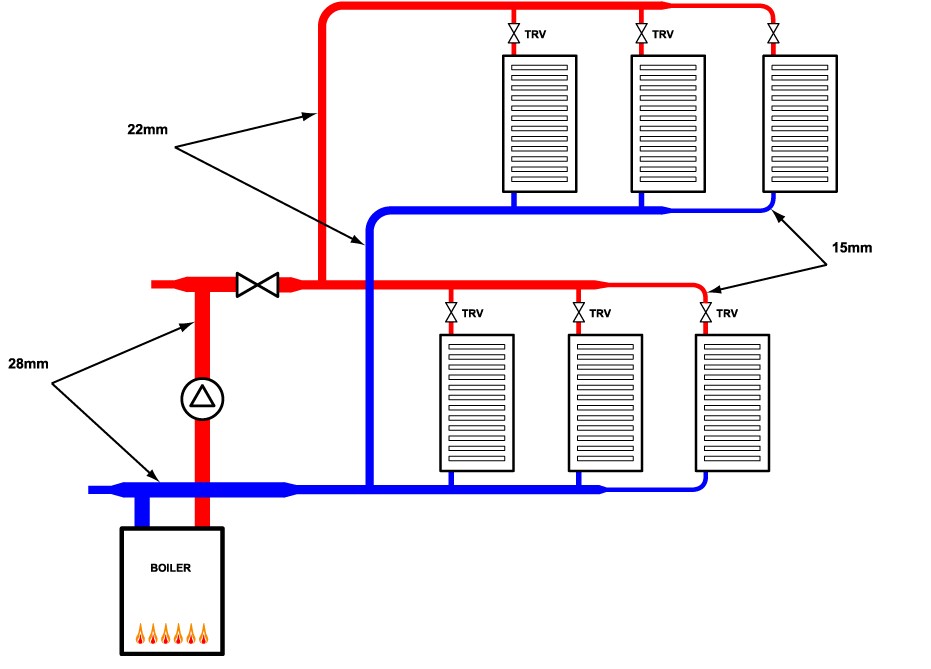
Before you perform the installation of aluminum heating radiators, it is worth considering how to correctly lay out the pipes. The differences are in the supply of cold water and return warm. In colloquial speech they are called feed and return. There is a riser. This is a vertical pipe. The following types of wiring are distinguished:
- Single tube. Here, the supply and return takes place according to one design. Radiators get up sequentially and also heat up.
- Two-pipe. It is easier here - one falls on the supply, and the second returns the coolant. Both are connected to each battery. Experts say that it is better to install a two-pipe system, since it keeps heat longer.
It is from the selected connection option that the heating efficiency of the battery will be calculated. How are radiators connected? Wiring diagrams and battery installation may vary. There are several easy installation methods. After calculating, everyone will choose the appropriate one:
- Diagonally. When the heating system is ineffective, this option is the best, because water enters the heater from above, floods it and exits from below, but from different sides. Heating takes place over the entire surface. If a large number of radiators are used for heating, then this option is the most suitable.
- Mounting the heating radiator side. It turns out that water enters from above, and exits from below. This option has been used at all times, and today it is no less relevant. If the system functions correctly, then the installation of DIY radiators in this way will be appropriate. But the number of sections should not be more than ten pieces. In case of malfunctions, the final radiators will not receive proper heating of the coolant.
- Fixation from below. Such a heating radiator mounting scheme is performed on both sides. According to the masters, the effectiveness of this method is minimal. But for plastic pipes, the method is suitable, since the installation method is fast. The plus is that the wiring is under the floor and does not spoil the design of the room. If you perform the installation correctly, then the heating occurs evenly.
All these are DIY installation and connection methods for heating radiators. It is clear that before buying equipment, you should decide how it will stand and whether it will look aesthetically pleasing.
What should not be forgotten?
Installation of heating radiators in a private house or apartment should begin as soon as the power is finally calculated and verified. The selection of the desired heating element is carried out in the store. The manufacturer must always indicate the permissible power of the products. It is worth pre-planning the installation location to get the right battery size. Today it’s realistic to install heating radiators of any size. The price of individual production will be slightly higher than usual. Here you need to carefully calculate the number of sections required and add the resulting power. What is the price of installing heating radiators? If you hire a specialist, the cost will be from a thousand rudders per piece.
When the radiator has a collapsible design, then you can play with a power indicator by adding or removing it. It also happens that in one room it is planned to use various designs. In this case, non-separable products are initially selected, and after that they are supplemented by collapsible ones.
Permissible installation of batteries of various groups. In this case, it is better to mount the air outlet. A heat-reflecting screen can be placed between the battery and the outer wall. It can be made from:
- Izospana.
- Alufoma.
- Penofol.
Installation of a heating radiator in a house or apartment should take place according to the level, without a large deviation. Where air vent is installed, an error is allowed for efficiency. If you are connecting from a riser, then it is worth considering the fact that the center of the inlet openings is not higher than the heat transfer pipe outlet. Often in this installation, a bypass is used. This is a special jumper. It is set parallel to connecting the batteries. With a bypass, the operation of the system is fully controlled.
During installation, you need to know how to match the pipe material. Because the expansion coefficients of the structure are different, and this can lead to malfunctions of the entire system. If the pipe is steel, the wiring should not be plastic. On sale, any heat sources have special packaging. Do not get rid of it until the installation of heating radiators and connection is completed. This will help to avoid the effects of mechanical damage.
How to prepare the heater for installation?
After buying collapsible radiators, you need to collect the required battery, calculate the power and only then install it. To make the assembly reliable, plumbing nipples and gaskets are used. What it is? Nipple - a short tube with a thread outside, right and left. Connection and uncoupling is carried out using a special key. Although many people find it easy to pick up another tool. Correct installation is carried out when working with the right thread.
Complete with radiators are special brackets. They are committed. It will be reliable if they are mounted in a wall. So that the design does not bring inconvenience, it is worth considering the approximate distances:
- Not less than six centimeters from the floor, but not more than thirteen. This is enough to ensure that cleaning is carried out without difficulty and there is uniform heating of the wall.
- Regarding the windowsill at a distance of not less than six centimeters.
- From the wall itself, do three centimeters or a little more.
The hook is attached to the radiator between the sections, so before starting work, it is worth taking measurements and putting marks. There are end caps on the sides (right and left), it should be located according to its designation. How to markup accurately? There are elementary rules:
- A vertical line is drawn (for example, under the windowsill). The length corresponds to the radiator itself. This is the center.
- The distance between the first and last sections is measured.
- The horizontal line is measured. The length corresponds to the distance measured in the previous paragraph.
- Without leaving the line of the network center, the received data is put aside in both directions. As a result, the marked points will withstand the entire structure.
- The resulting center-to-center distance should be noted from the point of intersection of the horizontal line and the axial center down.
- After the horizontal line is drawn through the point. This is the center of the lower radiator compartment.
- Further, the distance to the right and left under the lower hooks is already noted. They already tightly fix the battery.
- The dowels are driven into the received points. Already in them brackets are fixed.
This method is relevant for a battery of different materials, but provided that there are no more than eleven sections. If the design is larger, it is worth adding the number of mounting components. Sometimes the availability of brackets is limited or they need to be purchased additionally.
How to fix non-separable batteries and start the system?
Most often, in such designs in the kit there are the necessary elements. In addition, there is a detailed arrangement of fasteners. The meaning is similar to the procedures performed and described above. The principle of mounting convectors and registers is comparable to the operation of the radiator circuit and the use of hooks. The number of these components is basically four. The number will change if there is a chance of non-standard fixation. When it’s clear how to hang the radiators, it’s time to connect them.
Before starting, it is worth checking all the connections. If necessary, use sealing means (for example, FUM tape). Today, plastic wiring is often used. It is recognized as reliable and cheap. But you need to have additional equipment. It:
- Device for soldering polypropylene pipes.
- Crimp device for fixing metal.
- Gloves for work.
- Thermostatic devices.
Before you go to buy all the components, it is worth deciding which pipes the work will go with. Need adapters, fittings, and other battery fixation elements. Once assembly is complete and reliability is verified, water can be started. After the entire perimeter is visible for leaks. Next is the heat supply process. This is a simple job, and if all the recommendations are followed, you can do it yourself.