On the eve of one of the most pleasant and joyful holidays - the New Year - it is customary to present loved ones and relatives with beautiful souvenirs.
In this article, we suggest that you learn how to sew the original
DIY horse craft. Such a gift will express all your love and give friends and family a piece of your warmth. On the eve of the New Year of 2014 (year of the Horse) this charming product will be a wonderful souvenir, Christmas-tree decoration or an original element of decor for your home. So, let's get to work.
Sew DIY "Horse" DIY
To do the work you will need the following materials:
- paper;
- fabric of 2 colors: plain red and with a fine pattern;
- scissors;
- threads
- pins
- cotton wool or holofiber for stuffing;
- buttons for the eyes, beads for decoration;
- braid for the manufacture of bridles and blankets;
- yarn for the tail.
If you want the DIY toy made by yourself to be perfect, you need to start by preparing the pattern: you need to draw the animal’s body on paper and carefully cut it out. The photo shows how our paper blank should look. Now we take the fabric, folded in two layers, with the front side inward, circle the pattern with soap and cut out the main shape of the horse’s body. It turns out two identical parts. After cutting the sides, you need to make a back. To do this, draw a piece of two legs and a part of the back (as shown in the photo) on paper and cut it out.
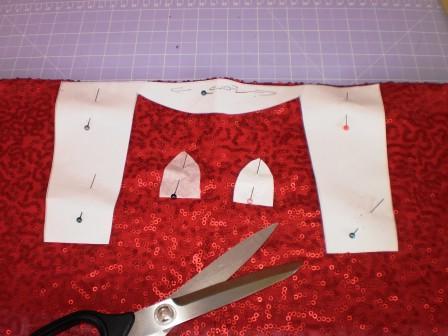
We place the resulting pattern on the fold of a contrasting fabric with a small pattern and circle it along the contour. As a result, you will have one more detail of the future toy. It remains to make the ears of contrasting material. After these operations you should have two main lateral parts of the horse’s body, one “abdomen” and two ears. Now, with the help of pins, we assemble all the details in a single design. Cut a long strip of fabric with a pattern and attach it with needles or pins to the two side parts of the horse.
Souvenir "Horse" - we make a toy with our own hands
After neatly fastening the parts, you can begin to stitch them. First, we sew the side and back of the horse, after which we sew the second part. After you have successfully stitched two parts of the body and the back, you need to separate your legs to the level of the abdomen, as shown in the photo. Sew the peritoneal part to other details.
Tip: you must leave a small hole so that you can turn the workpiece and stuff the toy with filler. Everything, DIY
"Horse", hand-sewn, is almost ready. It remains only to trim the excess thread and fix the seams. If you want your toy to be more durable, you can sew all the seams twice. We turn the blank and proceed to stuffing. First, we fill the horse’s head with holofiber, and then in turn all parts of the body. It is advisable to stuff the toy tightly so that it has a beautiful, voluminous appearance.
An amazing gift for the New Year is a horse. DIY decorate crafts
Now our horse has acquired an almost finished look, it remains to give it only a little realism and gloss. Prepare the ears: cut two triangles from the fabric, sew them together, bend to the right side. Make the second ear by analogy with the first. When both parts are ready, fill them with holofiber and fasten together and sew the horse onto the head. Tip: ears can be decorated with beads or sequins. Now make the horse the eyes of two small black buttons or beads. The tail of the animal can be formed from yarn for knitting, from it you can also tie a harness and an openwork ass. As you can see, it’s not so difficult to make a beautiful DIY “Horse” craft, and the creative process will bring you joy and pleasure! We hope you can make nice souvenirs and give them to your loved ones on New Year's Eve 2014.