The first shoes of a born baby are booties. These are short shoes knitted from soft yarn with ties that warm the baby's legs and keep the sliders from falling off. Of course, you can buy ready-made booties in the market or in the store. But it’s not always possible to get what you want. Knitting booties on their own with knitting needles is easy, even a novice master will cope. The main thing is to know the principle of a set of loops on knitting needles and be able to close them in the last row. For a simple option, such skills are enough. Experienced craftsmen are able to vary both the style of booties and their decoration.
Knitting booties with knitting needles according to the description and schemes is simple. Before starting work, you need to choose the right yarn and make the calculation of loops. The rest is a matter of technology. The finished product can be decorated with ribbons, bows or pompons. There are several simple knitting options using both two and four knitting needles. Beginners knitters are afraid to take up work, if to do it you need to distribute the loops over 4 knitting needles, but only the first few rows are hard to give, then it becomes much more convenient. But you don’t need to sew the booties parts together, the knitted product turns out to be solid and stronger.
In the article, we will consider how to knit booties with knitting needles with a description and work execution schemes. We’ll tell you how to choose the right thread for the smallest so that the yarn does not irritate the baby’s skin and does not soar the legs. We also teach novice masters to make the correct calculation of loops so that the knitted thing matches the size of the child’s foot. All the schemes and descriptions presented in the article for knitting booties with knitting needles are simple, the procedure does not take much time, so you can safely start working with us, you will definitely succeed. Let's start with an important stage of work - the right choice of yarn for knitting.
Yarn selection for babies
The choice of thread for knitting booties with knitting needles - according to the description and patterns went without them, it does not matter, is of great importance. After all, the baby will not be able to tell mom that the knitted product stabs him or rubs his leg, but simply cries. Mom will not understand the true cause of her child’s restless behavior and will be helpless to guess. The baby’s skin is very delicate and sensitive, so even through thin sliders the baby will feel discomfort.
Therefore, first of all, exclude the threads are spiky and hard. It is also not recommended to buy fleecy yarn. A small child can grab booties with his hands and tear out a mohair, bring it to his mouth or accidentally inhale microparticles with his nose. And the legs in such booties will be subject to constant irritation. It is better for the baby to choose yarn smooth and soft.
Since natural wool often causes allergic reactions in infants, it is best to take combination yarn or pure acrylic for knitting booties with knitting needles according to the description and patterns. In the warm season, craftsmen choose cotton. If you use the rest of the yarn available in the house, then check the quality of the threads yourself. Just squeeze a ball of yarn in your hands and run it over the delicate skin on your lips. If you do not feel discomfort, then the baby will be comfortable.
How to calculate loops
Before starting to knit any thing, the master must necessarily calculate the number of loops needed for knitting. When you have already decided on the yarn, make a sample. It is enough to tie a small square of the canvas. Usually gain 20 loops plus 2 hem. Knit 10 cm and close the loops.
Since the yarn has elasticity, it is recommended to iron the sample through a damp cloth before calculating the required number of loops. Then take a ruler and measure the length of the sample. It turned out, for example, 10 cm. The loops in it are 20 (edge ones are not taken into account). 20 loops: 10 cm = 2 loops of 1 cm. Now you can make an accurate calculation of loops for knitting booties with knitting needles according to the schemes and description. Consider the simplest way to do the job.
Knitting according to the pattern
The photo below shows a simple version of baby booties. The diagram is the letter "T" and it is designed for the length of the baby's legs, equal to 8 cm. This is the average indicator of the baby after birth. The width of the foot is 4 cm. The upper part of the pattern is 20 cm, which will allow you to wrap the foot on both sides towards each other.
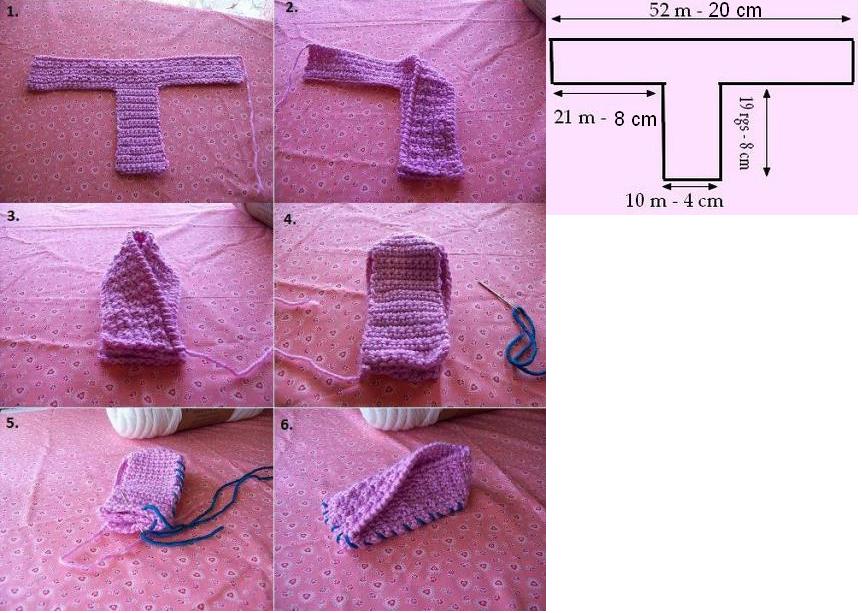
The scheme of knitting booties with knitting needles with a description will help you get the job done quickly. After you have learned from the sample how many loops of this yarn are included in 1 cm of the fabric, calculate their number for 20 cm, add 2 hem and draw loops on two knitting needles. Tie a knot at the end and gently pull out one knitting needle. Next, the height of the booties is knitted with the selected pattern, in our version it is 4 cm. To find out the number of rows that need to be knitted to achieve such a height, refer to the sample again. They only measure its height and the number of rows in each centimeter with a ruler.
When the height of the product has reached the desired size, you need to leave only the loops in the middle of a width of 4 cm. Knowing how many loops are required by the calculation results, count the excess on one side and the other. In order not to be mistaken, you can tie in the right places pieces of thread of a contrasting color between the loops, thus putting bright marks.
First, the loops are closed on one side of the pattern, then the row is knitted to the end, the knitting is turned over and on the wrong side they close the extra loops from the other side. All that remains is the central ones needed for further knitting of the booties with knitting needles. We figured out the description and schemes. Now consider how to stitch a pattern to complete the job.
Stitching Edges
To connect the details of the pattern, the workpiece must be turned upside down. The main or contrasting color of the thread is inserted into the eye of the gypsy needle (if you know how to use the hook, then this work can also be done with it). Stitching is carried out through each side loop of one and the other side.
On the toe of each boot, the short sides are superimposed one on top of the other and three fabrics are sewn together at once. When everything is firmly connected and knotted at the end, booties are turned on the front side. It remains to try on a new thing to the baby. If the knitted product falls from the thin legs of the child, do not worry, you need to additionally make a couple of stitches on the smell. You can sew a beautiful button at the seam or tie a bow.
Marshmallow booties
These are simple and easy to make booties with knitting needles for beginners. The diagram and description will help to connect the product without errors. The photo below shows that the marshmallows pattern consists of a scarf and 2x2 gum, where the front loops alternate with the wrong ones. The front part of the booties is tied with an elastic band.
On the sides there is a wide part, which subsequently folds in half. It turns out booties with lapels. After calculating the loops for one and the other knit, type the resulting total number of loops and knit such a pattern as in the photo below.
Often, for knitting such baby booties with knitting needles (the diagram and description see above), threads of different colors are used, highlighting strips of elastic or a lapel.
How to sew a blank
When the booties are tied, it remains only to stitch the workpiece correctly. The front part, made of elastic, is pulled together with stitches from above, picking up the canvas with folds. The wide part, knitted with a garter stitch, is lifted up and sewn along the edges with the front.
This can be done with a crochet or gypsy needle by threading the main thread in the eye. In the center of the booties, you can strengthen the decorative element - a pompom, bow, button or separately crocheted flower. In the photo above, in addition to a small flower, a thin bow from a nylon ribbon is sewn and a bead is inserted. The product looks beautiful, but it is important to remember that children have very tenacious fingers that can tear off not only a bow, but also a bead that is dangerous for a baby. Therefore, do not overdo it with jewelry, be safe and do not use small items. If you still want to add beauty, then sew the entire decor firmly.
The scheme and description of knitted booties on the insole
The next option for knitting booties consists of three stages. First, the insole is knitted, then the front part with a 2x2 elastic band and the heel area. A drawing of knitting insoles can be viewed below in the photograph. Since it is knitted with a garter stitch, then all the loops are facial. Each cell of the pattern corresponds to one loop or row. To increase the fabric make yarn after knitting the edge loops in these places. They are marked with a tick. If you need to make a decrease in the number, then knit two loops together.
When all rows according to the scheme are completed, the loops are closed and knotted at the end of the knot. Further work is shown in a step-by-step photo. Knitting booties with knitting needles according to the scheme with the description is easy, just carefully follow the instructions.
Next work steps
When the insole is ready, then around the toe, make a set of loops from the side surface and knit with an elastic band 2x2 about 6 cm of lifting the foot. The next step is to collect the remaining insole loops on an additional knitting needle and knit the height of the booties until they are connected to the front.
On this, knitting booties on 2 knitting needles, the diagram and description of which are presented above in the article, ends, the fabric is translated into 4 knitting needles and then the product is knitted in a circular fashion to the selected height. You can make it elongated and then roll it up. If you do not know how to knit or it is inconvenient for you, you can perform the parts separately, and then sew with threads using a hook or needle.
One-piece knitting option
It is much easier for novice masters to work on schemes and descriptions. Knitting needles for boys and girls knit in different colors. Green, blue, blue or yellow colors are suitable for babies, and pink, red, lilac or raspberry are suitable for babies, although they often choose colors according to other clothes. The following photo shows the shape of the workpiece for subsequent stitching crafts.
She recalls the inverted letter "T", where the long part falls on the foot of the child, and the short part wraps around the ankle. At the junction, small holes are clearly visible. They are necessary for pulling the rope to tie booties on the bow.
We knit booties with needles according to the scheme
A description of the execution of work is similar to previously performed booties. After measuring the size of your child’s foot, double it and calculate the required number of loops for the set, plus two edge loops. The long part is knitted to a height of 4-5 cm, then the loops on one side and the other are closed by the method already known. We will not repeat ourselves, since the implementation of such work is described in detail earlier in the article.
A narrow part of the workpiece is knitted of any height, because booties can be both short and high, like boots. The holes for the rope are placed at an equal distance, for example, every 4 knitted loops. They are made by passing the needle through 2 loops immediately, knitting them together on the front side of the craft. In the next, wrong row, it is necessary to restore the original number of loops. This is done by wrapping an air loop over each hole.
Further knitting continues until the fabric is raised to the planned height. In the last row, the loops close. To booties freely worn, do it without tension. At the end, the blank on the wrong side is folded in half and sewn along the bottom and back. There is an upper hole for putting on booties on the baby's legs. A tape or a pigtail connected from the main thread of the yarn is successively pulled into the holes. At the ends, you can make brushes or attach separately made pompons.
Beautiful booties on two or four knitting needles
If you are already an experienced master, you can easily find simple models of baby booties, you can try to make a more complex version of knitting. Depending on the desire, such products can be knitted on both two and four knitting needles. In the latter case, the craft will be seamless, and in the case of using two knitting needles, you will need to use a needle or crochet to make a seam along the lower part of the foot and on the back of the booties.
Start knitting from the bottom. After measuring the length of the child’s foot from the heel to the tip of the thumb, calculate the number of loops from the previously connected sample. Then double their number, add edging and dial the resulting number of loops on the knitting needles. The height of the garter stitch is measured with a flexible meter from the middle of the foot to the outside, for example, 2 or 3 cm. Add the same amount to raise the height of the sole up. Next, you need to calculate the middle of the canvas and put a mark, tying a red thread in the center between the loops. From this point, count an equal number of loops in one and the other direction. Work to be done on tying the leg lift. For example, 8-10 loops will remain. Then only they are knitted, the rest of the loops remain intact. So that the front part is connected to the sidewalls, in each row the first and last loop of the middle is knitted together with one loop taken from the side. The result is a smooth bend of booties.
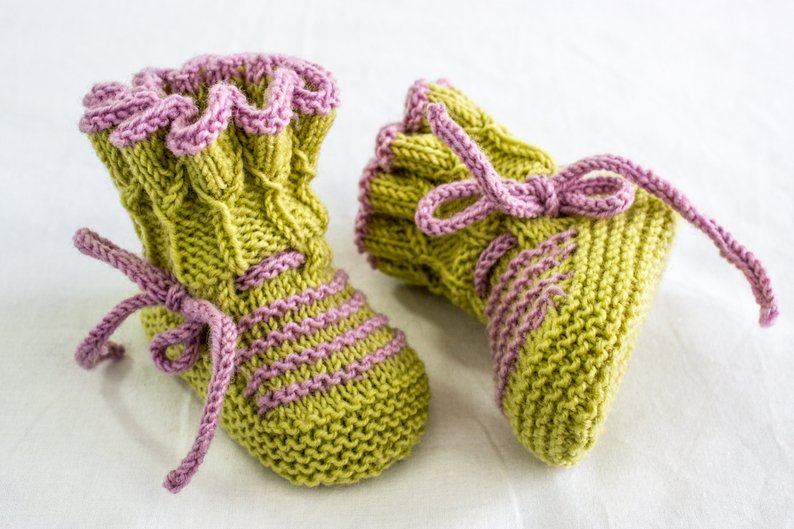
When the rise of the foot is tied to the ankle, knitting continues with all the loops. You can make the height of the booties with a rubber band 1x1 or 2x2, any other pattern, for example, "pigtails" or "toffee". The top of tall products can be made even or slightly expanded upwards by adding a few loops.
The photo above shows a sample of such booties. Please note that the front part is knitted from yarn of different colors. At the connection level of the lower part of booties and bootlegs, holes for a decorative lace are left. They can be made by knitting two loops in the same row, returning to the previous number inside out by adding crochets or air loops.
Now you know how to knit booties on two knitting needles. Schemes and a description of the work will help to do everything quickly and easily.
Dressing bootees
Finished products can be decorated in a variety of ways. You can sew the upper edge with a lace pattern using a hook. Booties with buttons or bows on the sides look interesting. They can be matched to the tone of the main yarn or found contrasting to highlight the decor visually.
The method of manufacturing booties with knitting needles according to the schemes and description for boys and for girls is almost the same. The smallest try to tie ruffles and lace inserts. However, even on the booties, you can add elements corresponding to the floor. So, on products for girls, you can attach flowers or butterflies. The boys pick up plastic cars and sew them securely on the sides.
You can also show the accessories of the booties for boys or girls with the color of yarn and the pattern of booties. If the first one knits the products, mainly with a handkerchief and elastic, then for girls a beautiful ornate pattern is selected.
Before you start, be sure to think through everything to the smallest detail - the color and quality of yarn, style, select the right knitting needles and pattern, as well as decorative details.