Many amateur craftsmen, having a country or personal plot, try to embellish it in every possible way with crafts for the garden. Any materials at hand are used: worn tires from old wheels, empty plastic bottles and cans, polystyrene and cuts from sawn trees, hemp and construction waste.
A variety of garden figures and flower beds, garden decor items and weathercocks are made, beautiful patterned paths and steps, vases and parapets are created. Craftsmen fantasize not only for decorating the house, but also for the vegetable garden, garden and courtyard. The use of waste material can significantly save money, bring a new life into absolutely unnecessary things that others can even throw away. In the article, we will consider some interesting examples of DIY crafts for the kitchen garden.
Decorative well
From used tires from the wheels of the car, you can build an object of garden interior - a well, acting as a flower bed. You can place it in the yard, near the entrance to the house or in the front garden in front of the building. The well consists of three tires and construction waste - wooden planks and a piece of slate. After the materials are prepared, we begin work on the well. To do this, you first need to find out the height of the three wheels stacked on top of each other, add the height of the side rails and add another half meter in order to dig a part of the structure into the ground.
Then the well will hold firmly in one place and not move. Then you need to draw on the tires the contours of the end of the wooden sticks. Mark them at an equal distance opposite each other.
Work on the flowerbed
Then, with a sharp knife, you need to make 6 holes in the tires so that the sticks pass through all three wheels. This is necessary so that the wooden bars are kept in a level vertical position. When the holes are cut out, you can start painting the wheels. Here you already need to show imagination and creativity. You can draw a brickwork, as in the photo above, or you can just depict flowers or multi-colored stripes.
From the bars, a figure is twisted onto the screws in shape resembling the letter “P”, on which a piece of slate is attached in an oblique manner. The wooden support is inserted into the holes in the wheels. Such an article for the garden and the garden turns out to be tough and durable. The edges of the support are inserted into pits dug in advance and filled with earth, if desired, they can be cemented with a solution. A bowl of earth is inserted into the upper wheel, and flowers are planted. You can also hang a pot of climbing plants on the center plank.
Flowerbed "Frog"
As a craft from the wheels for the garden, you can create a flowerbed that resembles a frog figure. It will take 5 wheels - 3 pieces large for the body, 2 small - for the eyes, a wire for the hands and a piece of plastic or rubber, from which the legs will be cut out on the screen.
To keep the wheels together, they are twisted with bolts. Circles cut from waterproof plywood are attached to small tires on the front side. Wires acting as arms and legs are tied to the inside of the tires. First you need to draw palms on cardboard, then transfer the contours to the selected material and cut 4 pieces. It remains to assemble all the parts together and paint all the elements with paint, painting small details: mouth, eyes, cilia.
When the crafts for the garden are collected and painted, you can fill the voids of the wheels with earth, where flowers will later be planted.
What can be made of plastic caps?
If desired, you can collect a huge number of multi-colored plastic bottle caps. This is simply an indispensable and cheap material from which you can make the most useful DIY crafts for the garden, for example, to sew a flowerpot or garbage container, cover with a pattern folded from different color covers, a countertop, make an inscription on the yard gate with a plot number . And what a comfortable rug for a shower! On the wall of the room or summer kitchen, you can decorate the panel by nailing the covers to the plywood base.
To prevent insects from flying into the house, some craftsmen collect vertical curtains from the lids on the front door. The only difficulty in working with covers is to collect the right amount and choose the right colors. But this issue can also be solved by entrusting the collection to children, acquaintances and friends. Having shared your venture with loved ones, hope for help in collecting the necessary material.
Garden path made of covers
The most time-consuming and beautiful craft for the garden with your own hands can be a garden path with a beautiful ornament made of plastic covers. In order for it to be solid and durable, you need to seriously approach the work on the mall. After the necessary amount of material is collected and the pattern is invented, you need to make a base. First, the topsoil is removed. To do this, dig a trench up to 10 cm deep.

Wooden pegs are driven along its edges, and the formwork is put. Then a layer of crushed stone or broken brick is laid at the bottom of the trench, which will fulfill the function of drainage. Next, the cement mortar is mixed in the following proportion: 4 parts - cement, 1 part - sand, 1 part - glue. All this is poured onto the gravel. Until the solution has set, you need to place the covers in the correct order, creating a pattern. For this to happen at a fast pace, lids of different colors are distributed in advance on separate containers. If the drawing is complex, then the solution does not cover the entire surface, but perform the drawing in parts.
Another track option
There is another option for crafts for the garden and the kitchen garden from improvised materials - this is a path made of wood cuts. It is possible to prepare small logs after cutting trees or when buying firewood for the winter. Their length should be the same, about 10-20 cm. As in the previous version of the track, you need to make a trench, only already deeper. First, the soil of the required depth is removed, then the curbs are laid out, and sand is poured. The track itself is tamped and lined with geotextiles, a PET film is also suitable.
This is done with a protective purpose to protect the structure from the germination of grass, weeds and subsidence. Then drainage is laid - gravel, crushed stone, broken brick to a height of 5-10 cm. You can add a little sand. Then the drainage is carefully rammed with a roller or manual tamper. Next is the work on the saw cuts. They need to be sanded with staple, cut into equal blocks, treated with antiseptic solution from insects.
You can use a solution of copper sulfate 10-20% or drying oil (development of machine oil). The logs should dry well in a shaded area. When everything dries, a waterproofing layer is applied using bitumen briquettes. Only then do paving begin. A rubber or wooden mallet is used to press churbaks into the sand. Gaps are covered with sand or gravel screenings. Ground cover plants or moss can then be planted. The edges of the tracks are either framed by curbs or sprinkled with gravel.
Vane
Crafts from plastic bottles for the garden can be different, from animal figures to flower vases. Now we will introduce the reader to the manufacture of a weather vane from a two-liter capacity. You can take transparent, as in the photo, or you can color. We will install the spinner vertically; when the wind blows, it will begin to spin around its axis, like a bump. First, the plastic bottle must be marked on long strips extending vertically from top to bottom. The width of the strips should be 10-15 mm. Exactly in the middle, the container is cut in half.
Then the strips are bent at an angle: the lower part is in one direction, and the upper part is in the opposite. For gluing use a glue gun or a simple stapler with staples. A hole is made in the bottom and in the lid with the help of a metal needle heated on fire or with a sharp awl. Later it will be necessary to insert a rod into it, on which the craft from a plastic bottle for the garden will spin in the wind.
The only requirement for the rod is that there should be a thread on which the weather vane will be pressed with nuts. It should be slightly flattened so that the corners peek out from behind the “body” of the bottle. The shape of the design resembles a children's toy yule. You can create another rod in another way. For example, make it short and, having flattened the bottle, fix its edges with a stick inserted into the drilled holes at the ends of the rod. You need to hang the weather vane in an open place so that nothing prevents the bottle from spinning. You can decorate the strips with multi-colored tape by gluing it with strips around the circumference of the lower part of the container.
Mushrooms
Polystyrene crafts for the garden and kitchen garden look beautiful. With the help of this budget and lightweight material, any figures of animals, magic gnomes, birds, insects are created. Now we will tell you how to make foam mushrooms mushrooms, which will decorate the interior of a country estate. They can be placed next to the tracks in the garden. They are cut with a sharp knife from a large piece of polystyrene, which remains from the packaging of the refrigerator or other equipment. Since this material easily connects with others, cut mushrooms can be glued to a small area of concrete.
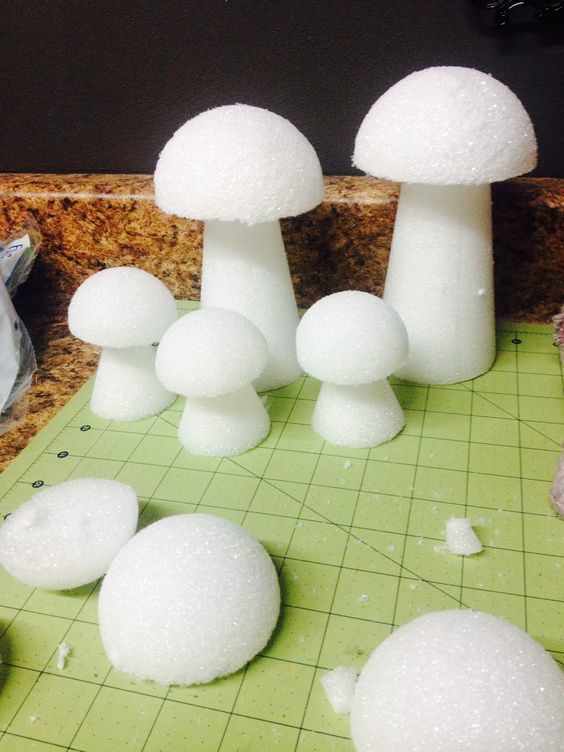
Foam garden figures after manufacturing require additional processing. You will need glue, liquid nails, gypsum putty, acrylic paints. The blank after cutting along the drawn contour must be glued together. The mushroom cap is attached to the leg with the help of facade frost-resistant glue, silicone sealant can be used. Then the surface of the mushroom is leveled with gypsum putty. It remains only to paint it and after drying cover it with acrylic varnish.
Hemp steam engine
If after cutting down the tree you still have large logs, then you can use the saw and ax to cut out a spectacular craft for the garden and the garden with your own hands. Such a locomotive, as in the photo below, perfectly fulfills the role of a flowerbed for flowers, and if you have children at home, you can adapt this design for games.
The wheels of the engine are made from thinner saw cuts, and the wagons are made from thick logs. If you have a chainsaw in the household, then it will be convenient for you to cut the grooves with it. The roof rests on 4 pillars. It can also be made from moisture-proof plywood.
Birdhouse Birdhouse
Another interesting type of crafts for the garden - from traffic jams. Birds will be delighted with such a warm and cozy house. After all, the cork perfectly holds heat. This is a natural material. Parts are fastened easily with a glue gun or by threading a wire. The only problem in the manufacture of such crafts is the collection of material.
But if you set a goal and come up with a container where to store wine corks after each walk , then by the end of a year or two years you can pick up a bird feeder.
Conclusion
The presented samples only in general details characterize garden decor items. From each material, you can come up with a variety of interesting and original design elements. It is enough to dream up a little and want to do something with your own hands.