A generator is a kind of power plant that provides energy to all engine systems: power, cooling, ignition, so failure of it will inevitably lead to other malfunctions. In order to prevent breakage, it is necessary to systematically diagnose it, and if it was not possible to avoid malfunctions, immediately repair it.
In this article, we will talk about how to check the generator for operability without resorting to the help of specialists. But first, let's look at the symptoms of its possible malfunctions.
The main symptoms of a generator malfunction
The following signs suggest that the generator is out of order, or there are malfunctions in its operation:
- constant burning of the signal lamp in the form of a red battery on the dashboard, which indicates that the generator does not charge, or produces a current of insufficient magnitude;
- continuously discharged battery;
- interruptions in the operation of electrical equipment (lighting and signaling, multimedia, heating and ventilation units) when the engine is running;
- the appearance in the cabin (engine compartment) of a characteristic burnt smell;
- excessive heating of the generator stator;
- hum (rustling, whistling) of the generator.
The appearance of such signs is a serious reason for conducting a diagnosis. To do this, it is not at all necessary to contact a service station, since it is quite possible to check the generator for operability on your own, especially if you have at least the slightest skills in handling a car tester. But first, let's talk about the main breakdowns.
Major faults
The generator may have malfunctions of both mechanical and electrical nature. These include:
- failure of the voltage regulator;
- malfunction of the diode bridge (rectifier block);
- short circuit of a rotor field winding;
- shorting of stator windings;
- brush wear;
- bearing wear.
Next, we will talk about how to check the generator for working independently, based on the symptoms present and possible malfunctions.
Voltage Regulator Test
The regulator is designed to stabilize the generated voltage before applying to the on-board circuit of the car, including the battery for recharging it. It is possible to determine its serviceability independently by checking the charging of the generator, or rather, the amount of voltage supplied by it to the battery terminals. Depending on the make and model of the machine, it can range from 13.5 to 15.5 V. Therefore, before you check the generator for proper operation of the regulator, you need to know exactly what voltage it should produce. This information can be found in the vehicle manual.
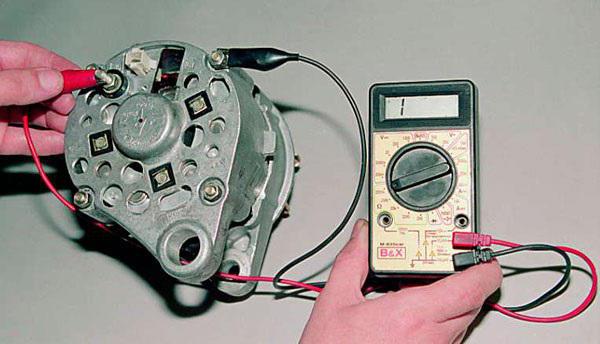
How to check the generator with a multimeter? To do this, switch the device to voltmeter mode and, observing the polarity, connect its probes to the battery terminals with the engine off. A voltage is considered normal within 12-12.8 V. Next, start the motor and repeat the procedure. The voltage at the battery terminals should increase to 13.5-15.5 V. Only in this case can the regulator be considered operational. An increase or decrease in the voltage value, on the contrary, indicates that it is faulty.
How to check the diode bridge of the generator without removing it from the car
The diode bridge plays the role of a kind of rectifier, converting the alternating current generated by the generator into direct current. Usually it consists of six semiconductor diodes, and three of them are “positive”, the other three are “negative”, that is, the first pass current in one direction, the second in the other. The rectifier can be checked both with the generator removed and without dismantling it. Consider both options.
Before checking the diode bridge of the generator without removing it, it is necessary to disconnect all wires from it and from the voltage regulator, having previously disconnected the ground terminal from the battery. First, check the rectifier for a short circuit. We turn on the multimeter in ohmmeter mode, connect the positive (red) probe to the “30” terminal of the generator (positive contact of the bridge), and the negative one to the generator housing. With a working rectifier, the readings of the device will tend to infinity. If the resistance is several ohms, the rectifier is faulty.
Now let's talk about how to check the diode bridge of the generator for a breakdown. Let's start with the positive diodes. Again we connect the positive probe to the corresponding bridge pin (terminal “30”), and the negative probe to the rectifier bolts (brackets). Resistance should also tend to infinity. Otherwise, one or more diodes are broken.
We turn to the "negative" semiconductors. We connect the red probe of the tester to the bolts of the rectifier, the black to the case of the generator. Endless resistance is a sure sign that the diodes are intact.
Check the rotor winding
A common malfunction in an automobile generator is a winding short circuit. This can happen as a result of a sharp power surge, water ingress, brush wear, etc. Since it is possible to check the generator with a multimeter for the integrity of its windings, only having full access to them will require the dismantling of the entire assembly. We will not describe this process, since it differs for different cars. Before checking the removed generator for operability of the rotor winding, it is naturally necessary to disassemble it.
After removing the rotor, we find contact rings on its shaft. There are only two of them. Turning on the multimeter in ohmmeter mode, connect its probes to these rings. The device should give a resistance within 2-5 ohms. These are normal values for a working rotor. Higher resistance indicates poor contact between the rings. In the opposite case, when the readings are close to zero, most likely there is an interturn circuit.
How to check the generator for operability of stator windings
We pass to the stator. It has several windings, each of which must be checked separately. But before that, it is necessary to disconnect the wires connecting the terminals of the windings and the diode bridge.
The probes of the multimeter, turned on in the ohmmeter mode, are alternately connected to the terminals of each of the windings. The working winding should have a resistance of about 0.2 ohms.
Next, you need to measure the resistance between the common output (zero) of the stator and the output of any of the windings. It should be at least 0.3 ohms.
Generator Brush Wear
If the generator has been dismantled and disassembled, it does not hurt to check the condition of the brushes. They may fail due to prolonged use, or as a result of problems caused by the skew of the rotor shaft. If the brushes have traces of great wear and tear, their geometric shape is broken, they must be replaced.
Generator Bearing Wear
The car generator has two bearings. One of them is mounted on the rotor shaft, the second is pressed into the central part of the cover. A hum, a whistle coming from the generator while the engine is running, is a sure sign that some of the bearings ordered a long life. A concomitant symptom may be heating the generator housing. Having found these symptoms, hurry to replace bearings. Otherwise, this will lead to a skew of the rotor shaft or its jamming with all the ensuing consequences.
You can check the bearings by removing the alternator belt and manually turning its shaft. If the rotor rotates easily, without jerking and play, the bearings will still serve. If rotation is difficult or the shaft has play, do not pull with bearing replacement.