Decoupage is the decoration of objects with paper material by gluing and subsequent fastening. It is used on various surfaces: wooden, plastic, metal, glass, paper, as well as having different shapes. It can be like flat objects, for example, a board, a countertop, a stool, a cabinet facade or a casket, or voluminous.
Particularly popular are flower pots, bottles, decanters and glasses. Decoupage of volumetric products is more complicated, requires not only an understanding of the process in theory, but also the experience of its repeated use in practice. The main problems when working in this technique are the fragility of materials, the formation of bubbles and wrinkles, and poor adhesion to the surface. To avoid this, it is necessary to strictly follow each step of the glass decoupage workshop.
Materials
So, before you start work, you must first prepare everything you need. To turn a simple object into a work of art, you will need:
- Wineglass. You can use any wine glass, regardless of its shape and color of the glass. The main thing is that it is smooth.
- Paper. These can be special decoupage sheets on paper or rice basis. The latter variety is quite expensive, but durable and stretches well, which makes it easier to glue it on the surface of complex geometric shapes than other types. However, the most common material is paper three-layer napkins with a pattern. This is a fairly easily accessible and budget material with a large selection of drawings. The only minus is that this paper is very fragile, the workpiece may be deformed from excess water or improper brush movement. You can also use newspaper clippings, matte photos printed on office paper. However, such materials are quite thick, so it is difficult to use them for decoupage glasses.
- Glue. It is better to use a professional composition, it has an optimal consistency, does not contain excess moisture that violates the integrity of the paper, when dried it becomes completely transparent, does not change color over time, does not have a sharp odor, dries quickly enough, but not so much that it was not possible to adjust the location item in the process. However, its cost is higher than that of simple clerical glue, so PVA, slightly diluted with water, is most often used.
- Lacquer. To fix the product must be covered with acrylic varnish. Aerosols are best used.
- Primer. It is necessary for better adhesion of paper to glass. Instead, you can also use varnish, applied in 1 layer. You can only glue the pattern after it has completely dried.
- Acrylic paints. They can be used to correct the application, decorate the edges or paint over the joints, if the overall picture consists of several small details.
Instruments
In addition to the materials listed above, for decoupage glass glasses you will need:
- Brushes: flat, with artificial pile - for applying glue, thin round ones - for painting, round thick ones - for joints.
- Foam sponges. Convenient for applying soil, varnish, final leveling of paper and cleaning excess water.
- Scissors. It is convenient to use manicure or medical tools.
- Multifora (file).
After all the materials and tools have been prepared, you can begin to work.
Step one
First, the base must be degreased with an alcohol-containing liquid, and then proceed to priming.
There are 4 types of glasses decoration:
- Solid. Implies coating with an image of the entire surface of the product. In this case, at first it is completely covered with a primer or varnish. Then it is painted in white or in tone of the background of the napkin.
- Partial on the general. The entire area is primed, everything is painted, except for the reserve drawing zone. This is done so that on the entire surface of the finished product there is the same number of layers of paint. In this case, the background tint will be the same everywhere. Otherwise, layers overlap in the drawing area and the color is more saturated.
- Partial on a selective background. In this case, not the entire glass is primed and painted, but the part that is provided for by the sketch. Parts of the product remain transparent.
- Partial on a transparent background. Here, only the place where the drawing will be located is primed and painted in white.
Second step
Work begins with paper. Selected images must be separated from the base. They can be cut out - the method is suitable for large drawings or for decor on a transparent background, or cut off with your hands. In this case, it is easier to combine the pieces into a single composition. The technique is suitable for composite drawings, continuous coating or partial against the general background.
When working with napkins, only the top layer is used, the bottom two can be used as a background or for training.
Step three
The most important part is the decoupage of the glass itself. For processing wine glasses, 3 methods are used:
- A drawing is applied to a dry surface, after which glue is applied in small portions with a flat brush on top of it. Movement - from the center to the edges in a circle. In this method, it is important to remember that when wet, the paper stretches, respectively, its size will increase. This method is convenient in that in this case almost no bubbles form, but it is necessary to clearly control the amount of glue and the force of pressing the brush.
- The surface is treated with glue. The paper, located downward with a pattern on a piece of a multifora (file), is sprayed with water, then applied to a glass on top of the glue. To make it more convenient, the image does not immediately detach from the substrate. It must be bent in an arc, leaned against the product, and then gradually applied from the center to the edges, smoothing through the file.
- A dry pattern is superimposed on a wet surface, only its center is fixed. Next, you need to wet it with a brush, spreading it over the product. Since the center will stretch, wrinkles will form which can be removed by lifting the paper by the dry edges. After the drawing is located on the surface, gently apply glue on top.
When all the elements are attached, the product must be dried. This will take 10-12 hours at room temperature.
Fourth step
The next step in the decoupage of glasses is to eliminate the shortcomings. First you need to lightly walk along the outline of the picture with fine sandpaper to remove the protruding parts. In the same way, you can get rid of a small crease.
After that proceed to decorating. The joints between the elements and the paper with the background mask with acrylic paints. It must be remembered that when it dries, it darkens. In addition, you can circle the outline of the picture, for example, if it is made in the form of a medallion or you need to highlight it more. After all the touches are finished, it is necessary to let the product dry again.
Fifth step
And the final stage is varnishing. It is necessary to act extremely carefully so as not to deform the product, since both ink and paper are still easy to spoil. Varnish must be applied in 2-3 layers with an interval of 2 hours. This decoupage of glasses is over.
Useful Tips
As with any other needlework technique, there are some tricks here. To successfully complete the work, the following nuances must be taken into account:
- It is better to iron the napkins before use in order to remove unnecessary creases.
- If the paper is wetted and dried before processing, it will not change its size when wet. At the same time, it will become less comfortable to work on surfaces of complex shape (for example, the side of a cognac glass).
- Before gluing, the paper can be varnished, partially dried, and then attached to the product. In this case, the risk of tearing the pattern when smoothing on the surface is reduced.
- Glasses made of colored glass can also be decorated; here, the partial coating technique is suitable. Moreover, you can use not only paper, but also decorative foil or gold leaf.
- If the decoration of the glass is required only for one event, it is enough to cover the product with only 1 layer of varnish, and after the celebration, remove the decoration with a solvent.
- With glasses on a high leg, you can decorate not the side surface, but the base itself. In this case, varnish is used instead of the primer, and the paper is glued with a pattern to the glass.
- The hairdryer cannot be used for drying, this leads to deformation of the paper and the appearance of cracks. The same result is obtained if the paper or ink is not completely dry.
- So that the glasses can be used, it is necessary to let them stand for about two weeks.
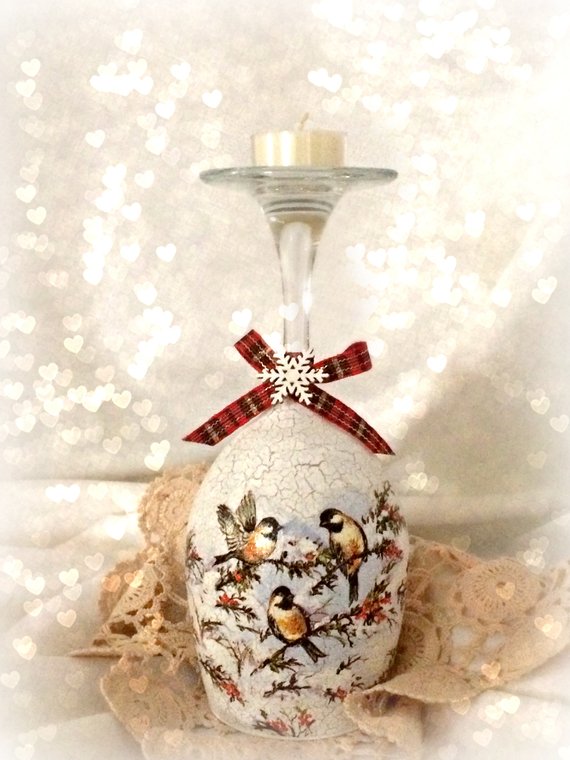
DIY do-it-yourself utensils will be a wonderful gift for a wedding, anniversary or New Year celebration. The decoupage of glasses, despite the many nuances, is a little more complicated than decorating other surfaces. However, this particular item is often used during the holidays and will remind of the donor for many years to come.