If you have a lot of free time available, you can decently save and build a fur coat pattern from natural fur yourself. If it will be difficult for you, there is another option - buy a fur and find a tailor whose cost of services will be much less than the cost of a finished coat. To be competent in the matter and successfully cooperate with the tailor, we will begin to study this issue.
What you need to pay attention to
When patterning fur coats from natural fur, pay attention to the following:
- The length of a straight coat is the distance from the shoulder to the knee, and the short one is from shoulder to waist plus 10 cm.
- For a fur coat size from 42 to 48 sizes, a fur cloth of 150 cm is required, for 50 and more it is recommended to take the cloth in two lengths.
- If you plan to sew a fur coat with a hood, feel free to add 80 cm to the canvas, with a stand-up collar - 50 cm.
- No extra length is allocated to the pockets; they are usually made from the pieces remaining after the pattern.
- Allocate 10 cm to the seams and allowances.
Search for a template and take measurements
The first step is to build a pattern of fur coats from natural fur. Or search for a template for patterns in open sources, for example, in fashion magazines. So that the pattern of a fur coat made of natural fur is successful, and the product fits well, focus on your outer clothing, for example, a jacket or coat.
To make the future fur coat fit your physique, find out the following parameters:
- chest height;
- waist and chest
- shoulder and back length.
There, where you got the pattern, there will be a table - choose the appropriate size. To cut all parts evenly, transfer them to paper. When you start cutting, do not forget to mark the places where later joining and grinding will take place.
Skinning
This is perhaps the most important stage in the pattern of fur coats from natural fur. Its further quality directly depends on the preparation of materials. Be as careful as possible.
Cut the skin with a furrier knife. Try not to damage the pile. Gently get rid of everything superfluous: head, paws and tail. Then, the defective sections of the mezra and pile are eliminated. Two to four centimeters are left in place of the bends for stock.
The skins are laid down for about an hour. Before that, they are carefully moistened, so that water does not fall on the fur. Further, they are turned over, stretched on a plane, and the edges are fixed with thin nails or stapler brackets.
After drying the skins, they are put on a pattern. All villi should be directed in one direction, and fur shades should be combined with each other. The skins are pricked, and then the excess is cut off from the skin.
Sewing
The plates are connected using threads with a seam called “zigzag”. Its peculiarity is that its execution occurs from right to left. At the beginning of the connection, several stitches are made. Subsequent punctures are made after 2-3 mm. Do not forget about the pile. When it falls under the threads, the furriers do not sew further; they straighten the pile with a needle.
The stitched product is straightened and the seams are smoothed out on it. Then there is a recheck. The product is again sent to the pattern, fur excess is removed.
Next, grind the sides and shoulder seams. After they sew a lining.
Fur coat goes to try on to clarify the size. Excess fur is cut off, the bottom of the fur coat is cut off. The lining is sewn and hooks are set.
If you are not afraid of such painstaking work, proceed to the next point in the pattern of a fur coat from natural fur. This is a hood or collar.
Pattern of fur coats from natural fur with a hood
Hooded clothing appeared before humanity realized that clothing could be used as a social marker of success. Fashion was not in sight. Tailors with the ability to sew clothes with a hood were valuable, because both the poor and noble people loved to hide their faces. The hood hid his face and warmed.
To stitch a suitable hood, follow the instructions:
- Measure your head circumference and the distance from the top of the head to the middle of the shoulders.
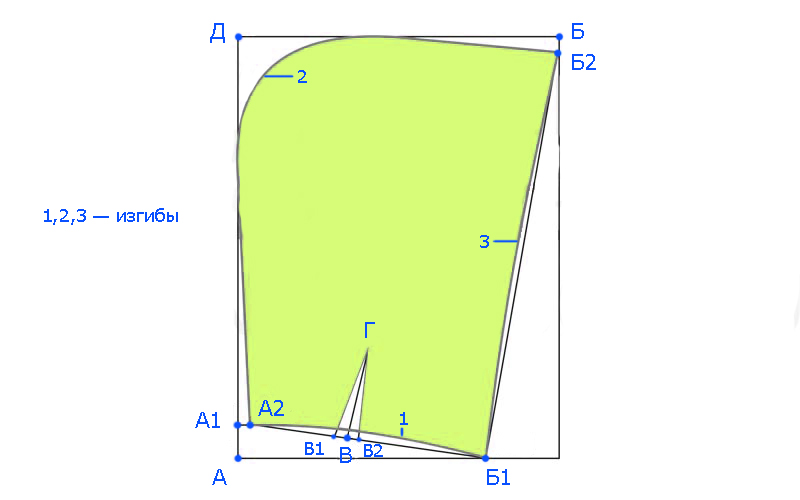
- Put point A. in the lower left corner.
- At an angle of 90 °, draw a line up from the point and set point A1 at a distance of 4 cm from the starting point.
- Perpendicular to point A1, retreat 1 cm to the right. Mark point A2.
- Measure and fold the length of the neck of the back and the shelves according to the pattern of the fur coat. Add to this a value of 3 cm. Set aside the obtained distance from point A. Received point B1.
- Combine A2 and B1. On this segment, put point B. It should be from A2 at a distance equal to the neckline length + 1.5 cm. Perpendicular to A2B1, draw a length of 10 cm from point B. This will be the length of the tuck - point G.
- From point B to the left and right, set aside 1.5 cm. These will be points B1 and B2, respectively. Connect the dots as follows: B1-G and B2-G. For section A2B1, select the appropriate bend.
- Assign the edge of the hood. From point A1 up, draw a line. Mark on it the point D at a distance from A1 equal to the height of the head (from clause 2) + 3-5 cm at your discretion.
- Now the width of the hood. Divide the head circumference by 3 and add 4–9 cm. Set aside this distance from D and put point B.
- From point B, back down 1-2 cm - this will be point B2. Use it to sweep the top edge of the hood. Combine B1 and B2. Round off the line to add elegance.
Stand-up collar, pattern of fur coats from natural fur
If the pattern of the hood seemed too complicated, try a stand-up collar. Even a novice will do just fine with this item. Let’s take a look at the classic version, and then where the fantasy takes you:
- Find out the length of the neck of a fur coat.
- Draw a rectangle ABVG, where AB = VG = 3–5 cm (rack height), and BV = AG = neck length divided by two + side width.
- To the left of G, set aside G1 at the side width. From G1 draw a perpendicular to BV - point G2 appears.
- Round the corner G2VG.
The bend of the collar will be the segment AB. The rack will be tightened to the edge of the side.