Papier-mâché products have been familiar to many since childhood. How often do children become victims of “fake” fruits made from this material and carefully laid out in vases in canteens, hotels, boarding houses. It can be very difficult for parents to explain to their child that this beautiful apple is completely tasteless and serves as a kind of decoration. And this is just one particular example of the use of such accessible material.
How to make papier-mâché do it yourself?
This material consists of glue (PVA, paste, wallpaper or other) and paper (absolutely any, from newspaper to toilet). And you can create home masterpieces from papier-mâché in two ways. The first involves obtaining a homogeneous mass by crushing the paper and immersing it in glue. The second is gluing strips of newspaper (wallpaper, etc.) of the finished product (figures, plates, cups, vases) to further create a unique design. Both the first and second methods provide for subsequent coating of the obtained object with paint. In most cases, acrylic is used, but there may be other options, such as gouache.
Papier-mâché Technology
Many people remember how to make a homogeneous mass of glue and paper from childhood (they taught this art in Soviet art, and sometimes general schools). Paper (for example, a newspaper) should be torn into small pieces with your hands and filled with water. If possible, it is boiled for half an hour over low heat. Otherwise, leave to swell for an hour and a half. Then the mass is properly kneaded with hands, trying to achieve maximum uniformity. It is advisable to use medical gloves made of thin rubber, since both the newspaper and the glue adversely affect the skin. The resulting paper pulp is squeezed. This can be done with your hands or use a strainer. And then glue is gradually added to it, getting something similar to dough. As soon as the mass becomes obedient, it can be considered a ready-made raw material for papier-mâché.
How to fashion a bracelet or beads?
After receiving the material, you can begin to create the simplest product. Beginners who are faced with this technology for the first time are recommended to start with something simple. It can be Christmas toys from papier-mâché (making the ball the easiest), a bracelet or beads. In all these cases, a ball of papier-mâché of the required size first rolls down. Then, when a sufficient number of them will be made, through the hole make through holes for fishing line and left to dry. The final, most interesting stage in the creation of jewelry is its coloring. Beads can simply be coated with one color, or with a thin brush to draw flowers, stars, some interesting ornament on them. It all depends on the skill and imagination of the author. After the paint dries, they are strung on a fishing line and, depending on its length, a papier-mâché beads or bracelet will be obtained.
How to make a plate?
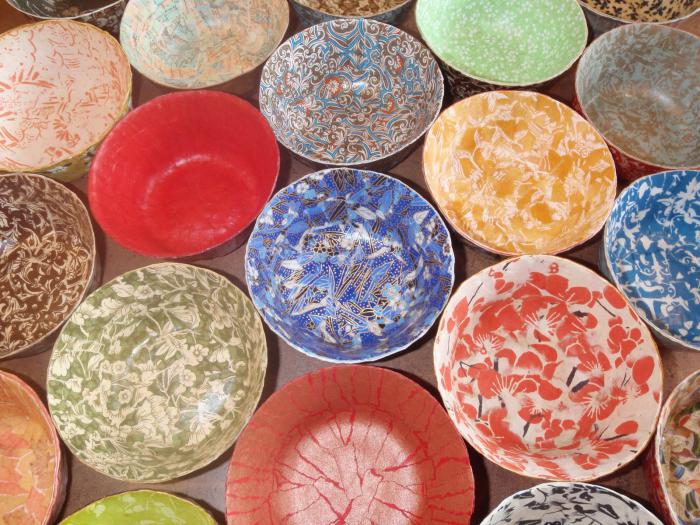
Usually in the manufacture of dishes uses a different technology. The ingredients will need the same ones: glue, paper (newspaper and thin white, for example, tracing paper, in approximately equal amounts), as well as paints, but you will need to act in a different way. Additionally, you need a ceramic plate, stuck around which, get the same from papier-mâché. How to do such things? Very simple. First, the newspaper is torn in small squares (2X2 or 3X3 cm). It is not recommended to use scissors, since uneven edges provide an invisible border between fragments. Then they do the same with white paper. Glue is poured into a saucer or other utensil, so that it is convenient to dip pieces into it. The plate must be greased with something bold to make it easier to separate the finished product from it. And then a layer of newspaper pieces is glued onto it, dipping each of them in glue. This should be done so that they fit snugly against each other, forming a uniform surface. As soon as the whole plate is glued, white paper is applied on top of the same principle. Thus, alternating layers, they are applied from 8 to 10. After that, the plate should dry. As a rule, this takes about a day.
A further 4-5 layers of white paper are glued onto a dried surface so that the newspaper through it is no longer visible. After another day, the ceramic plate is removed, and the finished product is pasted over on the underside with several more layers of white paper. After 24 hours, you can start painting, after which the craft is considered complete. If desired, the plate can be coated with transparent varnish, which will make it stronger, and the pattern more resistant.
Papier mache masks
There is another popular souvenir made of this material. Masks are usually created from pieces of paper, but can also be fashioned from a pre-prepared mass. Their manufacture is considered more complicated than the creation of beads or plates. So, getting started without having any experience is not worth it. If the mask is planned to be sculpted from papier-mâché (how to make the substance itself, described above), then nothing more will be needed except for it and paints. In this case, you just need to give it the necessary shape with your hands. To make it easier to do this, you can use a mannequin or apply papier-mâché directly on someone's face, smeared with cream. The finished mask is dried and painted with acrylic paints as desired. Particular attention should be paid to eye openings. If necessary, you can finally correct them with a clerical knife after drying.
If you plan to use pieces of paper, it is advisable to pre-mold the base, for example, from plasticine. It should be pasted over with pieces of paper, similar to a plate. It is better to remove the plasticine base after the mask dries. So that it can be used for its intended purpose, and not just as a souvenir, small holes are made on both sides, into which you can later insert a tape or elastic band.
Papier-mâché figures
Such souvenirs are often found in specialized stores. But if desired, animal figures, mythical characters, dolls, flowers or fruits can be created independently. If we are talking about small souvenirs, then they are usually molded from a paper-glue mass. In the case of larger objects, pre-made layout, which on top is covered with pieces of paper. Especially popular for the Christmas holidays are animal figures for the symbol of the coming year. This is a dragon, snake or papier-mâché horse. Undoubtedly, to create such a creation, you need both talent and certain skills. After all, these are not simple balls or plates. But sometimes one desire is enough to build a funny (albeit not very similar to real) animal and give it to a loved one. To make it more stable and strong, you can first make a wire frame. And only then stick it over with paper pulp and decorate it.
How to store papier-mâché products?
It is well known that paper is moody. It is easily destroyed by moisture, can change its properties from high or low temperature and direct sunlight, is easily ignited. Knowing how to make papier-mâché (pieces of paper or mixed with glue mixed with paper), you should also understand how to properly store products. Undoubtedly, the glue itself, and paints, and all kinds of frames used in the work, make it somewhat stronger. But papier-mâché, like ordinary paper, is afraid of dampness. Therefore, products should only be stored in a dry place. In this case, it is advisable to prevent ultra-low and too high temperatures and open flame nearby. With proper storage, figurines, dishes and other figures can please the owner for many years.
How to make the material more durable?
Professionals who manufacture figures for sale, try to make them as strong and resistant to external factors. To do this, pre-create a rigid frame made of wire or other material. You can also add a little cement or gypsum to the mass. As a result, it’s not quite papier-mâché, but it’s quite durable and easy to use material. That's just to work with him certainly have gloves.
The use of technology for children's creativity
Preschool kids and older kids are very fond of handicrafts. It develops creativity and motility of the fingers. As a rule, clay or clay is used as the material. But papier-mâché is no worse. After all, this is an absolutely natural safe material (especially if it is made on the basis of a paste), which children of any age will gladly work with. Of course, it is better to cook the mass itself for some of the adults. But you can sculpt from it all together: from the smallest to high school students.
A few tips for beginners
Those who have never worked in this technique, but want to try themselves in this direction, need to understand some nuances. Firstly, regarding materials. The paper from which papier-mâché is made can be any, but it is highly desirable that it is soaked well. It is best to use natural glue (paste or PVA), so that both the mass itself and the product made of it are not toxic. It is best to cover the finished product with acrylic paints, since they are the most durable. If we are talking about children's creativity, it is better to take gouache. In order for the figure or other design to be stronger, a wire frame should be used. I fix gouache on the surface with varnish.
And you should never be upset if complex figures are not obtained the first time. It’s better to start with something simpler, but with time and experience everything will come out: dolls, animals and other figures.