Many of you have repeatedly heard such a phrase as modeling raglan sleeves. But not everyone knows what kind of cut it is and what features it has. It is believed that the fashion for this sewing technique went from the 50s of the last century. The raglan sleeve has a peculiar cut, in which the drawing consists of the sleeve itself and the shoulder of the product. Then he is completely attached to things. Such a thing looks quite unusual, creates the illusion of long arms. Thanks to the cut, modeling has no special difficulties. Therefore, even a novice seamstress will be able to try this technique of product execution.
Raglan Sleeve History
You will be surprised, but the merits of creating this technique of sewing part of the product belong to a military man. Often we, using certain names, characterize them with certain things, although we do not even have an idea who actually gave them life.
Lord Raglan was born in 1788 in the family of a duke and admiral's daughter. He was the eighth child. Despite the fact that this man did not receive the title of duke by inheritance, he coped quite well with the task of self-realization and became a politician and military man. Based on the plots of his life, we can conclude that it was rich and varied. The name of the Lord first appeared on the pages of fashion publications, although up to this point he was not a "dark horse".
After the war with Napoleon, Raglan was injured, incompatible with the normal functioning of the arm. She had to be amputated. In the future, due to the inconvenient cut of things that were worn at that time, the wound after amputation began to heal more slowly. She delivered a lot of inconvenience and discomfort. Being a military man and not used to giving up, Lord Raglan made an order to the tailor. His main request was a special cut of the sleeve, which he ordered to call "raglan". So the first modeling of the sleeve (raglan) took place.
Nowadays
Recently, the designs of the second half of the 20th century are constantly used in fashion. Fashionable modeling of raglan sleeves without a middle seam is quite common today. Famous designer houses use this technology of tailoring products to make their brand more recognizable. In essence, this pattern-making technique is a feature of women's clothing. It is not customary to cut men's and children's clothes with a similar sleeve because of its rather complicated implementation.
Today, the technique of making things with a similar feature is not a luxury or a special idea. It is quite simple to wear products of a similar cut every day. The raglan sleeve is popular with women with broad shoulders, as it visually makes them smaller, lowering the width of the back.
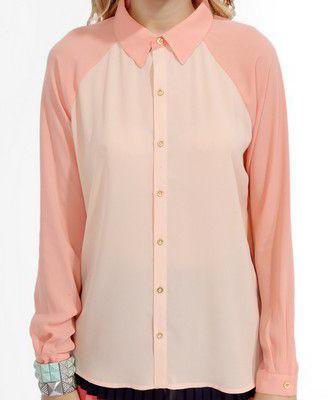
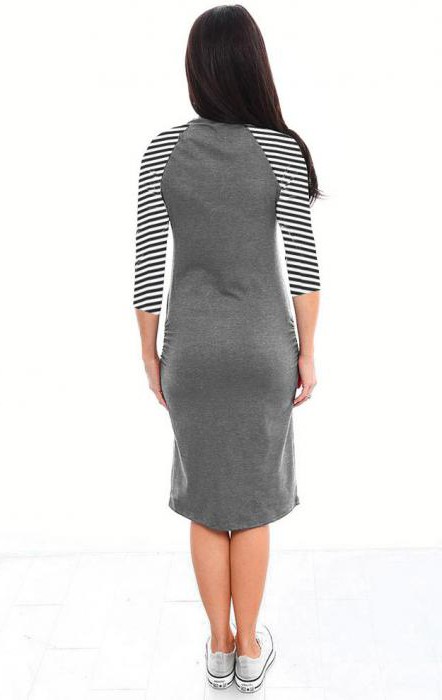
There are a lot of things with a similar cut
The list of some products:
- Sweatshirts.
- Coat.
- Mikey.
- Tunics.
- Jackets.
- Dresses.
- Sweaters.
Raglan Sleeve Modeling
In order to start the manufacturing process, you must have the following:
- Centimeter.
- Paper (a couple of meters).
- Pencil.
- Pattern of the basis of the product.
- The line is the longer, the better).
- Calculator.
If you want to perform modeling of sleeves raglan from set-up without any problems, then our master class will help you.
Training
Prepare paper for work. Clear the workspace. Initially, you should have a frame pattern for the future thing. Based on it, the product will be manufactured.
Modeling the back of the product
Measure the armhole of the back from point P3 to P11, lay a straight line from P31 in the direction of the okat, set the height O2. From O21 draw an arc with a radius of + 1 cm. Measure the distance from P3 to A2, from P31 draw a second arc with a radius of P31A2. Connect the points A2 and O21 with a straight line. O21 and the line of the upper cut of the sleeve are connected by a flexible curve. 211 = / 2 + 1 cm = 7, 2 + 1 = 8, 2. From a height 11 to 31, draw a straight line and denote the unit of intersection with the horizontal 31 by the point 3.
From A2 draw an arc whose radius is A2, A21. From P3 draw an arc of radius P3A21. Connect A21 and P3 with a straight line, divide by 2. Put the third point. Between points 3 and 4 there should be a segment of 1 cm. Draw a bisector of the angle G11, which should be equal to the segment G1 + 0.5. Draw through the A21, 4, P3, 1, P21 the line of okat of the rear half. The modeling of the raglan sleeve based on the set-in sleeve is completed, but not to the end. It was the back of it.
Final stage
Measure the armhole of the floors from P6 to P5, lay the straight line from point 11. In the place where this line will fall, put the height O22. From O22, you make a notch with a radius that is equal to . Measure the distance from P6 to P41 from the floor. From 11, draw a second arc with the same radius. Set the point A41. Connect the height of A41 with O22 in a straight line. O22 connect to the top line of the flexible curve. In the head of the sleeve, the tuck is 7-8 cm. From the point P1, set aside / 2 + 0, 5, put G4. From the height of G4 draw a vertical to the intersection with the horizontal 11. Set the corresponding point. From A41 draw an arc to the floor, which is equal to A41A42. From a height of 11, draw a second arc with a radius of P6A42. Connect the points A42 and 11. Divide the line in half and set the height to 5. Set aside 1 cm from 5 to 6. Draw a line of okat through points A42, 6, 11, 2, P11.
This is how raglan sleeve modeling looks. For real craftswomen there is nothing complicated. In addition to modeling the raglan sleeve from the base is quite an interesting task, this process does not require much time and effort.
Beginning of work
Prepare a pattern of the basis of the product. It should have tucks that you subsequently cut. For further work you will need:
- Paper.
- Scissors.
- Pencil.
- Centimeter.
Close the chest tuck, distribute it into the depths of the armhole. Determine the highest point of the okato, lower the perpendicular from it down to the bottom line of the product, after cutting the single-seam sleeve in half. Combine the front halves of the base and sleeves with each other. Find the intersection point of the front of the base and the raglan, draw an arc under it. Add the missing length of the okata. Round off the shoulder line, raise 0.5 centimeters upwards, draw a new line of the sleeve seam. This embodiment is suitable for the front of the product.
Second step
Cut the back horizontally, extend it by 1.5 cm, straightening the midline of the back. Perform the above steps in order (applicable only to the back of the thing).
Once your patterns are ready, we can assume that the modeling of the soft raglan sleeve is completed. Transfer the drawing to the fabric. Using scissors, cut out the outline of the fabric. Stitch all the details manually.
Trying and final steps
When you are sure that the thing fits perfectly in your figure, with the help of a sewing machine sew the resulting parts of the product. Complete with necessary accessories. In simple terms, sleeve modeling has a general outline, described in the table below. According to these steps, you will sew the necessary product.
Modeling Raglan Sleeves | One-piece sleeve modeling |
| Harvesting backs and shelves to Km | Harvesting back and shelves Bq to Km |
| Blank for Km | Procurement of parts for Bq sleeve |
| Checking slices for contiguity | Checking slices for contiguity |
| Assembly of parts | Assembly of parts |
| - | Gusset construction |
| Checking the blank of the resulting pattern | Checking the blank of the resulting pattern |
When modeling a classic raglan, it should be noted that its line originates from the highest point on the neck of the back and shelf. The features of this product execution technique can serve as a positive experience, and vice versa. Due to its shape, such a sleeve can both visually narrow the figure and expand the shoulders to unprecedented sizes. Therefore, it is desirable to attach a drawing to the figure to more accurately determine the measurements.
- Apply a ruler to the point on the neck. From the base, deepen the armhole at least 4 cm. Draw a tangent to the armhole line. Close the shoulder tuck by drawing a raglan line through its top.
- If the sleeve is soft in shape, the tuck is not particularly significant. With the introduction of a tuck into the sleeve ridge, the raglan changes to reduce the fit. It is laid off from the highest peak of the okatka 2 centimeters to the right. The depth of the tuck will be less than the height of the okat. Usually it is 10 cm.
- Remove the front and elbow halves of the sleeve. Apply raglan to the resulting base, raising the end point of the shoulder by 1.5 cm.
- Next, trace the resulting figure along the contour and cut out this drawing from the paper. A similar modeling scheme is based on a single-seam straight sleeve.
Popularity is gained by things that craftsmen make with their own hands. Especially when it comes to knitwear. Interesting weaving methods are forgotten today, although in reality they are quite simple and distinctive. Take even a seamless knitting method from the neck.
The use of circular knitting needles is a clear feature of knitwear. You will need:
- Centimeter.
- Knitting.
- Knitting needles.
Step by Step Actions:
- Measure the circumference of the neck using standard measurements of 50 size, according to which 38 centimeters around the neck fall on this size. Based on this, we use 82 loops for knitting.
- For more convenient work, divide a segment of 82 loops into 3 equal parts. 82/3 = 26 pieces. And one in stock.
- It turns out 26 loops on the sleeve and back, and 27 on the front of the product. To determine the correct number of loops per raglan line, subtract 8 from 26 pieces. 26 - 8 = 18. Since we have 2 raglan, then, of course, divide 18 by 2 and get 9. All the residues that are formed in the calculations are added to loops before.
- We look at the final result: the back - 26 pieces, sleeves - 9 pieces each, ragged lines - 2 pieces, in front - 27 pieces.
There is one feature of the neckline of the back of the raglan knitting - it is always higher than the neckline of the front:
- before - 1 p.
- raglan - 2 p.
- sleeve - 9 p.
- raglan - 2 p.
- back - 26 p.
- raglan - 2 p.
- sleeve - 9 p.
- raglan - 2 p.
- before - 1 p.
The depth of the cut will depend on how many loops you add. Knit in rows, adding loops through the row on the side of the cutout of the front. Add on the raglan line. Knit 27 loops and one more for complete symmetry. The connected part is connected by raglan lines in a circle. To get 50 clothing size, you need to have a line length of 34-36 centimeters. Without adding loops in a circle, we connect the front and back, until we get the desired size.
As a rule, so that no seams are visible, all the loops are knitted with stocking needles. This applies not only to the common base, but also to the sleeves. Knit the sleeves in straight rows, reducing the loops in each 6 row. This way you get a seamless raglan sleeve simulation.
How to make a sleeve
Using the technique of knitting facial loops, add them with the crochet. To form holes along the raglan line, knit the yarn with a simple loop. Cross knit in case you want to have no holes. If you want to decorate the sleeve with decorative trim, then use the technique of knitting oblique or track. For everyone who wants to learn how to make a product in the technique of knitting, this master class will come in handy.
Raglan's positive side
- Lack of seams. This characteristic will favorably affect clothing for babies. Uncomfortable protrusions on things that cause discomfort to the crumbs are contraindicated for them.
- Easy to change product length.
- There are practically no ends of the threads when knitting.
- Trying on the product runs without problems.
- Complete freedom of movement.
Negative sides of the sleeve
- A meager selection of patterns.
- A small selection of models.
- A huge number of loops.
- Narrows the shoulders. If you already have small parameters in this area, then this type of clothing is unlikely to decorate such a figure.
Whatever you say, namely knitting a raglan is a simple task. Even modeling patterns will be more difficult. It is not necessary to carefully monitor the number of loops to be added and added, since everything is quite symmetrical and quickly performed. Modeling raglan sleeves with pleats takes on a new breath in today's day.
We've heard images of Lord Raglan in his signature coat. This is a vivid example of how convenience and good taste can serve the benefit of its owner. It is not known when and who would please the world with such an invention. Today, such products are in great demand. Even modeling raglan sleeves with assembly is in demand in the fashion industry. Modern designers and fashion designers have made hundreds of thousands of styles of clothing using this zest. Many seamstresses in different parts of the world know about raglan firsthand. Each fashionista considers it a duty to have at least one thing with this type of sleeve in her wardrobe.
They say they meet on clothes. And most importantly, any thing is designed to decorate the figure of its owner. No matter what size you wear. It is important that due to some tricks you are able to decorate your figure and hide flaws.
Raglan sleeve is your assistant. And knowledge in the field of its design and modeling will help you with the further manufacture of products yourself!