It is no accident that newcomers to sewing begin their journey with aprons and straight-cut skirts. Building blueprints is not as easy as it seems, because it is easiest to start training with building a straight skirt drawing. Having once built a pattern according to your figure, you can use it for several years to model products for yourself if the figure has not changed in size.
There is a desire - no need to be afraid
If you want to learn how to sew, then all fears and experiences need to be put aside. If you study and make efforts, it is simply impossible that there is no result. The construction of the basis of the drawing of a straight skirt does not require special knowledge and skills, it is enough to adhere to the instructions. If you understand this topic once and understand the principle of work, then in the future you will no longer need to resort to schemes. It will be enough to have measurements, a ruler and a crayon.
It all starts with standards
Measurements must be taken correctly, the course of further work depends on this, not only the construction of the drawing of a straight skirt, but also the fit on the figure. Also, having a basic drawing, it can be used to simulate a bell skirt, godet, pencil skirt, evening models with shuttlecocks and other options.
To work, you need to have three basic measures: waist, hip, and length of the desired skirt. These are basic data, with their help a calculation will be carried out and additional numbers will be obtained that are useful for calculating the undercuts.
Since the ideal figure is rare, it is not always easy to take measurements. On a full figure, the waist line can not always be determined visually. Some people wear trousers and skirts below the waist because they are so comfortable. Therefore, you need to tie a thread or belt at the waist and ask the person to correct him in the way that suits him. On this line you need to measure the waist. The received data can be written to a notebook.
The thigh circumference is measured along the most convex parts, horizontally positioning a centimeter tape. It should pass through the convex parts of the buttocks, thighs and abdomen.
Product length is the desired skirt length. It is measured vertically from the waist. The measurements for constructing a drawing of a straight skirt should always be in front of the eyes in order to check with them. For work, only half the measurement value is used. In the literature you can find such designations of the waist circumference - POT or ST. This is the same! Accordingly, the hips half-circumference is NSP or SB. Measure - the product length in the drawing has the designation DI.
If it is difficult to deal with the drawing
The algorithm for constructing a straight skirt design drawing can be described very simply, or can be complicated by formulas and a large number of notation. All these notes will not confuse an experienced person, because he understands their meaning. But for those who did not sew earlier, they will become a real trap in that they do not even want to understand what’s what.
If some description seems very complicated and incomprehensible, then you just need to find a couple more descriptions and check, perhaps another author has found simpler words in order to explain how it is easier to build a drawing of a straight skirt.
Work with the grid
In order not to make the description very complicated, in this article we will use the most basic notation and data, which will be enough to build a drawing grid of a straight skirt. For example, exemplary numerical values corresponding to the figure will be proposed. They will need to be replaced by their standards.
- OT = 70 cm, then POT (ST) = 35 cm.
- OB = 100 cm, then POT (ST) = 50 cm.
- Product Length (DI) = 60 cm.
When the measurements for building the basis of the drawing of a straight skirt are collected, you can proceed to the drawing. It can be performed on a special tracing paper or take a large paper, or wallpaper. The drawing can be done with a pencil or pen. For work, it is convenient to use a ruler of at least 50 cm.
The first point is the beginning of work
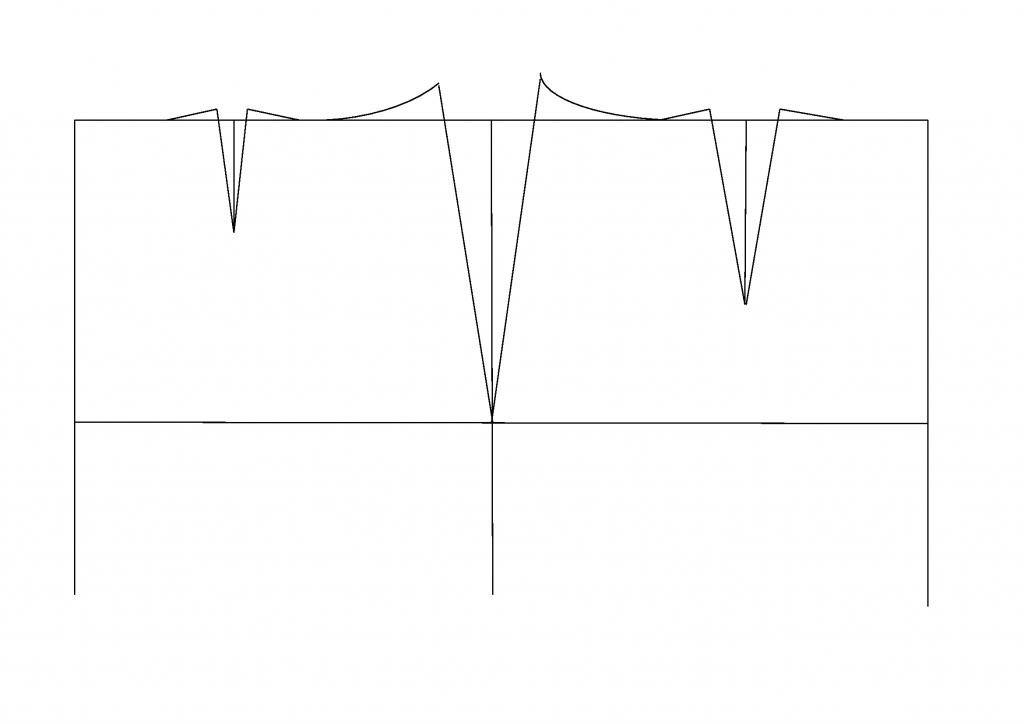
4-5 cm back down from the upper left edge. Draw a horizontal and vertical line from the point to get an angle of 90 °. Top sign T.T.
From this point, go down 60 cm (the length of the skirt), put T.N and draw a horizontal line to the right - this is the bottom line.
From T.T. down, lower 18-20 cm and put T., from it vertically to the right side to draw a line of hips. If the pattern is built on a woman of short stature, then you can stop at 18 cm, if you are tall, you can go down by 20 cm.
To outline the width of the grid, it is necessary from T.T. to the right to postpone the measurement of POT + 2-4 cm. These few centimeters are added to free fit. If the fabric is thin, 2 cm is sufficient, if it is dense and warm, then you can add up to 4 cm.
50 + 2 = 52, so put off the measure of 52 cm. Set T.T1 and draw a vertical line down from it to the intersection with the bottom and put T.N1. It turns out a rectangle. At the intersection with the LB put T. B1.
Sideline definition
To make it clear, it is worth stipulating that this grid is only half of the skirt: half in front and half in the back shelf. The line T.T and T.N is the middle of the front (front shelf), and the line T.T1 and T.N1 is the middle of the rear half. In order to divide them among themselves, it is necessary to build a side line, it will be in the center. The FOB measure with allowances for this is divided by 2.
52: 2 = 26 cm, it is this value that needs to be postponed from T.T. to the right, put T.T2 and draw a straight line down from it, at the intersections with horizontal lines, respectively, put T. B2 and T. H2.
We pass to the recesses
Half of the work has already been done. It was the turn to build tucks on the drawing of a straight skirt. The sum of all the tucks is equal to the difference between the waist and hips. So FOB-POT = 50-35 = 15 cm. So, on our grid we need to build undercuts in which 15 cm of fabric will go.
Half of this value of 15: 2 = 7.5 cm will be removed into the side seams. From T.T2 left and right, put aside 7.5: 2 = 3.75 cm and put T.V and B1, from them to T. B2 draw straight lines under the ruler. So that there are no sharp corners, make smooth rounding on the hips.
The amount of the front undercut must be calculated using the formula where the entire amount of the undercut is divided by 6, which means 15: 6 = 2.5 - this is the depth of the front undercut.
To calculate the depth of the rear undercut, you need to divide the entire amount of the undercut by 3, i.e. 15: 3 = 5 cm.
To test yourself, you need to add up the sum of all the darts and get the original 15 cm.
7.5 + 2.5 + 5 = 15, so we see that the calculation is correct.
Construction of the front and rear undercut
In order not to get confused in complex formulas, we take the simplest construction option. From T.T. put 10 cm to the right and put T.T3, from it to the left and to the right put aside 1.25 cm (2.5 cm depth of the front groove) and put T.V2 and B3.
From tt3 down lay 7 cm - the length of the front undercut and put t.G. Combine T. T3 with T. G and T. B3.
We pass to the back half of the skirt.
The segment B1T1 should be divided into 2 and put T.T4, put 14 cm down from it and put T.G1, and put aside 2.5 cm (5 cm the depth of the back groove) and put T.V4 and B5. Combine T. B4 with T. G1 and T. B5, we get the rear undercut.
Detailing
To make the product fit perfectly on the figure and make it comfortable to sew, it is worth working out some details. The end of the anterior and posterior grooves should be raised by 5 cm, and the side by 1 cm. The tips must be smoothly connected to the waist line. Such a calculation of grooves is universal, but if the figure is non-standard, then they need to be adjusted to make the product fit perfectly on a specific figure.
The drawing of the pattern of the straight skirt is finished, now the pattern can be cut, transferred to the fabric and sew. If you want to make a skirt with a narrowed hem, then at this stage you can correct the pattern and put 3-5 cm to the right and left to the left and left and connect the resulting points with T. B2. So, after tailoring, the skirt will be with a narrower silhouette. If additional questions arise, you can use the instructional cards for constructing a straight skirt drawing. Each master works according to the algorithm that is more convenient for him and, accordingly, schedules the progress of work.
Cutting order
Such a pattern is basic, based on it you can simulate different styles. The main thing in building a drawing of a straight skirt is straight, clear lines. Regardless of complexion, a straight silhouette and strict lines add clarity to the image.
Before cutting, the fabric must be prepared. It must be sprinkled with water and thoroughly ironed through a cloth. Before cutting, the fabric should "sit down" as much as possible so that this does not happen after the product is sewn or after the first wash. Each fabric has its own shrinkage rate, therefore, when buying material, you should always take it with a margin. Sometimes after steam treatment from 150 cm, 140 cm may remain. This must be taken into account.
For the cut of the skirt, there are several layout options for the pattern, depending on the model. It takes into account: whether there will be cuts, a slot, whether there will be a back seam in the center or only on the sides. Where will the zipper be: front or back? If the front, then in the center of the front shelf there will be a seam, and the layout needs to be done a little differently.
Easiest option
In the skirt, the design of the slots and the processing of the codpiece can be difficult if the zipper is done in front. For the first time, you can do without these elements and make cuts on the sides and insert a zipper in the side seam.
In this option, one-piece shelves will be cut out, and there will be two parts in the work: the front and back shelves. For cutting, the fabric needs to be folded so that the center of the front and the center of the rear shelf fall on the fold of the fabric; when cutting, leave 1-1.5 cm of allowances on the sides and top. It is better to leave a little more fabric, so that if necessary it was due to which to increase the size. From the bottom, you need to leave 5 cm for the hem.
The belt is cut out from a single piece of fabric. And usually below the skirt pattern. If there is nowhere to lay out a whole-cut belt, then it is sewn from several parts. In some cases, it is laid out on the side, if the width of the fabric allows. The length of the belt is calculated as follows: FROM + 10 cm. An additional 10 cm will go to the seams and fastener (button and buttonhole). The width of the belt is 10 cm, it will be folded in half, and 2 cm will go to sew the belt to the skirt.
All patterns are outlined with a special chalk, separately you can outline the outline along which you will need to cut the workpiece. The recesses are cut out only on a paper pattern, they are redrawn onto the fabric, but not cut out.
When the details are cut, the drawn marks are only on one half, in order to transfer them to the other side, you need to fold them in half, with the side facing inwards, and knock lightly. On the second side there will be an imprint, it can be brought so that it is more clear. This option is quick.
There is another option for transferring marks: the part is folded in half, the hint remains on top, and you need to sew through it with air loops, without tightening the thread. So the undercuts and the entire basting are sewn, then pull the fabric so that the main part of the threads remains between the layers of fabric, and cut along these threads. So the marking will remain around the entire perimeter of the part and in the places of the grooves. Transferring the drawing to the fabric will be as clear as possible. It is enough for experienced craftsmen to translate only undercuts, and they can visually control the width of the allowances.
Also, when laying out on the fabric, you need to make sure that the direction of the pattern and the pile are the same. If there are defects on the fabric, they must be circumvented when cutting. During the transfer of the pattern to the fabric, all the markings are done on the wrong side.
As for the cut of the belt, you can immediately draw it on the fabric without first cutting out anything. If the skirt model is without a belt, then you need to choose the option of processing the waist line. In this case, you can make a cut belt, it is cut out separately and then transferred to the fabric.