Toys are always very pleasant to make, because they are pleasant to the touch and are made of bright fabric. We offer you several workshops on tailoring monkeys that are relevant for 2016.
How to build a pattern for tailoring a monkey?
If you decide to sew a monkey (no matter which one), but you do not have the necessary pattern, then you can build it yourself.
Standard patterns of a toy monkey consist of the following elements:
- torso;
- head;
- ears;
- long ponytail;
- paws.
Each of the listed parts is drawn on paper one by one. As for the legs, then on the pattern they are indicated by one element or two. It depends on the fact that your toy will have arms and legs of the same shape and length.
The size of the parts can be made arbitrary, they do not have to be proportional. Interesting are toys with long legs.
How to sew a monkey with your own hands: a master class with a detailed description
To create such a bright monkey, choose colorful fabrics, preferably with a different pattern for some parts of the toy. Ideally, choose similar colors. For example, the main part of the monkey is sewn from pink fabric into green peas, and the ears and extreme elements of the legs are made from a green canvas into a pink strip.
Master class on how to sew a monkey (photo of steps is attached):
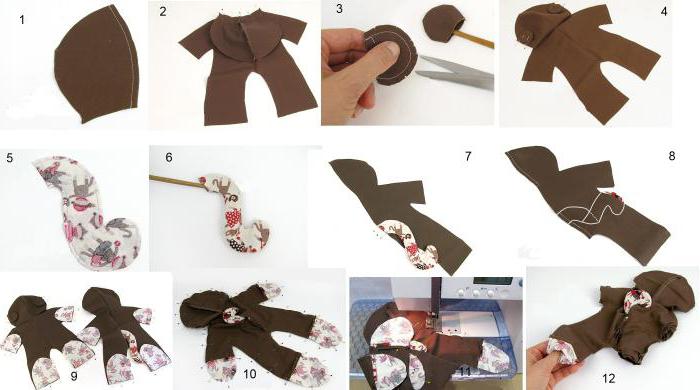
- Cut a solid piece for the head and stitch its sides together (Figure 1). This seam will be held in our center muzzle.
- Cut the front of the body from the fabric and sew the head to it (Figure 2).
- Cut out the four parts of the ears and sew them in pairs (Figure 3).
- Sew the ears with one side to the front of the head (Figure 4).
- Cut two identical parts for the tail and sew them together, leaving a hole at one end (Figure 5).
- Push the filler with a wooden stick (if there is none, you can use a brush or pencil) (Figure 6).
- Prepare two identical halves of the back of the monkey. To one, line the tail in the middle (Figure 7).
- Lay the second part on top of the first half with the tail and stitch them neatly together (Figure 8).
- Prepare eight identical halves of the “socks” to be swept to each foot of the front and back of the toy (Figure 9).
- Carefully sweep the front and back of the monkey together (Figure 10).
- Stitch the parts together, leaving the two halves at the top of the back unstitched (Figure 11).
- Turn the finished toy skin (Figure 12) out through the hole left.
The final stage of tailoring the monkey
When the frame of the future toy is completely ready, it needs to be packed tightly with filler. Since the monkey is not small in size, it is better to take a synthetic winterizer for this purpose, and not foam rubber or cotton wool. Spread the filling evenly over all areas of the toy with a wooden stick. Knead the toy with your hands so that no lumps or cavities form anywhere (Figure 13).
From white and red shreds make a muzzle and a mouth. Embroider the nose there. Take the buttons and sew the eyes, and below - the prepared muzzle (Figure 14).
Sew a hole with a hidden seam through which the toy is turned out and the filler is pushed (Figure 15).
The toy is ready!
Monkey for sleep
Instructions on how to sew a monkey:
- The pattern for this toy consists of three parts: body, abalone and pocket. Transfer them to the fabric (Figure 1). As a result, you should get two parts of the body and ears, as well as a muzzle and a pocket.
- On the patch that is intended for the muzzle, embroider the eyes and nose (Figure 2).
- Take a muzzle and a pocket to the front of the toy (Figure 3).
- Stitch or sew in the planned parts (Figure 4).
- Lay the ears and back of the toy as in picture 5, and stitch the parts together, leaving a small hole below.
- Turn the toy out and firmly push the filler inside with a stick (Figure 6).
- Sew in the hole (Figure 7).
The wonderful monkey pillow is ready!
Monkey in a hat
Master class on how to sew a monkey from fabric:
- The pattern for this toy consists of only three parts: the body, legs and tail. But the following number of parts should be cut from the fabric: two on the body, six on the legs and two on the tail.
- Fold in pairs all the parts with the front side inwards and sew them, leaving a small hole in each. As a result, you get one body, four legs and one tail.
- Turn out the details.
- Push any filler (for example, synthetic winterizer) into all parts of the toy with a wooden stick.
- Sew the parts together.
- Sew the monkey on the area of the cap a piece of cloth that will replace it.
- Make a face. Sew on eyes-buttons, embroider a stitch nose and mouth.
The monkey is ready!
Charming monkey in full growth
Step-by-step instructions on how to sew a monkey from a fabric (full-length toy pattern):
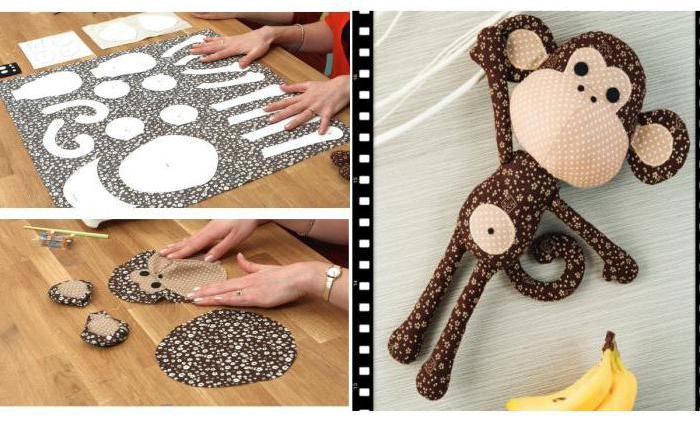
- Prepare a pattern and two types of fabric - one darker, the other lighter.
- Cut out all the details of the paper pattern and lay them on the fabric.
- From the dark cloth, cut the following details of the toy: 4 arms, 4 legs, 2 torsos, 2 tails, 4 ears, 1 head, 1 forehead. From a light canvas, cut out two middle of the ear, 1 belly, 1 heart-shaped detail for the eyes and 1 circle for the muzzle.
- Stitch together the paired details of the ears, leaving a small hole at the bottom, and then on the front part of the wash light center.
- Sew eyes and a muzzle to the frontal part. Sew together the finished front of the head and back, not forgetting to leave a hole in the bottom.
- Stitch together the paired parts of the arms, legs, tail and torso. A hole should also be left in each component of the toy.
- On the body from the front, wash the belly.
- Fill all the details of the monkey with filler (for example, cotton, sintepon or others) with a wooden stick.
- Sew together all the details of the toy: stitch the ears to the head, and the finished head, tail and legs to the body.
- Sew on the pupils and nose.
The monkey is ready! If desired, you can decorate the monkey with a bow, ribbon or dress it in some outfit.
Simple monkey pillow
The sequence of the process, how to sew a monkey with your own hands:
- A master class on creating such a monkey suggests the presence of soft tissue, for example, it can be fleece. On the product sewn from it, it will be very pleasant to sleep. You will also need a thread and a needle.
- Cut from a large piece of fleece a solid outline of the monkey figure along with the head, ears and tail. Optionally, it can be done with paws.
- Prepare two identical parts - front and back.
- Carefully connect the two parts with the front side inwards and sweep them.
- Stitch the monkey, leaving on one side a small hole, through which then turn the frame of the toy.
- Push the filler inside the monkey and carefully sew the hole.
- Sew the ears in the middle, making them embossed.
- Cut out the white fleece of the belly and eye area and wash them on the toy.
- Embroider the eyes and nose with a stitch.
Monkey pillow is ready!