Our calendar year contains a considerable number of holidays dedicated to various events. On the day of celebration and fun, I want to please my loved ones by congratulating them and presenting unusual presents. Shortly before this moment, each of us raises the question: “What to present as a gift?” Optional souvenir must be expensive and purchased. An original gift given to a loved one will be a 3-D postcard created with your own hands and with your soul. In this article, we will consider how and from which this pleasant surprise can be made independently.
Training
The main material from which a 3-D postcard is made with your own hands is cardboard, which can be either white or color. Also, paper of various shades, glue, ruler, scissors, pencils or felt-tip pens are required for work. Depending on what you want to portray, additional materials may be needed. These are felt, beads, scraps of fabric, ribbons, thin cords, beads and many other things that can be found in the bins of any housewife. Foamed polyurethane is used to fasten individual elements and create a volumetric effect, and double-sided tape will also fix the details. In fact, a 3 D postcard, created with your own hands , does not require a lot of time. It can be made in one evening. The main thing is to show desire and imagination to create an unusual thing.
Gift heart
3 D postcard with your own hands can be made without additional decor. Nevertheless, it will be original and exclusive. The main thing is to perform step-by-step actions correctly. To work, you need to prepare a colored sheet of paper, a ruler with a simple pencil, an office knife. Check out the template below. With its help, a stencil is created, and the contour is transferred to a sheet of paper of your chosen color. You can also duplicate the scheme on a sheet of notebook in a cell. After the diagram has been drawn on colored paper, cut out the areas marked with yellow with a clerical knife. The paper should be folded along the gray lines so that when you close the card, the heart moves forward. To clearly fold the folds, use the blunt end of the scissors.
How to make a 3 D postcard more durable? To do this, glue the blank with a three-dimensional figure on a cardboard of bright color and several times close and open your product. It is appropriate to give this card on Valentine's Day and thereby express your love and tender feelings to a loved one. In this way, you can create not only a heart, but also simple figures symbolizing various holidays, such as a Christmas tree or a birthday cake.
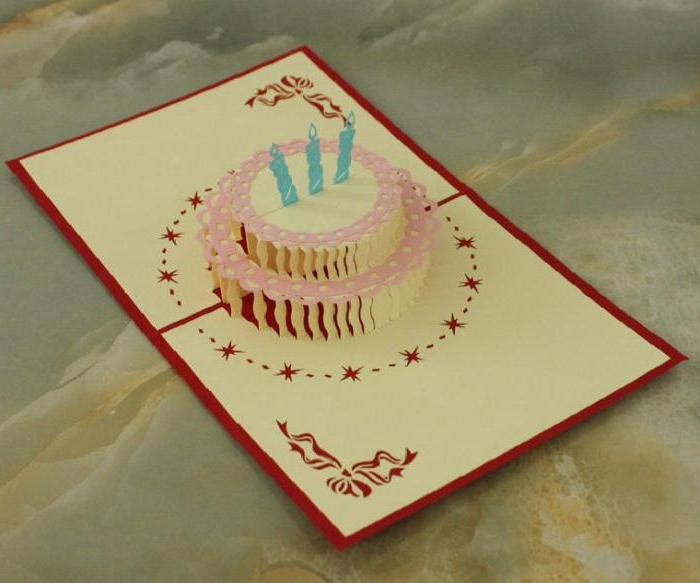
Birthday surprise
Very interesting and original products are obtained by combining several identical blanks. Let's take a step-by-step look at how to make beautiful birthday cards in this way. Such crafts are carried out simply, the main thing is to be careful and attentive. For work, you will need the same materials that were described in this article earlier. Take a colored cardboard sheet, mark the middle with a pencil and carefully draw the sharp end of the scissors on the cardboard along the ruler without cutting it. Then bend the sheet in half. This method will help to avoid bumps and creases. Beautiful birthday cards look original if the solemn inscription on the front side is applied in artistic typeface and cut out. During operation, plain color paper will be glued on the inside. Next, go directly to the creation of the volumetric part.
Making 3 D postcards. Master Class
We take a white sheet corresponding to the size of the workpiece, and reduce it around the perimeter by 0.5 cm. Cut the paper width by another 1 cm and mark the middle across the sheet. The next step is to prepare a template for the shape that you would like to depict. It can be a cake, balls, flowers, a box with a gift and many other symbolic elements. We place the template on one side of the white sheet in the upper part and circle, then we shift the stencil so that the figure is mirrored to the previous one, and also transfer it to the sheet. Then carefully cut the upper parts of the patterns, leaving the base integral with the rectangular part. Internal workpieces are made. We take the figures and bend the images up. Next, we place the rectangular sheets with drawings on the prepared color cardboard so that they are in contact with each other in the middle. We glue the rectangles to the colored cardboard, and also glue the tops of the figures together. Do not forget to step back 1 cm from the middle. The 3D postcard is ready!
New Year's Present
On New Year's Day, it will be appropriate to present Christmas cards to your loved ones. Children can be involved in making this presentation, as it is done very simply. Take the green paper, fold it in half and draw a half figure on the fold. Wavy horizontal lines will need to be incised, and vertical bent. In this case, the method of creating snowflakes is used. Then stick the blank onto a sheet that will serve as the outside of the postcard. Close the product so that the Christmas tree bends forward. The card is ready, you can beautifully sign it and decorate it with various improvised material.
Anyone can create a festive 3D postcard. Develop a fantasy, experiment, of course, it will be unique and exceptional.