All children love mobile toys with which you can perform any action. An airplane is ideal for this purpose. It is not necessary to buy an expensive model, because during the flight it can crash and the child will experience resentment and fear that his parents will scold. It is much easier and faster to make an airplane out of paper. There are a huge number of ways to make a paper airplane. Moreover, the work is creative, fascinating, any child will like it.
The plane can be folded from a square or rectangular sheet of paper, an old newspaper or magazine using the origami technique. It is interesting to make a model for the national team by drawing individual elements on thick paper in advance. A plane glued from parts looks beautiful. His child can independently paint with paints or markers.
In the article, we will consider several original options, how to make an airplane out of paper, what materials can be used for such work. If you choose products using the origami technique, then first learn how to use the sheet folding scheme. If the model is voluminous, then a detailed description of the task will help to cope with the work easier.
Prefabricated model
First, consider how to make an airplane out of paper, consisting of individual parts. The figure below clearly shows the cut holes in the body through which the wings and tail are inserted. Choose thick paper, at least 160 g / m 2 , so that after the first flight the plane does not deform. Additionally, for durability, each detail can be pasted over with transparent tape, previously painted with gouache paints or felt-tip pens.
An airplane made of paper is easily assembled and disassembled; it is convenient to take it with you on nature or on a tourist trip. Details of the place do not occupy at all, and the child will be pleased to have a toy on the road. Yes, and you can draw as a template details of any shape, because the aircraft can be passenger, cargo or military.
Airplane at an exhibition at school
In schools and kindergartens, various exhibitions of children's crafts made of paper or natural material are often organized. We bring to your attention an easy option for making an airplane from paper with your own hands, which is quite suitable for this purpose. In addition to color cardboard, you will also need a matchbox, PVA glue and patterns.
The match box is centered between the same rectangular wings with semicircular ends. The body of the aircraft, like its tail, is made of a thin strip of paper folded in half. On the front, glued separately screwed with PVA glue or glue stick.
After the work is completed, it remains only to decorate the appearance of the airplane with an application. Boys are unlikely to agree to decorate the plane with flowers, so you can give your child complete freedom of choice. It can be stripes or spots of camouflage, the image of the national flag or a red star. Separately, you can glue the chassis wheels from below, then the plane will be inclined. If the wings are long, then inserts of strips can be made between them. Then the corncracker will keep its shape perfectly.
Sleeve use
If you run out of a roll of kitchen napkins or toilet paper, do not discard the cardboard sleeve. This is a great material for children's crafts. Next, consider how to make an airplane out of paper using such a convenient base. The sleeve will make a sturdy housing. For the strip of wings, you will have to cut through the slots in the center. Great details come from corrugated packaging board, as well as durable double-sided colored paper. On the front of the craft, it is better to seal the hole in a circle so that you can later tighten the screw. If it is installed on a pushpin or decorative nail bent inside, the screw will spin. To attach the tail, cuts are also made on the sides and top.
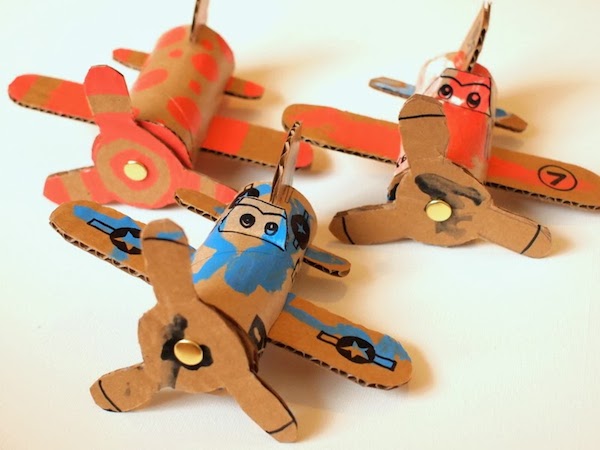
It is interesting to cut a small hole in the center and seat the pilot in it. Its function can be performed by a drawn man assembled from the Lego constructor or cut out of foam rubber. The craftwork will be durable, with it the child will be able to calmly play both in the apartment and take it with him to the street.
You already understood how to make an airplane out of paper, but when decorating, you will have to fantasize yourself. You can design the appearance of the aircraft with an application or paint with markers.
Rugged model
We will present you another interesting version of the craft crafts. The case is represented by an arc of bent durable paper in half. Cardboard can be used, or several layers of ordinary A-4 sheets can be glued together. Parts are fastened by sticking into holes cut for the wings and tail.
The manufacturing method is similar to the previous samples, however, wheels are added below. They are first cut out of cardboard, and then strengthened on a rod threaded through both sides of the body. This craft can be rolled on the table or floor. This version of the aircraft is suitable not only for games, but also for an exhibition at school.
How to make a flying airplane
So that the plane can fly, it is made of light tissue paper using the origami technique. This is the Japanese art of folding the sheet in a special way, as a result of the folds, the selected figure is obtained. It’s hard for young children to do the job. From personal experience, I can say that even 5-year-olds find it difficult to clearly align the edges of the sheet, so it is advisable to perform such crafts under the clear guidance of either parents or kindergarten teachers.
The main difficulty of origami is the clarity of the folds, the correct combination of angles and sides, accuracy and care when reading schemes. First, let's look at how to make an airplane out of paper from successive photographs below.
Step by Step Explanation
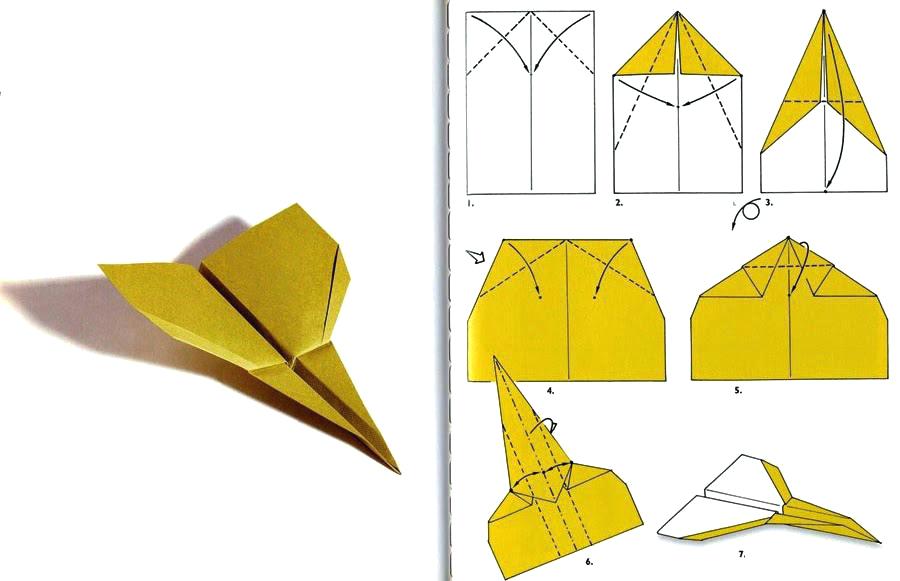
For work, take a rectangular sheet in A-4 format. The paper weight should be at least 100 g / m 2 . It is more convenient to use the ruler or the back of the scissors (round rings) when rubbing the folds, especially if the paper is thick.
First, bend the sheet in half vertically to define the center line. Next, bend the two upper corners to make a triangle at the end of the workpiece. Such a fold must be done again so that the nose of the aircraft becomes sharper. So that the airplane can be held in hand and launched into flight, you need to bend both wings 1-2 cm from the center line, deploying them in different directions. After all the folds are carefully smoothed out with improvised means, flight tests can be carried out.
Learning to read schemes
Most often, origami is made according to patterns printed in books or on Internet pages. These are sequentially arranged drawings that show how to make bends. For a better perception of the material, dashed lines and arrows indicate the direction of paper folding. If the sequence is not indicated by numbers, then the scheme is read from top to bottom and from left to right, like regular printed text.
Learning origami, children acquire useful skills of mental activity, as well as develop useful skills for studying at school. They also study accuracy and attentiveness, because even a small error of 1-2 mm can distort the craft, make it crooked.
The diagram below shows the sequence of manufacturing an aircraft with pointed angles at the nose of the hull. When flying, they help to increase the duration of the distance traveled, which will allow the child to win distance competitions.
War plane
The last scheme of origami aircraft is the most complex of the above. But if a child has excellent simple models, it is quite possible to try to make a military aircraft. It has a pointed nose and short wings. Initially, the work is carried out similarly to the previous options. The rectangular sheet A-4 is folded in half vertically, and then bend the upper corners to the center line, and twice.
The workpiece is folded in half with the flat side up. The upper corners are bent towards the center and the edges open in opposite directions. Then the workpiece is opened back. It remains only to bend even strips throughout the body at a distance of 1-1.5 cm from the center line so that you can take the airplane in your hand for a throw. Such a model flies well, and it looks more impressive. You can paint a military fighter with camouflage spots or make it out of gray paper by sticking stars on the sides of the wings. There is also a white number on military aircraft. You can show your child photos of real fighters before designing your appearance so that you end up with a good model.
In the article, we showed readers how to make an airplane out of paper with our own hands. If you have your own interesting options, share your personal experience in the comments. We will be glad to hear your opinion.