Tea houses have long been familiar in many kitchens. Their main task is to arrange tea bags in individual packages. And since this item is not only practical, but also quite beautiful, it is often put on the table during tea parties as an element of serving.
But not everyone can afford to buy a finished product. Therefore, there is a way out - do it yourself. Handicraft stores sell plywood blanks that can be easily decorated. Or, alternatively, glue from thick cardboard.
And when the workpiece is already in hand, you can make a decoupage of a tea house. This is a completely uncomplicated technique. How to cope with it, let's talk in the article.
A few words about the decoration technique
Decoupage arose as far back as the Middle Ages, when craftsmen, to make various household items cheaper, cut out ready-made pictures and glued them to furniture, covering with dozens of varnish layers.
In the modern world, everything is much simpler, but the essence of the technique remains the same: the craftswomen take ready-made images and decorate them with various crafts. As sources of pictures use decorative paper napkins, rice and decoupage cards.
Some needlewomen know how to make a picture for themselves by printing it on thin paper using a printer. For this reason, a decoupage style tea house became popular. It will not be difficult to decorate it, but you can achieve unrivaled visual effects in a couple of hours of painstaking work. But first things first.
Necessary materials
A blank and a decorative napkin alone are not enough to create a real masterpiece. We also need some tools and materials. Here is a list of the minimum set:
- napkins or decoupage cards;
- primer;
- decoupage glue (sometimes you can replace it with regular PVA);
- stationery file;
- soft spatula or melamine sponge;
- brushes;
- skins of different grain size;
- water based varnish.
Of course, those craftswomen who make decoupage of tea houses professionally have a much larger set of materials and tools. But more about that later, and now let's proceed to the simplest decoration.
Elementary decoupage: step by step instructions
How is tea house decoupage done? For beginners, step by step we will understand all the subtleties and nuances:
- At the first stage, it is necessary to prepare the product for decoration. We take as a basis the plywood blank purchased in a needlework store. It must be primed outside and blotted inside. The soil must always be laid in one direction so as not to raise the excess pile, and the layer is more even. All this should dry thoroughly until the moment when it will be possible to begin the main stage of decoration.
- While the workpiece dries, you can think about in what style a tea house will be created. To do this, find the right pictures. In all the same handicraft shops, you can buy ready-made decoupage cards or three-layer napkins individually. The latter are much cheaper.
- Now you can proceed to the main stage - transferring the picture.
Decoupage Highlights
To decoupage the tea house with napkins, you need to follow some rules.
Firstly, do not immediately glue the picture on the workpiece. She needs to be tried on several times and make sure that this is exactly the place for her where she will look best.
Secondly, all work must be carried out quickly, but without rush and fuss. Thin paper quickly fade from glue. If you hesitate or fuss, the pattern will not lie evenly, with air bubbles, crumple or tear.
Thirdly, paper elements must be carefully smoothed so that no bubbles and wrinkles form.
Fourthly, it is better not to cut out the pictures, but to carefully tear them off. So the edges will be uneven, which will be easier to hide under other decorative elements.
From theory to practice
How are all these recommendations implemented in practice? The main stage of the decoupage of a tea house looks like this. First, the picture is tried on to the place where it will be. Then this area on the workpiece is coated with glue. A motive is applied to it, on top of it put a clerical file through which the picture is smoothed out.
To begin with, it is better to try on small elements that are not so difficult to stick. Then you can already proceed to gluing large planes. If you know how to glue wallpaper, then this process will not cause you much difficulty.
In the simplest version of decoupage, almost no additional decorative elements are used. If you want, you can finish some motifs with acrylics or stick a bow or flowers somewhere. But it is worthwhile to understand that the paint needs to be put under the varnish coating, and it is better to attach textile volumetric elements directly to the varnish itself.
Decoupage tea houses: ideas
It seems that the technique is not so complicated, but choosing how to decorate a workpiece is not always so simple. Therefore, the article has a photo with interesting ideas on how to make a tea house unusual.
The easiest option is themed accessories. Make several houses for tea for each holiday or season: Easter, New Year, Summer Solstice, Shrovetide. Moreover, manufacturers of napkins make thematic products with colorful pictures.
Even for beginners, decoupage of a tea house will not be so difficult if you can inexpensively select the necessary materials.
If you want something more, you can buy yourself voluminous pastes for needlework, varnishes and paints with the effect of craquelure (cracking). But even from improvised materials you can make unsurpassed masterpieces.
Everything at hand
In the photo with the decoupage of tea houses, you can notice many additional elements. How to create them without using special (and sometimes very expensive) tools? The answer is simple: we take everything that is in the house.
For example, tiles on a house can be made by cutting ordinary cork wine corks into thin rounds and sticking them in a checkerboard pattern. The slate roof will be made of corrugated cardboard, from which one layer of paper was removed to this corrugation.
Chicken eggshell, crumbled into small parts by hands, perfectly creates a masonry effect. From finely chopped thick cardboard, you can make an imitation of bricks. Glued and colored semolina will look like sand.
If this is the winter theme of decoration, then everything that you bought for the Christmas tree will be used - artificial snow, cotton wool, tinsel. Frosty patterns on the windows will be made of fine lace. The main thing is when you make a decoupage of a tea house, let your imagination run wild. And then you will definitely get the most unique product.
For experienced craftswomen
If you have already mastered the basics of technology, then you can move on to more complex techniques. Consider, for example, how to create volume using decoupage. For work, we need a map with windows and doors, which are surrounded by masonry. So we get a pretty original tea house. Primer and decorate the blank for decoupage, as usual. While everything dries, carefully tear out the motives we need, leaving a margin of about 1.5 cm along the edges. Carefully and accurately glue with glue only that part of the workpiece on which there should be an opening of doors and windows. In this case, the stones should remain un glued. This is necessary in order to then create a volume effect under these elements.
When the pictures stick and dry, with the help of a palette knife, shove a little voluminous paste under the free edges, level it, form depressions and bulges on the surface of the picture and let it dry. After that, glue the loose ends as tightly as possible to the impromptu “stones”. After that, you can proceed to other elements of decoration.
Additional moments of decoration
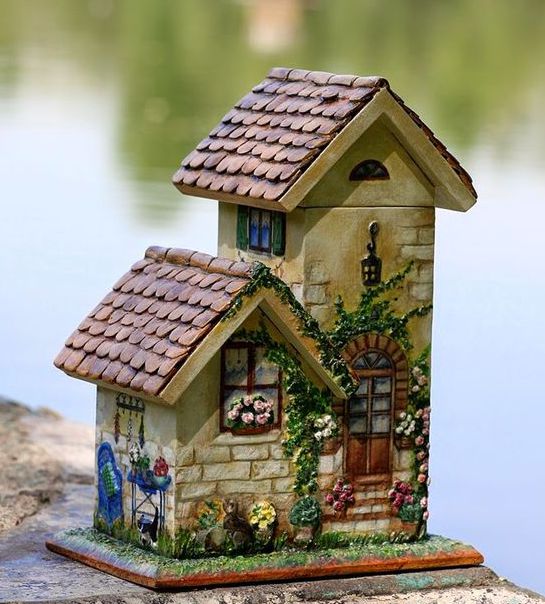
Now it’s fashionable for a tea house to be as close as possible to the real structure. That is, it should have windows and doors, a roof. Some craftswomen make balconies, shutters, bells at the front doors. Decorative fences can be made around the perimeter of the house, a tree or a street lamp is glued to one of the walls.
All this is possible due to the fact that now there are quite a few wooden veneer blanks on sale that are intended for further decoration. In this case, the main thing is the rule to beat the decorative element with the help of decoupage and paints.
Also, a significant role is played by color combinations, both in the product itself and with the overall interior of the kitchen. Of course, you can make a brutal house in the style of steampunk, but it does not fit into the kitchen of Provence or shabby chic. Therefore, even in such a simple matter as decoupage of a tea house, you need to have a sense of style and proportion. Without them, a few hours of your work can easily turn into utter bad taste.
Finally
To create a beautiful accessory for your kitchen with your own hands is not at all difficult. You need to take the right blank and materials to start creating. The stages of work are simple and understandable even to a student. By the way, you can make decoupage not only on your own, but also with your children, introducing them to needlework and the process of creating the beautiful.
You will see, having once created such a cute accessory, you can no longer live without this work. But this has its own plus: tea houses can be sold over the Internet or given to friends for any holidays.