Do not know what to give to a loved one? Present him a card. Quilling is one of the simple techniques in which you can create interesting work from paper strips. Making cards will be easy, as the creative process is very fun. Ideas for crafts you can find below.
Autumn card
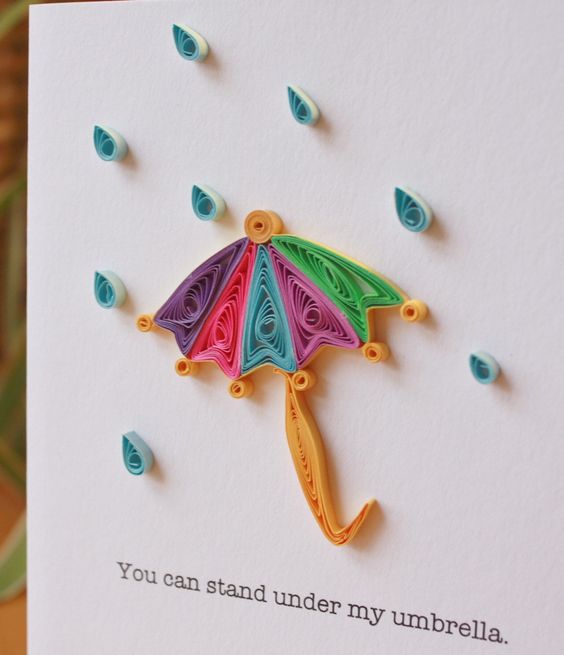
To cheer up a loved one is simple. It is enough to give him a postcard. Quilling is one of the simple techniques in which even an unprepared person can create a masterpiece. How to create a craft? For its manufacture, special strips of colored paper will be needed. You can purchase the blanks in the store, or cut them yourself. If you decide that it is not difficult for you to make strips, make them from two-sided paper. Now you can begin to work. First you need to create an umbrella. Parts of his cap are made of ordinary spirals. Take the strip and wind it on a toothpick. Now loosen the clamp and squeeze the circle on one side so that you get a sharp edge. On the other hand, a more complicated operation needs to be done. You need to put your finger on the arc and from both ends pull the workpiece toward the center. You get a bend that will resemble a heart. To create an umbrella you will need 5 such blanks. Now you need to create 7 small spirals. You can immediately attach items to the front of the postcard. It remains to make the leg of the umbrella. This will require two needles. We stick them in some soft surface, for example, in a pillow. Now we wind a paper tape on these needles. Using nippers or tweezers, bend the leg of the umbrella and “tighten” it with another strip. We attach the blank to the card. We make drops according to the standard scheme. We make a paper snail, and then flatten one of its edges a little. It remains to supplement the postcard with an inscription.
Dandelion
Creating such a quilling card is very simple. It will consist of paper spirals, threads and metal fittings. Let's start manufacturing. We wind paper strips on a toothpick. The ends of the workpieces are fixed with glue. Now you need to draw a flower with a pencil on a thick sheet folded in half. Cut the thread of the desired size and glue it on the pencil line. Now paper should be glued to the postcard. Metal or plastic balls should be placed in their center. And also with this decor you need to decorate the outer part of the flower. You can use not metal balls, but rhinestones or wooden beads. Now the outer edge of the postcard can be shaped into a wave. You can write a wish with a shiny gel pen or acrylic paint.
Greeting card for daughter
Such an addition to the main gift will not leave any girl indifferent. A quilling postcard is done as follows. Using curly scissors, the edges of the textured paper are trimmed. It turns out a smooth wave. Now, with the help of a toothpick, you need to create the same spirals, which with the help of flattening in the fingers is given the shape of an oval. Leaves are made a little differently. Needles are injected at an equal distance from each other. A paper strip is wound around them. Then the resulting figure needs to be stretched a little to add air to it. Three strips are glued on the base prepared in advance. And now you need to place the ovals and leaves of the flowers as shown in the figure above. A bow from a ribbon and a cute inscription can complement the card. Such a blank can be used as an independent postcard, or you can make a mat for it.
Christmas card
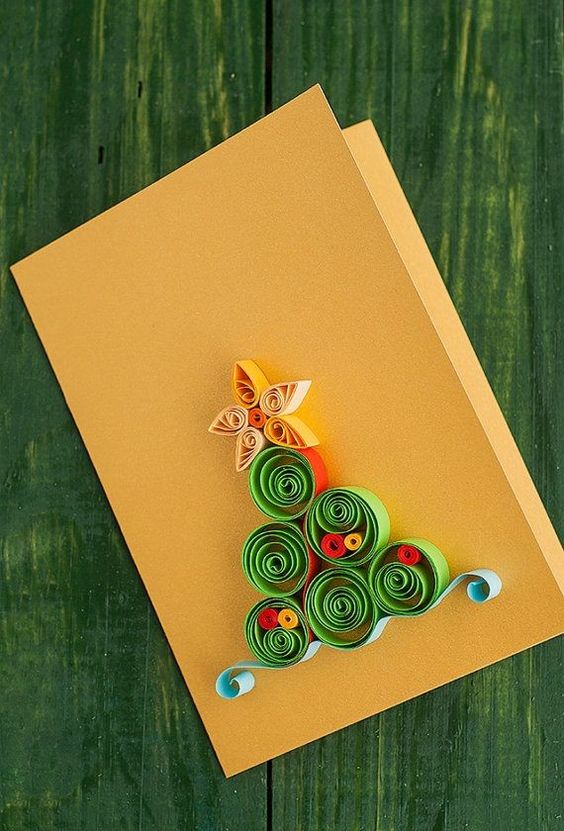
New Year is a favorite holiday of millions of people in our country. People begin to prepare for it several months in advance. If you also love the New Year, you can give your loved ones homemade quilling postcards. To create such work will not be difficult. To do this, you need special thin strips. With a toothpick you need to twist them in a spiral. The green blanks are slightly weakened so that the circles are quite wide, but the colored spirals are folded very tightly. In the desired position, the parts should be fixed to the glue. A star on a Christmas tree will be made in a slightly different way. The basis of the blanks is the same spirals, only one of their sides must be flattened in the fingers so that an even angle is obtained from the arc. It remains to collect a Christmas tree from green circles, and a star from drops. From the blue strip under the tree, you can build snowdrifts. DIY quilling postcard made. You can delight friends and loved ones with an interesting gift.
Simple postcard
Are you just starting to learn quilling? Greeting card for beginners is presented above. You can do it in literally 20 minutes. Provided, of course, that you buy strips or make in advance. How to twist funny cherries? Use a toothpick to wind red strips into the spiral, the ends of which must be fixed with glue. Twist the leaves should be on two reinforced needles. And to give a sharp oval a curved shape will help tweezers. Hook the tips of the tool over the edge of the workpiece and deform it. Glue cherries to the card and decorate them with eyes. Such decorative elements can be made independently of paper or bought in a store. How to make hearts? They should be made from ordinary spirals. One part of the circle should be flattened, and the other should be broken inside.
Balloons
A quilling style postcard can be even the simplest, but it will still look spectacular. Therefore, if you want to present a homemade gift, but are afraid that the result will be unsatisfactory, decide, you will succeed. How to make a card with balls? Use a toothpick to twist 5 colorful spirals and make them more airy. Then you will need to make small droplets. They are made according to the same principle as spirals, only the workpieces should be flattened from one edge. It remains to stick all the details on the card and add them with black or brown stripes glued with a rib. As a decor, you can attach a small bow.
Cake
How to make a quilling card of such a plan? The task of creating a cupcake is not an easy one. But if you try, such a figure will turn out even for a beginner. It consists of a cake from several parts. The brown part should be done first. It consists of three ordinary spirals and three triangles. Spirals should be twisted with a toothpick. Triangles are created using needles. The paper tape is wound on needles that are arranged in a triangle. The desired position of the part is fixed with glue. The pink layer is made using mixed media. You can twist part of the spirals with a toothpick, and part with a needle. Cherry is made in a standard way, as well as a lilac substrate.