Today, things related to their own hands have become very fashionable. It is worth noting that the easiest way to carry out models with a raglan sleeve. Knitting from top to bottom you can knit both a dress and a jumper, blouse or cardigan.
The stitching model is a profitable option for a "growing" thing
You can knit a raglan sleeve with knitting needles on top, then just do the back and front. And after that, assemble all the parts together and sew them together. This is one of the simplest ways of knitting things, since the master does not have to suffer from knitting out the armholes and cuffs of the sleeve, and then stitching the latter.
It should also be noted the practicality of knitting this model from above. If it is necessary to extend the part, only the last row closing the hinges opens. Further, the master simply imposes the desired value, and the thing becomes longer.
That is why so often knit things raglan style with knitting needles on top for children. Even if the baby has grown and the blouse has become not only short, but also narrow, you can tie strips-inserts and sew them into the side seams of the product. Moreover, these stripes may well be of a different color and even a different texture - now combined things are fashionable.
The pros and cons of knitting on top in a circle
But more often knitters use in their models the method of knitting raglan with knitting needles from top to round, from the neck to the bottom with one thread. This option does not provide for stitching parts, so it is much easier to perform.
The practicality of such a product is also that the yarn practically does not break. Therefore, if you want to dissolve the finished product and make it from a former blouse, for example, a beret will not leave much difficulty, because the thread will be practically without knots and tears.
Although there are some disadvantages to this type of work. Performing a raglan model with knitting needles on top, the master must carefully calculate everything in advance. After all, even a small slip will not be possible to correct along the way. It is possible for stitching models to remove excess fabric in the side seams. Everything will remain visible here. And all the corrections are in one thing: having dismissed, you need to start the model from scratch.
Correct calculation is the key to success!
Before knitting the raglan with knitting needles on top, you need to make a small piece of the fabric from the selected yarn with the pattern that you plan to use in the model. Usually enough sample in 20-30 rows with a width of 15-20 loops.
So, the sample for the calculation is completed. Now you should measure the resulting width. Suppose a craftswoman scored 20 stitches on her knitting needles. The width of the sample was 8 cm. We calculate:
- Subtract 2 edge loops from the number of loops. 20 - 2 = 18 (loops).
- Divide the resulting number by the width. 18: 8 = 2.25 (loops in one centimeter).
- We measure the girth of the neck. Moreover, it should be remembered that the head should easily pass into the neckline. Suppose we chose a girth of 40 cm (knitting tends to stretch a bit, so the head will easily squeeze into such a neck).
- Multiply the density of the knit (the number of loops in one centimeter) by the girth of the neck. 40 x 2.25 = 90 (loops). This will be the initial number of loops that should be typed on the knitting needles to complete the first row in the event that the model will have a raglan sleeve with knitting needles on top.
Calculation for a model made under the throat and without a fastener
Now it is necessary to calculate in what places it will be necessary to make additions for raglans.
For this, the total number of loops is divided by 3. In this example, it looks like this. 90: 3 = 30 (loops). This will be the number of loops in both sleeves. If you get a fractional number, for example, 22.5, then you can ignore the 0.5 loop. Usually only an integer is taken as a basis. In this case, it will be 22, especially since 22 is easily divided by 2, since the model will have two sleeves. If the master got 23.5 loops, it would be more convenient to increase the number to 24.
Dividing the result by 2, the master will receive the number of loops in the initial row for each sleeve. In the specific case, 30: 2 = 15 (loops).
The remaining loops will go to knit the back and front, 30 loops in each section, respectively.
Making additions when knitting raglan on top
So, consider the simplest option. This knitting raglan with knitting needles on top round the neck under the throat without a fastener. To do this, you need to dial the required number of loops on the knitting needles and tie a sufficient length of the pipe with an elastic band. Then the addition of loops begins, so that the model is "raglan on top" with knitting needles. The master class of this process will help the novice master to become a real pro in this business.
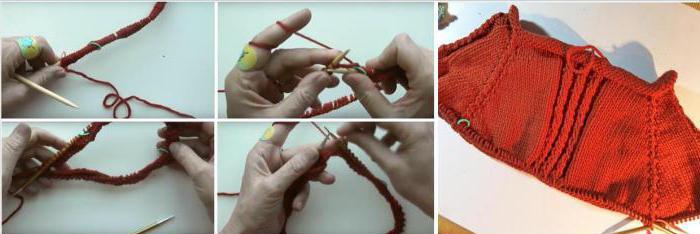
- The required number of loops is typed on the knitting needles.
- The first row is knitted with the selected pattern.
- At the same time, loops are calculated on which additions will be made. These places are marked with colored rubber bands or thread. To get it more accurately, from the beginning of the row half the number of the back is postponed, that is, in our example it will be 15 loops. An elastic band is put on a knitting needle.
- Next, the beginning of the sleeve is carried out - they knit 15 loops and put on an elastic band.
- Now lay the front loops - 30 pieces. This place is marked again.
- Sleeve - again 15 loops.
- From the second row they are already starting to add. You can just do crochets around the marked loop. You can knit three from the loop (double crochet, front, double crochet), or from 3 make 5. Make a bird’s trace.
- The third row and all subsequent odd ones are made simple knitting, where the yarn is knitted as a separate loop.
- The second row knitting algorithm extends to all subsequent even rows.
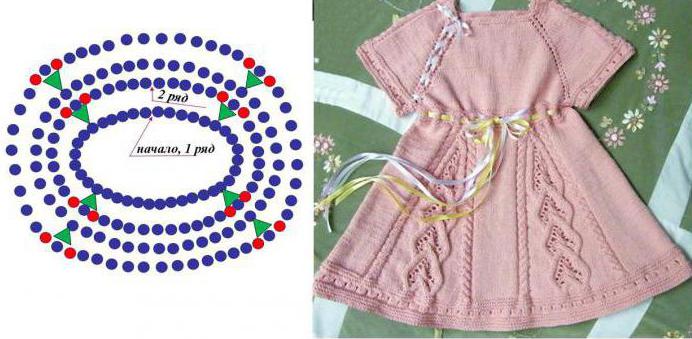
Here is presented to help the novice master, who undertook to knit a raglan model on top with knitting needles, a diagram that clearly demonstrates the beginning of the addition process.
Calculation of the increase in loops in the armpit area
And so the top of the model is done. The product reaches the shoulder joint, which means that knitting raglan with knitting needles from above goes into another phase. It is time to loop, designed to knit the sleeves, transfer to spare knitting needles or remove them on a twine or linen elastic. It should be tied in a ring so as not to miss the loops.
The main thread, the master continues to knit in a circle, moving from the back to the front. In places where the back ends, you should dial additional loops on the knitting needles. Their number is calculated in this way.
Chest girth multiplied by the density of the mating. For example, this size is 92 cm. We remember that the density of our knitting is 2.25 loops in one centimeter. 92 x 2.25 = 207 (loops).
Next, from this number, subtract the number of loops of the back and front. Then the result must be divided in half. Here is the number of loops and is additionally typed on the knitting needles.
The final stage of work on the model
Now, in a circle, the master knits with the selected pattern until the product becomes the desired length. After that, you should tie an elastic band or just close the loops - it all depends on the model chosen. The thread at the end of work breaks off, fastens, and its tip is hidden from the inside.
The loops of one of the sleeves are transferred to the knitting needles. The main thread enters the work. Knitting is carried out in a circle. Near the elbow, you can slightly reduce the width of this part of the product. When the sleeve reaches the required length, they knit an elastic band or simply close the row. Do the same with the second sleeve.
Raglan with a front slit at the neck
It is known that the heads of babies are not always easy to crawl into the sweaters under the neck. Therefore, making a raglan style with knitting needles on top for children, the master often chooses a model with a cut, thereby increasing the neck.
The total number of loops is calculated according to the scheme described above, adding 2 edge loops to the result . The process itself is no longer round-robin, but with the rotation of the product. You can trim the gates of the throat with a strip of the "muddle" pattern.
This drawing is pretty simple. This is an alternation of front and back loops. Only over the front should be worn wrong side, and vice versa. That is, it turns out, as it were, the gum knitting algorithm, but with entangled loops. Hence the name of this drawing.
Moreover, at the edges of the rows it is also best to knit the trims with a "muddle" pattern. In principle, this is the only difference, because the model fits in almost the same way as raglan on top with knitting needles, the master class of which was described above.
After the bar reaches the required length, knitting becomes circular. The operation algorithm further fully corresponds to that described above.
Jacket raglan on a through fastener
The difference between this model and the sweater on the bar at the gate is that the row does not join the ring. All jacket fit in rows with the turn of the product. And to calculate the total number of loops, not only 2 edging, but also the number of planks (1 time) are added to the result.
For example, at the very beginning, we found out that for a regular raglan from above, a round loop requires 90 loops. Now we will adjust their number in accordance with our model. We also make a jacket with raglan knitting needles on top of a through fastener, which means that you need to add 2 hem and strap - where buttons and loops will be placed. Usually it is 7-9 loops. 90 + 2 + 9 = 101 (loop).
The bar itself is formed symmetrically on both sides of the row. Moreover, on the bar on which it is planned to make loops, the master knots the “holes” at the same distance. To do this, you can knit 2 stitches together in one row in one row, and on the wrong side make a yarn in this place. In the next row, the yarn is knitted in the usual way. The result is a “hole” for the loop.
If large buttons are selected, you need to close 2-4 loops in the right places, and on the wrong side of this row, add the number of previously closed loops in the same place. Then the hole for the loop will be larger.
Being able to knit raglan knitting needles on top and calculate the number of loops for work, it is quite possible to model other product options. Experienced craftswomen use tying braids in front, make slots for pockets, make collars of various configurations and make a neck of various shapes.