Recently, diamond embroidery is especially popular with needlewomen. The works created in this technique amaze the imagination with the sophistication and grace of the lines, delight with the magnificent play of light. The paintings look like a real jewel. Anyone can try their hand at this art. The technology for assembling diamond panels is simple compared to other types of needlework. Create a masterpiece with your own hands will help the detailed instructions outlined in the article. Diamond embroidery is a fascinating occupation and a great way to pass the evening, and the finished panel will be a wonderful addition to the interior of any room or a great gift.
Description
Diamond mosaic got its name due to its resemblance to cross-stitch and a special play of light on the edges of the elements, similar to diamond shine. The work is performed on a canvas divided into cells according to the size of rhinestones. Fields for fastening elements are marked with special symbols corresponding to a specific color. To decipher the shades will help the legend that is available in each set. The canvas for the mosaic is covered with a layer of adhesive. The latter protects the substrate from drying out and contamination. It can be solid (if the mosaic is small) or cut into strips for ease of operation.
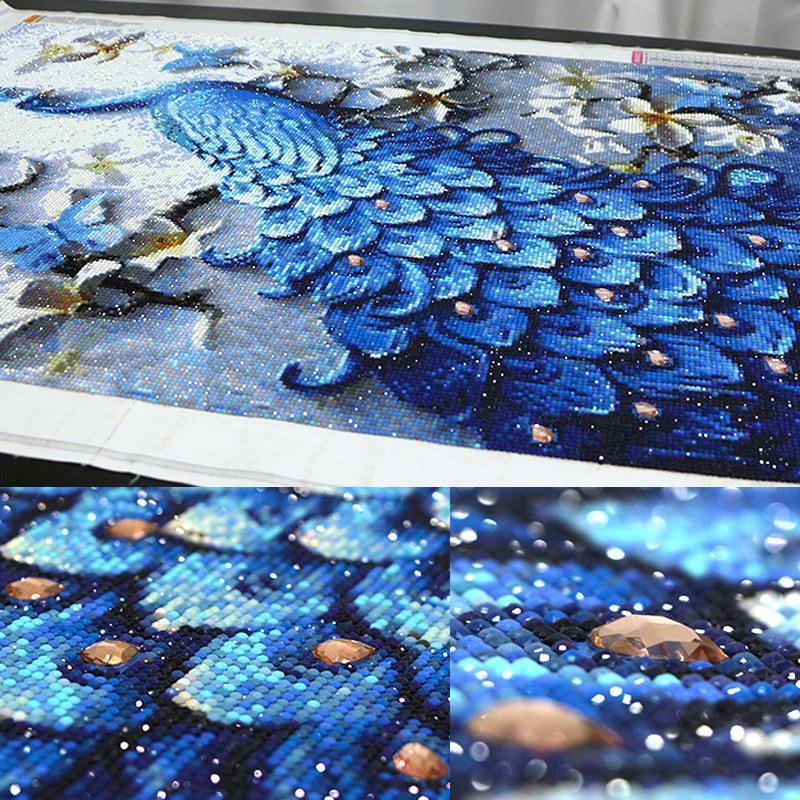
Rhinestones for diamond mosaics are usually made of acrylic. It is a durable material that is not afraid of exposure to ultraviolet rays. Thanks to this panel will delight you with rich colors for many years. Mosaic elements can be round and square. Working with the first is a little more difficult, since accuracy and a trained hand are required. Mosaic of square elements looks solid and neat even for beginners. Rhinestones have a faceted surface to create beautiful highlights.
Making diamond embroidery with your own hands is not as difficult as it seems at first glance. Only accuracy and patience are required.
Diamond Embroidery Kits
In the assortment of shops for needlework, you can find both Chinese and Korean sets for creativity, as well as domestic. The debate on the web about which of them is better does not cease. Kits from Color-Kit (China), Iteso (China), Anya (Korea) are popular. Among domestic manufacturers, positive feedback from needlewomen received: “Diamond Painting”, “Spider Web”, “Granny”.
Typically, a diamond embroidery kit includes:
- Fabric base for mosaic, coated with a layer of adhesive and divided into sectors. Each cell is marked with an icon corresponding to a specific color. The adhesive layer is protected from drying and dust by the substrate.
- Rhinestones for diamond embroidery of the required colors, packed in separate plastic bags with number stickers.
- Legend. It is needed to match the cell symbol on the canvas and the color number.
This is the basic equipment. Some manufacturers supplement the kit with a stretcher, a tool for gripping rhinestones (tweezers, glue stick, a special stick), an organizer, sorter and corrector.
Creating a diamond mosaic from scratch
All kit components can be purchased separately. Experienced needlewomen do this to create unique panels on photographs. Manufacturers offer ready-made canvases of various sizes, already divided into standard sectors and covered with an adhesive layer. To break a photo or a picture you like into cells, you can use a special program, for example, "Diamond Mosaic" version 0.9. The utility will not only divide the selected pattern into sectors, but also calculate the number of elements of different colors in pieces and grams. As a standard, the program uses DMC rhinestones, which are easy to find in needlework stores.
Basic materials and tools
Before you begin, you must prepare all the necessary tools:
- Canvas (ready-made from a set or purchased separately). In addition, you can take advantage of the above program and print a paper base. In this case, you will also need a double-sided tape to work with which paper is glued. It replaces the sticky coating of industrial-made canvas.
- Rhinestones. Experienced needlewomen pour the elements into the organizer for beads, but this is not necessary.
- Tool for laying rhinestones. This can be a plastic or metal tweezers, glue stick, a special stick (it is often included in sets) or a manipulator. Tweezers are considered a convenient tool for working with square rhinestones. The manipulator can stack elements not only one at a time, but also in groups of up to eight pieces. Such tools are often equipped with LED backlighting, which facilitates work and protects the eyes from excessive voltage.
- Legend.
Additional tools
The following fixtures facilitate the process of creating a diamond mosaic, but can be easily replaced with improvised tools found in every home:
- Sorter. This is a special container where rhinestones are poured right before work. The bottom relief makes the elements stack in even rows, which is very convenient when working with the manipulator. The sorter can be replaced with a palette for paints or a regular saucer.
- Corrector. This tool is designed to align the rows of rhinestones so that the work looks neat. It is a flat plastic spatula with a width of about 10 cm and can be replaced with a metal ruler.
Having prepared all the necessary tools, you can begin to work on diamond embroidery. The instructions below will help you easily and naturally create a work of art that will take its rightful place in your interior.
Preparation for work
As a rule, the canvas is sold folded or rolled up. Before starting work, it must be leveled, since mosaic elements will not hold at the places of bends. To do this, put the foundation under the press for several hours or at night. Books or glass can be used as cargo. If you can’t wait to get started, experienced craftswomen recommend using an iron. The appliance must be turned on at a minimum temperature so as not to damage the adhesive base. It is better to iron the canvas through a layer of fabric.
The workplace must be flat and clean. Dust and small pile can settle on the adhesive layer of the base, which negatively affects the strength of the attachment of rhinestones.
The work uses elements of a very small size (2-5 mm), so it is necessary to provide high-quality lighting so as not to strain your eyes and not mix up the shades. Currently, manufacturers offer special LED panels with backlight to ensure the comfort of needlewomen. Such devices also allow you to adjust the angle of inclination of the work surface, which is very convenient. Of course, you can use a regular table lamp.
Main stage
The following master class on creating diamond embroidery for beginner needlewomen will help make the process of work easy and enjoyable.
First, according to legend, they choose the color with which they will work. A small number of elements are poured into a sorter or saucer. Then peel off part of the protective film from the canvas. It is not recommended to completely remove the substrate, this will help protect the sticky layer from contamination and loss of fixing properties. In addition, if the work is not completed in one approach, it can be rolled up without the risk of damage if there is a protective film.
Using tweezers or another tool, grab a rhinestone and set it on the appropriate cell on the canvas. The element needs to be pressed slightly. It is not recommended to apply force, this will allow later to smoothly align the rows of rhinestones vertically and horizontally. In addition, excessive pressure can damage the base.
The process of laying elements continues, changing colors, according to the symbols indicated in the cells. At the end of a row or column, it is aligned using a corrector or a metal ruler.
When the work is completed and all the elements are in place, they must be permanently fixed. To do this, use a rolling pin or a construction roller. The work is covered with a layer of fabric or the remaining protective film and rolled with effort.
Mosaic is ready! As you can see, the technique of making diamond embroidery is quite simple, even a beginner will cope with the work. Now the work can be fixed on a stretcher, a sheet of cardboard or chipboard.
Varnishing
All the main steps in creating a mosaic are described in detail in the above instructions. Diamond embroidery is a very exciting creative process that allows you to relax and relieve stress.
Some needlewomen, in order to more securely fix the elements, cover the mosaic with a layer of acrylic varnish. For diamond embroidery, a glossy composition is suitable. It will give rhinestones an extra sparkle. You can use varnish in the form of a spray or apply the composition with a brush.
It is important to remember that the coating layer must be very thin. Otherwise, the varnish will flow between the mosaic elements, which will spoil the appearance of the work. As a rule, it is enough to apply 1-2 coats to achieve a firm fixation of rhinestones on the canvas. Each layer of acrylic varnish needs to be dried during the day.
Decor
How to make diamond embroidery? Finished work can be placed in a baguette frame. It is best to use a simple frame so that it does not distract from the main plot of the panel. The frame can be decorated with rhinestones remaining after work. The main thing is to observe the measure so that the work does not seem overloaded.
To protect the panel from dust, it can be placed under the glass. It should be borne in mind that it is better to choose anti-reflective material for diamond mosaics. If you use ordinary glass, then the radiance of the work itself will be blurred. It is worth considering that mosaics covered with acrylic varnish do not need additional protection.
Modular paintings are very popular in modern interior design. They also perform in the technique of diamond embroidery. This decor looks amazing. Modular paintings are fixed on stretchers and varnished. Frames and glass in this case are redundant.
Tips & Tricks
How to make diamond embroidery? Following the above instructions will create a magnificent panel, and the advice of experienced craftswomen - make this process even easier and more enjoyable.
- If the sticky layer is dirty, you can remove the garbage with a wet art brush. The use of cotton buds is not recommended, as they leave villi. Wet wipes also will not work: impregnation can enter into a chemical reaction with the adhesive, and the work will be ruined.
- If the fixing layer is dry, you can continue to work using a transparent double-sided tape or glue gun. In the latter case, the fixing composition will have to be applied directly to each element of the mosaic, and not on the canvas.
- Some large works consist of several paintings in order to fasten them together, you need to cut one piece and stick it with an overlap, observing the markup. Fixed over the rhinestones will hide the joint.
Conclusion
The paintings made using the technique of diamond embroidery are a real work of art. Creating such a masterpiece with your own hands is quite easy. We hope that the detailed instructions on diamond embroidery presented above will help beginner needlewomen to cope with the work.