Quite often, when arranging a territory outside the city or when building a house, it becomes necessary to drill holes in the soil. They may be required when installing the fence, when you need to mount poles. Such holes are also needed in the construction of arbors, utility buildings, as well as arches.
Why you should do it yourself
Pits may also be required when installing a pile foundation. These pits are usually done with a manual or motorized drill. Such equipment is available in the store, but many today prefer homemade products. Such devices are more reliable and productive than factory ones. In addition, an earth drill with your own hands can be made from improvised materials, that is, you do not need to spend money on its purchase.
The main types and features of the drill
To date, three drill designs are known. They can be:
- Gardening.
- Screw screws.
- For TISE piles.
The first variety has two semicircular blades that are fixed to one another at an angle. This type of hand drill is commonly used to make holes before planting. With this tool you can get pits when there is a need to establish supports for arbors or fences.
Screw Design Features
If you want to make an earth drill with your own hands, you can make a screw design. It has a longer cutting part, and you can use the tool for the same purpose. With it, you can easily make a hole under the supports. Due to the design features, such a drill will have to be removed less often, so you will be able to work faster.
There is also a drill for TISE piles. The design resembles a conventional garden drill, but has a reclining shoulder blade for extensions. It is located at the bottom.
Features of the garden structure
Do-it-yourself earthen auger will simply be done if you take the garden structure as a basis. Depending on the type of soil on which drilling will be carried out, the design can be slightly modified as you wish. This is the beauty of homemade products, because they can be adapted for specific purposes. The point here is not only in size, but also in the blades. They can be removable, bolted. Ordinary drills are inexpensive, but they can only work under ideal conditions. With their help, you can work on light soils, and on clay they are ineffective. Complicated soil may be in your area, so you need to provide a reinforced structure.
Reviews on the design features of the garden drill
If you want to make an earth drill with your own hands, then you should get acquainted with the opinion of home masters about the design features of such devices. You can take the garden model as a basis, which is effective and simple. It consists of a cutting part, a rod, a tip in the form of a drill and a handle. According to consumers, the cutting part should have two steel semicircles. The diameter of the blade can be selected taking into account the desired diameter of the pits.
If desired, the blades can be made removable. Home masters argue that it is better to use a bolted connection for this. Do-it-yourself homemade earth drill can be done by providing it with a rod. As it is usually a profiled or round pipe. You can use scrap, but working with such a tool will be difficult due to the impressive mass. The length of the rod should be equal to the depth of the pit. About 60 cm should be added to it. If this value is less, you will drill the last centimeters, bending over the ground, which is very inconvenient.
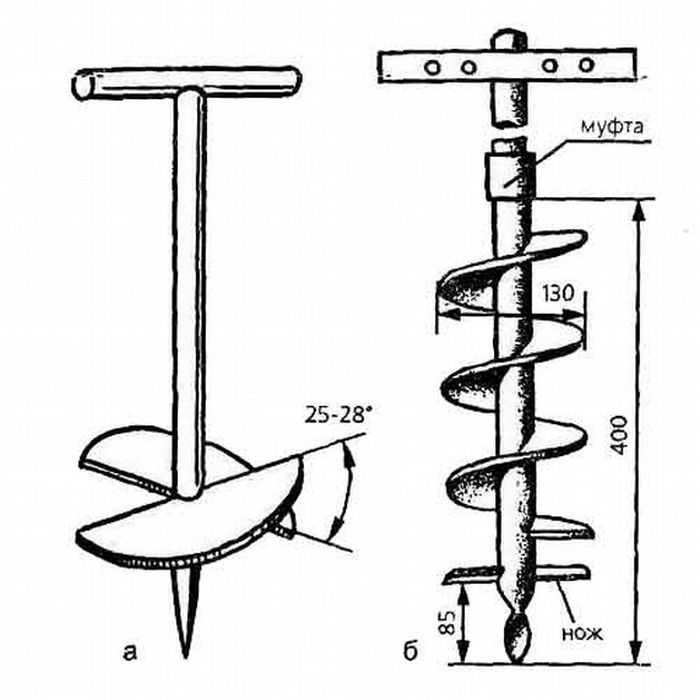
If, with such a calculation, the total height will be more than 1.50 m, the team bar should be made. Consumers emphasize that in this case the core needs to be extended with pipe sections of the same diameter. It will only be necessary to come up with a joint system. Before proceeding with the manufacture of an earthen hand drill with your own hands, drawings must be made. Having familiarized with them, you can understand that the design provides for the presence of a handle. It is usually welded to the rod to form a structure resembling the letter "T". The length of the handle can be about 40 cm. The optimal value is 50 cm.
The tip should look like a drill. This part will be located under the blades. Home craftsmen emphasize that he will be the first to loosen the soil, responsible for centering the tool. Thanks to the tip, you can hold the device vertically. The proposed design is basic, you can modify it if you wish.
Preparation of materials
If you want to make an earth drill with your own hands, drawings must be prepared without fail. However, not only this must be done. One of the first steps is also the preparation of the material. The rod is best made from a pipe, the diameter of which should be 3/4 inch. If we are talking about a profiled pipe, then its dimensions can be equal to 20 x 20 mm.
Knives that will play the role of the blade can be made of 4 mm sheet steel. The saw blade for the angle grinder is also perfect. The main thing is to choose the right diameter. It’s easier if you make blades from a disc. The cutting edges in this case are ready. The side faces will need to be sharpened additionally so that the soil is cut easier.
When making a handmade earth drill with your own hands, you must make a lance that will serve as a drill. It is usually made from different materials. You have to make a sharpened rod. To do this, you need a piece of bar of impressive diameter.
Another option is to use a strip of steel, from which you can make a part similar to a drill. You can apply a combination of two options. It is more convenient if the handle will look like a round pipe. Choose its diameter so that it is convenient for you to hold the handle.
Work on knives
Doing a drill for earthwork with your own hands, you will also have to work on the knives, as well as the way they are fixed. It is important to decide at this stage whether the blades will be stationary or removable. In the latter case, at one end of the rod, it is necessary to strengthen the shelves of steel. They should be tilted so that the knife planes are divorced at an angle of 30 °. When the shelves are welded, they should make several holes for fasteners. The same holes are made in the blades. They are mounted on bolts of an impressive size.
Homemade earth auger should have holes in the discs. This will ensure a snug fit to the rod. The operation must be carried out when the blades are welded.
Work on the blades
If the blade is based on sheet steel, you need to cut a template out of paper, and already make a circle of steel on it. In the central part, a hole should be drilled where the rod will be inserted and welded. Depending on which rod was selected, the hole should look like a square or a circle. Its dimensions are slightly larger than the dimensions of the rod.
When making a manual drill for earthwork with your own hands, you must decide what kind of blades will be. They can consist of two halves of a circle. Sometimes they are made in the form of an open circle, the edges are shifted. Dilute them with 25 °. The drilling efficiency will be maximum. If you want to work on dense soil, the blades under load can be reduced. To eliminate this, you need to add steel strips in the form of stops, which are made of a corner.
Using a hammer drill to make a drill
Homemade drills have some disadvantages, despite the fact that they are made according to their own drawings, given their own growth and type of soil. Among the main shortcomings, it should be noted that with the help of such devices it is possible to dig not very deep holes, and working with them on hard soils can be quite difficult. All this, as a rule, applies to hand tools.
If you connect the working part with a punch, it will be possible to increase labor productivity. At the heart of such a drill will be an earthen auger, hammer drill and adapter. The latter can be replaced by a gearbox. An important factor is the number of revolutions of the punch and power. The optimal value of the last parameter for the manual model is 2 kW.
Depending on the number of revolutions, the drill can be connected to the drill chuck through a gearbox. If the power is 2 kW, then the gearbox is not needed. If you want to make an earth drill from a punch yourself, you will need a tool that gives out the number of revolutions of the working nozzle up to 300 per minute. This value may decrease. It depends on the properties of the soil on the site. To make a drill from a perforator, it is necessary to prepare some materials and tools, among them it is necessary to highlight:
- Angle grinder.
- Electric drill.
- Metal fittings.
- Cable.
- Sockets.
- Welding machine.
- Material for the cutting part.
If you wondered how to make an earth drill with your own hands, then you need to pay special attention to the nozzle. To make it, from a rod or tube using a grinder, it is necessary to cut a piece 1 m long. Knives should be attached to the lower end. The base is cut off from the drill for installing the nozzle in a perforating cartridge. After that, the cut off fragment should be welded to the tube.
An earth drill from a drill with your own hands can be performed using the same technology. If the base is not used from an old power tool, the seat for the cartridge should be machined from the rod. An adapter can be inserted there. In addition to the manual model, you can make a stationary drilling rig. To provide power, you must purchase or make an extension cord yourself.
Work on the cutting part
The cutting part can be made removable. And the rest of the design may have the same appearance as in the manufacture of a mechanical drill. For this, ready-made screws, circular saw blades or a metal sheet are usually used. The drill tip for such a tool is usually made of a drill for metal, so that the tool can easily overcome the ground mass.
In fact, remodeling a punch or drill consists in making a nozzle that will fit the size and functionality. Difficulties can arise only if you begin to independently prepare a seat for a cartridge or adapter.
Spiral and spoon drills
It is much more difficult to make a spiral drill, but at metal receiving points you can find suitable objects for this. Perfectly use a fishing drill or auger. The main thing is that the diameter is suitable. It will be necessary to cut off the element of the desired length from the workpiece, as well as sharpen the edges and attach to the bar.
Spiral drill is great for drilling water wells. A spoon drill is used to drill wells while installing a casing. To do this, a length of pipe of 70 cm is usually used. A slot is made along the length, and an old drill is welded at the bottom. A feature of such a drill is that its fastening to the rod is offset by an axis of 15 cm from the axis. This will make it possible to obtain a larger diameter during drilling than the drill itself.
Conclusion
Before proceeding with the manufacture of the drill, you must determine its purpose. Some options can only be used to dig holes for seedlings and poles. Other designs specialize in water well drilling. The home-made drill is in no way inferior to the factory one, and surpasses it in some respects. In addition, it is cheaper. Therefore, it makes sense to engage in its manufacture.