Recently, an increasing number of people are fond of origami - the Japanese art of compiling paper crafts. Some are attracted by the classical form of this lesson, where the product is made of squares without the help of glue and scissors. However, origami from modules is more common . A step-by-step instruction of a vase involves creating a composition of many separate fragments, which in some places are fastened with glue.
What is it for?
Such a hobby is very useful: it promotes peace, concentration, and focuses on children. In addition, origami crafts can be great gifts for the holidays for loved ones and friends. Or they can creatively decorate your interior. It can be some kind of animal, bird, flower or a simple vase from origami modules. Step-by-step instructions will help in this difficult-looking case. And also a little zeal and perseverance. Even if you take ordinary office paper, you get a product no worse than the factory counterpart. Let's take a closer look at how a vase from (white) origami modules can turn out. A step-by-step instruction includes a number of similar steps, differing in the number of segments, their color and assembly scheme. Of course, the quality of the paper matters: they come out of thin and easily torn crafts short-lived, but even here you can get out of the situation by folding it in two layers during production.
Simple option
A vase of origami modules, step-by-step instructions for the manufacture of which are given below, are even for a beginner in this type of creativity. It consists of only 192 triangular fragments of the 1/32 format (from A4) in four shades: dark blue and white - 42 each, light blue and yellow - 54 each).
The assembly diagram is as follows:
- The first and second rows: dark blue and light blue modules, respectively (12 pieces each) - assemble and connect into a ring.
- From the third to the ninth row - to collect 12 pieces in this color sequence: yellow, white, yellow, light blue, dark blue, light blue, yellow.
- In the tenth - white modules (12 units) we place the smaller side up.
Next, a step-by-step instruction describing the manufacture of a colored product, provides that the eleventh row was expanded in white parts to 18 by fitting them on one recess of the modules of the previous row.
- By analogy with the tenth row, we have yellow modules (18 pieces).
- We will complete the next row with 18th light blue fragments.
- We finish the last fourteenth row with the same number of dark blue modules.
The "Japanese" vase is ready.
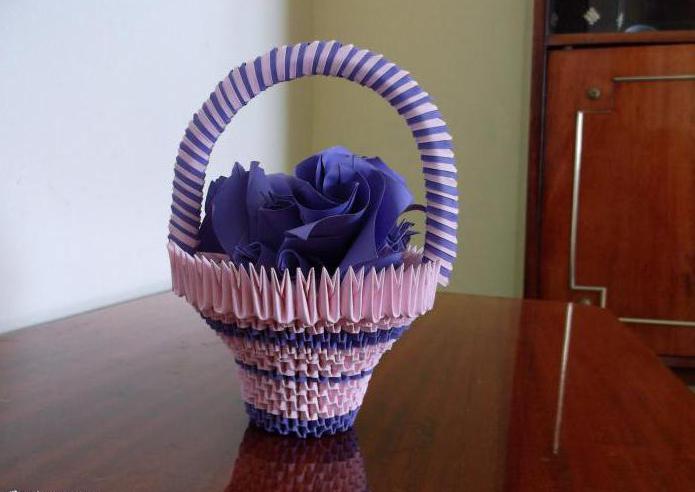
Origami floor vase: step-by-step instructions
We will try to assemble the craft using the yellow and blue triangular modules (484 and 170 each). To stack this particular vase, you need modules that are equal in size to one thirty-second part of A4 sheet. Other colors and sizes can be chosen to taste. Such a product will ideally serve as a souvenir or vessel for paper flowers.
Working process
How can a vase be made from origami modules? Step-by-step instructions are provided below.
- For the first, second and third rows, yellow fragments are needed: 20 pieces each. It is necessary to simulate the body of the vase. To do this, insert the modules in the fourth row (according to the photo), it is better to fix them here with glue to avoid discrepancies in the next steps.
- Modules of the 5th row must be put upside down in relation to the previous one. The sixth row is similar to the previous one.
- In the seventh, the modules are again turned upside down.
- We will supplement the eighth row with 8 modules (the result is visible in the photo) so that in total there will be 28 of them in a row.
- Ninth - we complete according to the scheme: for 7 yellow modules 1 - blue (only 4 blue and 24 yellow). Thus, we "draw" the pattern of our vase.
- In the tenth row, we apply 2 of the same color to all corners of the blue parts. As a result, we have eight blue and twenty yellow modules.
- 11th row: we put the modules on the extreme corners. The next three rows need to be folded to form a pattern.
- In the fifteenth and sixteenth - the upper corners are reduced to the center, so we round the shape of our vase. Now on the foot of the vase we put the blue modules on the ends of the yellow ones.
Further:
- We remove seven modules to narrow the neck of the vase to the 21st, by skipping in the seventeenth row of each 4th place for the module.
- We will make the eighteenth row of 21 yellow fragments, the nineteenth of the same number of blue ones.
- Reduce the 20th row to 14 yellow modules, skipping every 3rd place, the 21st - we build the same number of yellow modules that we glue together.
- The next two rows will consist of 14 yellow and blue modules, respectively.
- In the 24th - the yellow parts (14 pieces) must be worn upside down with respect to the previous row.
- The 25th row is equally supplemented by seven modules to get 21, and in the same way (but in blue) we build the next row.
- 27th - expanding by another 7 yellow fragments, now there are 28 of them. And the next row will consist of the same number of blue modules.
- Actually, the vase is ready, the assembly of the pens remains: we will connect the blue modules (19 pieces each) with each other. Add the shape to the resulting handles and attach them to the vase with glue. The original vase is assembled.
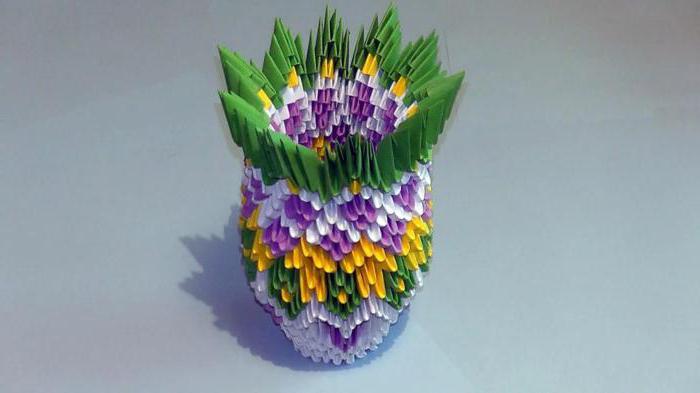
Delicate vase from origami modules: step by step instructions
Photos of such products immediately attract attention. This variation of the popular craft will be made in three colors: white, pink and purple.
- First, collect the bottom of the product. 1st and 2nd row, consisting of 24 parts (white and pink, respectively) we close in a circle and turn inside out, getting a cylinder. The third row will also grow pink modules.
- 4th - it is necessary to dilute with white fragments (every three pink one - white).
- The 5th row is completed alternately with white and pink parts (2 pieces each), creating a pattern.
- In the 6th - add purple modules. We complete the next two rows in the same way.
- The 9th row is typed only in pink modules.
- The next 5 rows are assembled in the same way, and the 15th and 16th need to be made with six pointed protrusions, the peak of each of which is duplicated with a purple module.
- The next step is to make a vase neck. To do this, you need to collect 13 modules in a row and connect them to the “shoulders" through the holes in the protrusions.
- When the neck “stretched out”, you can begin to shape the top: you need to put on 2 white fragments of the 1/32 format and link them with pink, and then build a kind of white “ladder”, securing it with pink modules. It turned out one of 6 petals. We collect five more according to the same scheme.
- Now, to make the top of the vase more harmonious, it is better to remove 4 modules in the rows of each petal. Our vase is completely finished.
Conclusion
As can be seen from the above, Japanese art is a very entertaining thing. If you wish, you will be able to vase from the origami modules. A step-by-step instruction, a little perseverance, diligence, and the original do-it-yourself hand-made article is ready.