Man learned to use solar energy for his own needs a long time ago. Today, people apply this knowledge, including for the manufacture of solar collectors, with which the sun's energy is converted into heat. Such a device can not be called quite complicated, so you can make it yourself.
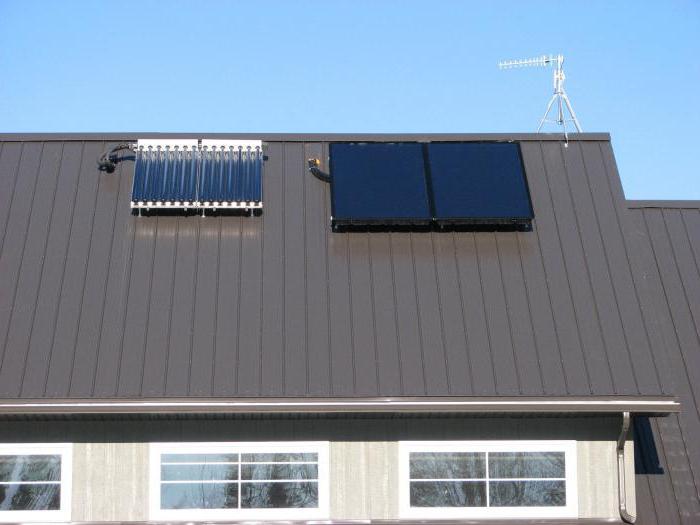
Vacuum manifold
A vacuum manifold is equipment that reduces heat loss more than others. This is made possible by the conditions that are maintained between the shell of the unit and the heater. The system includes glass tubes that are devoid of air. The black tube located inside heats up, thanks to which the design is able to raise the water temperature to 300 degrees. Despite the high efficiency, the system does not have the ability to self-clean from frost and snow.
Flat collector
The flat collector differs from the above in that it has much higher heat loss. Such structures are able to be cleaned without human assistance from minor drifts of snow. The device has the form of a transparent panel, inside of which there are tubes. The back wall has a heat-insulating layer. Water is able to heat up to 200 degrees. When a strong wind acts on the mount, an impressive load can be carried out, which is also facilitated by streamlined forms.
Air collector
An air collector is a flat unit in which air is used as a heat carrier. Such equipment is quite simple to manufacture on your own, however, it is worth considering that the unit has a low efficiency and cannot be used to heat water. The tubular manifold consists of four tubes filled with coolant. The circulation becomes possible due to the temperature difference between the lower zone of the drive and the collector. A similar system differs from a flat more impressive surface area, which is designed to absorb light. Mobile systems are installations that turn after the movement of the sun. For work, you can choose a design that unfolds completely, or a device that is equipped with a mirror, as well as a heating element. The master must also know about the principle of the collector, which consists in the fact that the solar radiation in the process heats the tube with a coolant, and then the heat passes into the battery. You can independently make vacuum collectors for heating from improvised means, however, for a start it is important to familiarize yourself with the technology of the work.
Making a simple solar collector
If you will make a vacuum solar collector with your own hands, then you should prepare a galvanized container designed for water. Its volume can range from 100 to 200 liters. Capacity to be located on the roof. 100 liters of liquid can heat up to a mark of +60 degrees if the barrel is installed on the south side of the roof. The latter will be covered with a shiny metal sheet. The efficiency in this case will be much higher, since the area of heat exchange with air is minimal. It is recommended to use such a simple solar collector in areas where the environment is maintained at the required level; it is best to operate such a system away from gassed areas. It is worth considering that in winter such an aggregate is capable of generating less heat.
Production of a collector from a radiator and plastic pipes
If a vacuum manifold is to be manufactured, more sophisticated technology can be used. Pretty cheap materials can be used for the work, but the water can be heated in a very simple way. For manipulation, you will need steel boxes, fittings, metal-plastic pipes, glass, as well as radiators made of steel, in the amount of two pieces.
Technology of work
In order to make a vacuum manifold, radiators should be located in metal boxes on the roof surface. They are covered with glass, and their purpose is to reduce the period of heating the water. When installing them, remember that the top is below the storage tank. This will allow the water to rise naturally into the tank. When making a vacuum manifold, you must remember that circulation should be carried out in the usual way. Tubes of water wires should be laid with a slight slope down, turning the elements in the direction of the radiators. A plastic container with a volume of 160 liters should be installed in the attic of the house. It connects to radiators using metal-plastic pipes that mate with fittings.
Water with the highest temperature should be located in the upper part of the tank. To do this, a tube of warm water must be connected to a container above the central part. In the lower part of the radiator, drainage taps are installed to drain the water in the winter.
Production of a collector based on a wooden frame
If you decide to make a vacuum solar collector with your own hands, then you can use the technology presented below. To do this, prepare insulation material, a black metal mesh, a deflector, two fans, a polycarbonate sheet and a wooden frame that has a bottom made of plywood.
The nuances of the work
Two holes in the shape of a circle must be made in the bottom of the frame in order to be able to take air. In the upper part, you need to make 2 holes that will have a rectangular shape. They are necessary for the removal of hot air from the structure. At the bottom you need to lay insulation material. The accumulation of heat occurs using a metallic black mesh. Two fans should be installed in the round hole. The support plates of the deflector are installed in the structure, and after that the deflector itself is fixed. It is required for the formation of air flow. If you decide to make such a vacuum-tubular collector, at the final stage the device is fixed to the wall of the building. As practice shows, the effectiveness of this equipment is 50%. It can be used for space heating.
Collector Installation Features
Although it is possible to make a vacuum solar collector for heating on your own, however, the work differs in some degree of complexity. It is important to correctly determine the installation location so that the efficiency can be raised as high as possible. The installation needs to be oriented south. The deviation is 25 degrees in both directions. It is important to eliminate all obscuring factors. The movement of the coolant should be turned upwards. The equipment must not reach the overheating point before and after the installation. In one row should not be more than 3 collectors. If you make a vacuum manifold with your own hands, and then it is planned to install it in a larger quantity than indicated above, then you need to build in a compensator and ensure linear thermal expansion.
Making a collector from a refrigerator coil
If you plan to make the construction described in the article yourself, it will be important to find out what the structure of the vacuum manifold is. You can understand this from the methodology presented below, which involves the use of a refrigerator coil. Among other things, you will need foil and slats, which will form the basis of the frame. Prepare a rubber mat, water tank, or container. It is important to stock up on glass, as well as shutoff valves according to the type of pipes and valves. Initially, it is necessary to flush the coil from freon. Next, the rack frame is knocked down. Its exact dimensions depend on the dimensions of the working unit. The mat must be adjusted to the existing slats, among which it is important to freely position the coil. On the rubber mat, which acts as the bottom of the frame, you need to lay a layer of thermal insulation. After the coil is strengthened with screw clamps. In the walls, the master must make holes through which the vacuum tubes will pass. The solar collector using this technology will turn out to be highly efficient. If there is a need to increase productivity, then you can seal the joints with sealant. Glass is fixed on top with tape. In order not to worry about strength, it is recommended to prepare aluminum plates by making special clamps from them.
Alternative vacuum manifold solution
It is important not only to choose the right vacuum tubes for the collector, but also to build the rest of the elements that will form the basis of the system. For the box in which the radiator will be installed, wooden 120-mm boards are suitable, which is their width; the thickness of the blanks should be 30 cm. For the bottom, you can use textolite, which is complemented by stiffeners. The bottom must be insulated with polystyrene or mineral wool, which is covered with galvanized steel. Next, two pipes are prepared, the diameter of which should be 1 inch. It will take 15 thin-walled pipes with a diameter within 0.5 inches. In thicker elements, holes should be drilled in order to establish thinner components perpendicularly. The design is welded into a single device. The heat exchanger is mounted on a galvanized sheet, hardened using steel clamps. In order to increase heat generation, the surface can be painted black; external elements are painted white to reduce heat loss. At the final stage, it is necessary to install glass to the walls of the box, having carried out high-quality sealing. The step between the pipes and the glass should be 12 millimeters. It is extremely important to consider these parameters, only then will it be possible to achieve the expected positive result, at which the efficiency of the installation will be at its best.