Such a thing as a notebook is necessary for everyone. Agree, without this accessory rarely anyone can do. Usually we purchase notebooks in the departments of the office. But you can make it with your own hands, or at least for a standard purchased notebook to make a cover, replacing the "native" with the author. How is a cover for a notebook made by myself? Such a product can be made of paper rather quickly and without special financial costs.
Such an exclusive jewelry will give you a lot of pleasure and make you proud of your own craftsmanship. Perhaps the received custom notebook will even be a pity to use under ordinary notes, in which case you can make it as a wonderful gift for a loved one. It will look especially cute if each page of your author’s product contains a pleasant and non-banal wish.
How to make a notebook cover with your own hands?
Let's consider several options. For example, the flyleaf of your future product may be made out of a felt sheet of suitable color. It will take about 50 centimeters to take such material, but in general its quantity depends on the format of the diary. A set of auxiliary tools consists of a thread with a needle, a ruler, scissors, as well as any set of decorative elements that you can get. Small elegant buttons, beads and even rhinestones are suitable. In this case, it all depends on your imagination. At the first stage of the needlework process, you should carefully measure the notebook that you have to decorate. Then we cut a felt cover from it according to the taken measurements, not forgetting the allowances.
Decoration options
How to decorate a notebook cover with your own hands? Such an elegant felt case can be equipped with a small pocket, holder for pen or pencil. To do this, mark the places of its attachment to the cover, cut the felt in this place and thread the holder there. For reliability, it should be sewn with a machine seam.
You can decorate a felt cover by sewing elegant buttons. If you chose rhinestones, for example, to decorate your product, then they are attached to the glue (you can use the most common “Moment”). The edges of the cover are pre-fixed with safety pins, then they should be sheathed with decorative thick threads, selected in a suitable color scheme.
Textile cover
If you don’t have felt at hand, or if you don’t like this material, you can make a cover on a notebook with your own hands made of fabric, almost any one. In this case, you need to provide another satin ribbon and the same sewing accessories. The fabric should be taken plain for the inside and decorative with an elegant pattern for the cover itself.
From the same fabric, a pair of inner pockets in the shape of a rectangle is cut out. The details of the future cover, laid out taking into account the allowances, should be ironed carefully and sewn into the pocket from the auxiliary (i.e. monophonic) fabric. Then we fold the side parts facing each other, grind on a typewriter. We put our notebook in the resulting cover, and that's it - smart clothes for him are ready!
DIY Notebook Cover: Scrapbooking Ideas
A technique called scrapbooking is especially popular these days. Products made with its help always look stylish and somehow especially sincere. In this technique, you can also decorate the cover of a finished notebook or even an album, you can also make a whole notebook.
In this case, a sheet of paper will serve as a block for us. In addition to it, you should purchase a beautiful scrapbook paper, the choice of which is huge now in specialized stores, ready-made elegant cards or print your favorite images on a color printer. And, of course, stationery for auxiliary work.
At the first stage of creating the product, we tint the ends of the block, as well as our future cover cut out of paper. Then it is attached to the flyleaf with double-sided tape. And in the blocks, as in the cover itself, you can insert metal eyelets. As a result, we get small holes through which you can stretch a bright decorative ribbon and tie it beautifully on top. The resulting cover is usually complemented by an original volumetric applique, for example, miniature flowers, prepared or made from any auxiliary materials.
And again about the tissues
How to make a cover for a notebook with your own hands to someone whose hobby is sewing? If you are a lover of textiles, and in stock there is a certain amount of bright unusual fabric, then you can decorate with it not only a notebook, but also almost any book, personal diary, album for drawings - everything, up to a passport.
Even when there is no sewing machine, it doesn’t matter, small pieces of matter are perfectly sewn in the manual way. The fabric for the wrong side of the product can be taken easier, for the front - more elegant and expensive. At hand, of course, you should have pins, needles, threads and scissors, without which not a single textile product will work.
In the manufacturing process, we cut the fabric, getting two rectangles of the same size. The smaller side of each should correspond to the height of the notebook with the addition of a couple of centimeters for allowances and about 5 millimeters for loose fitting. The long side of the rectangle is equal to twice the width of the notebook, to which its thickness is added, five centimeters on each side for upside down and a centimeter for seam allowances.
Further work technology
Both rectangles are folded with the front sides inwards on the short sides, stitched in a centimeter from the edge, turned out, folded evenly and ironed with an iron. Then the workpiece is applied to the notebook itself, the lapels are inserted between the bookends and adjusted to achieve equal length. Four corners are chipped with pins without affecting the front side. The workpiece is turned inside out, stitched along the long sides also with an indent of 1 cm, and you should not forget to leave an unstitched section five centimeters long for subsequent eversion.
For reliability, the edge can be stitched in a zigzag pattern. Then, through the hole left, the cover is turned out, and the gap itself is sewn with a blind seam. Corners are straightened and carefully smoothed. If necessary, decorations and decorative elements are sewn on top according to the principles described above. DIY Notebook Cover Made!
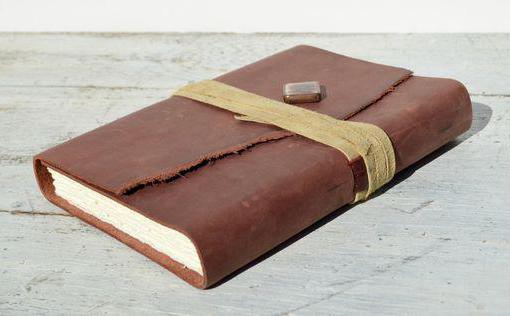
Go to the skin
Sometimes you want to give a person a gift that looks expensive and prestigious, but at the same time it will be made with your own hands. A leather-bound notebook for such purposes fits perfectly. It will come in handy for daily recordings. Do-it-yourself cover for a notebook can be decorated with a picture (for example, based on a game of tanks or any other - of your choice). Techniques in this case are the same.
It is good if you have a flap of genuine leather in stock, the dimensions of which are 30 x 45 cm, but you can do with a high-quality leatherette. If you plan to craft the sheets of the future notebook on your own, then stock up on a pack of A4 size paper (about 50 sheets + 2 on bookends), some more of which should be left aside. The quality is quite suitable for the most ordinary white paper that is used in printers. Cardboard will go to bookends and spine, you can take not the most dense, but on the cover - thick and hard.
What else is needed
You will also need a pair of strips of not too thick fabric about 15 centimeters long and about three wide, a 30-mm tube of Moment glue and synthetic beige or black threads. Tools and materials will be a file or a file, an awl, a ruler with scissors, a pen, as well as acrylic paints for painting on fabric and a thin brush for working with them. And also instant coffee. Use it to age paper. But if you prefer white sheets, we omit this procedure. For aging, we will make a coffee solution: add five tablespoons of instant coffee to a liter of water. The more it is, the darker our sheets will turn out. Do not forget that when drying, they will inevitably lighten a couple of tones.
How to color paper
The resulting solution should be poured into a suitable container of the desired size (basin or rectangular pan with high sides). We soak the sheets individually, dipping in coffee and turning over for uniform coloring. While they remain in solution (this is about a quarter of an hour), we lay out newspapers on the floor and then lay out our sheets for drying on them. We repeat the procedure, loading new portions of paper into the container until all the sheets have a pleasant light brown tint. Newspapers will often have to be changed, and it is better to lay out sheets for drying at night - by the morning they are usually quite dry.

Then they should be sewn into a notebook, collecting 5 sheets and bending each pack in half. Remember to check for even edges. Thus, we get 10 small notebooks. All of them should be stacked, aligned and pressed with a press. Soak them so you can from half an hour to several hours. We take it out from under the press, straighten it, clamp it again, placing cardboard underneath from the bottom to make holes for the needle. However, you can pierce the sheets with an awl or a thick needle, but not the fact that everything will turn out very smoothly and accurately.
How to make a binding
We mark the cardboard in divisions of 3 centimeters, near each we make notches of small depth. It turns out that we sawed all the pack of our paper at the same time. In this case, the work should be done quite accurately. Then the sheets are sewn together with a needle with a strong thread. At each step, the thread is properly tensioned, and care must be taken to avoid tearing paper pages. In the middle we lay pieces of fabric to attach the block to the flyleaf. After stitching all the notebooks into a single unit, we glue it in the root area, for this we align it again, fix it with clamps and gently spread glue on the root without excess and dry places. When the block dries, only the leather cover remains. For a notebook with your own hands, making it is not difficult.
Getting to the cover
If you do not agree to work with other material, you will need some experience. In addition, the usual tools for the fabric can not do here. Having at the disposal pieces of leather and suede, as well as the right size pattern, a couple of sheets of cardboard, glue and the right tools, you can get to work. We measure the bookend of the future notebook and cut the skin according to the size obtained with a mandatory allowance of one and a half centimeters. If you do not plan to transfer the finished drawing to the surface (and this is done using a laser printer), there is another decor option.
On thick cardboard we draw and carefully cut out figures stylized, for example, as flowers, hearts or any other three-dimensional shapes. We paste a cardboard flower or something else on the cover, and on top of it is another leather or suede fragment. We take a blunt knife and forcefully push the outline of our flower, then we can carefully cut the joint of two leather parts (upper and lower) in the form of a fringe. There is no need to use glue.
How to decorate it
Do-it-yourself leather notebook cover is decorated by cutting holes in it and attaching it with small leather strips-antennae made of suede, leather, flowers or other decorative elements. The antennae should be carefully inserted into the hole and fixed with glue on the wrong side. Having finished decorating the outer part of the cover, bend the allowances inward, make and fasten the lining and, if necessary, make pockets in which business cards can be placed. You can connect the parts of the cover to each other with leather straps.