In the past few years, hand-made products have gained immense popularity. Moreover, people not only buy them with pleasure, but also do it. And perhaps the latter rejoice even more. After all, doing something on your own is very interesting and exciting.
That is why in the article we will figure out how to make an original box with your own hands. The proposed workshops are quite simple to perform, so a beautiful and unique thing will be possible to please not only your beloved, but also your loved ones. For example, as a gift for a holiday.
Box out of the box
The simplest option that you can think of will require the following set of materials:
- a box of the desired size (if you wish, you can even make a whole chest);
- PVA glue;
- scissors;
- a simple pencil;
- eraser;
- beautiful clippings from magazines.
Next is how to make the box out of the box with your own hands.
So, the product described in this paragraph is incredibly simple to make. After all, we do not need to perform various manipulations in order to design the frame of our casket. It is only necessary to paste over the existing box as we please.
Box of boxes
If you want to make a product with several compartments, you need to take two or more boxes of different sizes. Then put them together as we did, playing tetris. That is, so that there are no gaps between them. Then it remains only to paste over the finished product. For example, a beaten egg shell.
Box of matchboxes
Another interesting variant of the studied craft will also not force our reader to bother with calculations, measurements and other actions that contribute to the receipt of the box. And all because we will prepare the necessary material in advance, namely matchboxes. Of course, empty. But let's take it in order.
To make a box with several “drawers” you will need the following materials:
- twelve matchboxes;
- scissors;
- PVA glue;
- colored paper;
- a simple pencil;
- one sheet of white cardboard;
- twelve identical buttons or large beads.
To make such a box of boxes with your own hands, the first thing we need to glue matchboxes. However, this is extremely important in a special way. And then we will talk about it in detail. So, take every three boxes and stick them on top of each other. After which we leave to dry. This will take about half an hour.
When the boxes are securely fastened to each other, you can proceed to the next step in the implementation of the original box. Which consists in very simple actions. You just need to put a sheet of cardboard on a flat surface. And put the resulting piles on it as shown in the figure below.
Now we take a simple pencil in our hands, carefully outline the outline and cut it out with scissors.
Then we prepare in this way another identical part. As a result, we get the bottom and lid of the future casket. However, it is important to note that, if desired, both parts can be made slightly larger than the contour.
Finally, we move on to the assembly. We take the first square and paste four stacks of boxes on it as shown in the figure above. Then we attach one more detail on top - the lid. And the frame of our original matchbox is ready.
We proceed to decorating. It is not necessary to describe this stage in detail. After all, each person will do everything in his own way. Therefore, we will move on to the final step.
It consists in attaching handles to “drawers”. This is not at all difficult to do. It is only necessary to attach prepared beads or buttons to the matchboxes with glue so that the inner box extends freely.
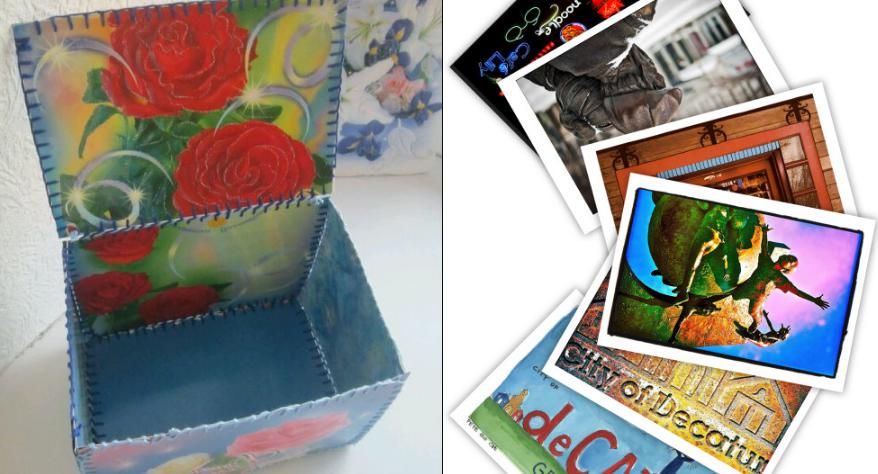
Postcard box
One of the simple and very original versions of the product studied in the article hails from Soviet childhood. After all, it was precisely then that such crafts were very popular, so every girl always acquired such a box and put various memorable little things, jewelry and other necessary trinkets into it.
To complete the master class you will need quite accessible materials:
- five beautiful cards of the same size;
- four sheets of white cardboard;
- a spool of sewing thread matching in color;
- a small needle;
- a simple pencil;
- a line of 15-20 centimeters;
- an eraser - just in case;
- scissors;
- beads of different colors;
- glue brush;
- PVA glue.
When all the necessary materials have been prepared, you can start reading the step-by-step instructions and the implementation of the original product.
How to make an interesting box with your own hands from cardboard and postcards:
- We start with the simplest manipulations - put a postcard on a sheet of cardboard, outline and cut it out. In the end, we should get four new details.
- Now we sew them and each card on all four sides. However, this should not be done at random; it is important that the front side of the postcard is not hidden. Otherwise, the box will come out not beautiful, but the most ordinary.
- Then we need to prepare the lid and bottom of the box for this. We take a postcard and measure the big side with a ruler.
- Then mark the desired segment on a sheet of cardboard. Draw a straight line.
- Further from one of the points we postpone the same segment, draw a line, getting an even angle.
- We repeat the specified manipulations once again. As a result, we get an even square.
- Cut it and outline three more times.
- Cut and get four squares of the same size.
- Sew each pair together. It will be the bottom and the lid of our little chest.
- We attach them with a needle with threads to an already finished frame decorated with postcards. But we sew the upper part only on one side. After all, our casket should open!
- Well, that's all the frame of our craft from postcards is almost ready, it remains only to decorate it. And our next step completes the execution of the original box with your own hands. After all, we need to smear the surface of the box with glue. And sprinkle beads on it in a chaotic manner. Then let the product dry well. This will take about ten to twelve hours.
A box of eggs
Another unusual idea will require quite accessible materials and a little time to complete. First, let's talk about the first aspect.
In order to make an interesting box, you will need such components:
- one package of eggs;
- a small piece of fabric;
- tapes;
- PVA glue;
- thread with a needle;
- large button;
- scissors.
How to make a box with your own hands:
- First we need to cover the packaging with a cloth.
- Then decorate it with ribbons.
- And finally, make an original clasp with a button and ribbon.
Box of sweets
Surely our reader remembers that in large sets of chocolates there is always a plastic box with cells in which each candy is reliably protected from minor damage. And to make an unusual box with your own hands, you just need to take an empty box of chocolates and paste over it at your own discretion. For example, you can decorate the lid with decoupage napkins. Or attach a child’s drawing to it, if the gift is intended for mom or grandmother. Also a great option for decoration would be photography. Moreover, it does not matter at all who will be depicted on it: a famous person or someone from a family member. If it is right and interesting to beat a thing, it will look very dignified and easily pull on the title of “work of art”.
Box made of plastic bucket from pickles or cabbage
Perhaps our reader bought small buckets in the store in which various types of pickles lie? If not, we highly recommend that he fix this situation. After all, the contents of the bucket can be eaten, but the container itself should be left. Because it will make a very original box.
To complete the master class you will need the following materials:
- a small piece of fabric of any color;
- PVA glue;
- a simple pencil;
- scissors;
- acrylic paints;
- art brush;
- pasta of different shapes.
How to make a box with your own hands? Master class below:
- We take the fabric, put a bucket on it and mark its height.
- Now we wrap the fabric around the container and find out how long the segment will be needed for us to fit the bucket.
- After that, cut off the desired piece of fabric and glue it with glue.
- Then we put a lid and a bucket on the remaining piece of material, outline it and the bottom, cut out two more details.
- Glue the first from the outside, and the second from the inside.
- Now it remains only to decorate the finished box. This will help us pasta and glue.
- Glue them in any order, and then decorate them with paints.
- Let the product dry and use it for your health!
Chip Jar Box: First Option
What else can you make a box with your own hands? The master class will not only tell you, but also tell you in detail. To execute it, you will need:
- box of chips;
- threads
- large needle;
- a small tube of glue.
How to do:
- We take the thread, put it into the needle and drag it through a tube of glue.
- Now we remove the needle and wind the thread on the jar, moving from top to bottom.
- Let the product dry. If desired, decorate with additional materials. Beads, glass beads, etc.
Second option
Another interesting option is obtained if you use DVD discs. They must first be cut, and then glued to a jar of chips. But at the same time bring them as close to each other as possible.
Wooden box
Such an article will be the most durable, but its implementation will require at least elementary carpentry skills. To make a box of wood with your own hands, you will need a small piece of plywood. It is necessary to cut out the necessary details from it. It is better to calculate their sizes in advance and think over on paper so as not to redo them again. Then you should fasten the parts with small nails, attach loops to the cover and one of the side walls. You can decorate the product on your own.