Crocheting is considered an easier type of needlework compared to knitting, as there is only one working loop, and the pattern most often consists of small parts that are easy to follow. That is why novice craftswomen who want to learn how to knit, immediately take up this technique.
This article will describe in detail how to crochet a circle, because it is with him that it is easiest to start learning. The form of circular knitting is easy to control, because the error in the pattern will be visible immediately.
First knitting skills
Before you start crocheting a circle, for beginners it will be useful to get acquainted with the main types of loops:
- Air loop. It is carried out by the usual capture of the thread hook and pulling it from the previous loop. The very first loop is formed by a circular motion of the hook around the thread and tightly tightened.
- Half-column (or single crochet). Having passed the hook into the loop of the bottom row, pull the thread, forming a loop and connect it to the previous one ordinary loop.
- With one crochet. Pry the thread from the bottom up, throwing it on the hook, insert it into the loop of the lower row and pull the thread, forming a loop. There will be three loops on the hook needle: make one of the two, and then repeat the operation. This is the standard knitting of a single crochet column. By the same principle, loops with two and three crochets are knitted when the pattern requires it.
It is these knitting techniques that help to make up the whole pattern not only in round knitting, but also in other types of crochet work. To begin with, it is recommended that you learn how to perform them on a simple circle and only then proceed with more complex patterns and schemes.
Rug from old clothes
One of the easiest ways to learn how to knit in a circle is to make a round rug with your own hands. A hook and a skein of thin strips cut from old knitted t-shirts can turn into a chic decor for an apartment in one evening without any difficulty.
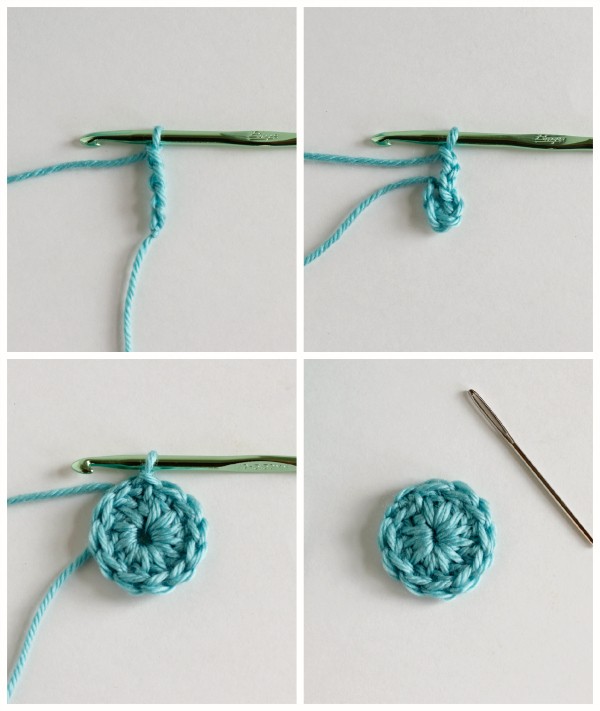
First you need to learn how to knit air loops of the same size and connect them into a ring. Eight loops will be enough for the average thickness of the thread: thread the hook into the first air loop, pull the thread and connect with a half-column to the leading loop. The foundation is ready.
Next, tie it with single crochet columns, placing them tightly to each other, but without deforming the circle. Then move around the circle, continuing to knit the same loops - they are the ones who carry out the entire mat of the required diameter. If desired, you can alternate a series of single crochet columns with a row of single crochet columns, then the mat will have an original pattern.
By combining multi-colored strips of thread, you can create various spiral patterns or simulate a rainbow - it all depends on the materials available and the imagination of the needlewoman.
For those who don’t know how to make threads from old knitwear: unnecessary T-shirts, T-shirts, thin sweatshirts and pullovers are cut at the seam, and then each detail needs to be cut into strips 1-1.5 cm wide, stitching them together with a needle with a thread of neutral color.
Grandma's style
How to crochet a circle in a more original way, will tell the famous technique “Afghan square” or “grandmother's” knitting, as this method of knitting is called in Russia. Using the classic combination of double crochet and air stitches, you can create a nice rug, pillowcase and even a shawl using ordinary acrylic threads and following the step-by-step instructions:
- Tie six air loops and connect them into a ring. Tie it with half columns, they will turn out from 8 to 10, it all depends on the thickness of the thread.
- Make three air loops for lifting to the second row and then knit three double crochets, then one air loop, three more double crochets, air, etc. until the end of the circle.
- Subsequent circles will be the same until the entire circle reaches the desired diameter.
You can alternate different colors of threads or use only one - in any case, the product looks very advantageous for such a knitting.
How to knit a napkin: a simple pattern
When the basic techniques are well mastered on thick threads, you can complicate the process and crochet a round napkin made of Iris or Chamomile threads, which are quite thin (you need to choose a hook of the appropriate size).
Experienced needlewomen often create patterns in the knitting process, but it is better for a beginner to use one of the simple schemes so as not to get confused and create a symmetrical pattern - a circle. How to crochet a napkin from simple motives, the scheme in the photo posted in the article will tell.
Where to begin
The beginning of crocheting in a circle looks standard: a ring of air loops, then climb to the second row, which consists of three ordinary loops, and then columns with crochets between which the air loop is tied. In total, 11 columns should turn out, and the row should be finished with a half-column tied to a lift.
Next, carefully follow the pattern, carefully counting the loops of the pattern. Problems should not arise, since it is quite simple.
Another option
A more saturated scheme with double crochets will provide an opportunity to understand how to crochet a circle using a rising wedge. Starting with one loop and adding one in each subsequent row, you can create a stunningly beautiful napkin on a table from a simple circle (or a tablecloth if you make a large product).
It is difficult to get confused in this pattern, since it is almost the same throughout its diameter - half of the wedge, the middle of two air loops and the second half in mirror image. Usually there are no additional loops between the wedges, but if during knitting it is noticed that the pattern tightens the circle, you can add one air loop between each (!) Wedge. In the last row, when the product is almost ready, do not forget to make a “pique” of three air loops, connecting them into a ring on the edge of each wedge.
How to fasten the thread at the end?
When all the rows of the pattern are finished or the product reaches the desired size, you need to finish crocheting in a circle. How to do this carefully so that the cut thread does not stick out? Typically, round products that are knitted according to special openwork patterns, the row ends in a hollow. It is there that you need to make an additional half-column by pulling the thread not from the past row, but one level lower and tie the thread into a knot, cutting it to a length of 3-4 cm. Next, hook it to the center of the product and try again to tie the knot with the hook . Thus, the edge will be firmly fixed, it will be possible not to worry that the product will bloom during washing.
Crochet the circle as described in this article is easy, do not worry if your hands do not immediately listen, stretching the loops of different lengths. In all types of needlework, many hours of practice are necessary so that the products are smooth and symmetrical. If something went wrong, don’t be upset: you can dissolve what you started and try again more carefully.