You can engage in folding various figures from a sheet of paper from a very young age. Origami is a fun and rewarding pastime. At first, novice masters use printed circuits. Children can be taught how to make origami crafts out of paper with their own hands by parents or kindergarten teachers. With frequent manufacturing, the sequence of performing sheet folds is remembered, subsequently a familiar figure can be created from memory, the action takes on an automatic character.
How to make origami out of paper? This is not difficult, especially at first, as the schemes for beginners are quite simple. It is better to take paper thick and double-sided. The thickness of the sheets is 80-100 g / m 2 .
Cat
Origami from paper according to the instructions described in the article can be made for children's games, table theater, applique or wall panels. The blank for creating a cat is taken in a square shape. On the diagram in the article there is a step-by-step image under the numbers. They begin assembling figures with number 1 and finish number 6. How to make origami cats from paper, read more below.
- The sheet bends in half diagonally.
- The resulting isosceles triangle bends along the top.
- The rectangular triangle is carefully smoothed with fingers along the fold lines and opens to its previous position.
- The corners of the base are bent up, but not to the end. Try to fold the bends symmetrically on both sides.
- The top of the figure bends inward. This is the cat's forehead line, so make sure it is not skewed.
After turning the crafts on the back, we will see the contours of a cat, cat or kitten. Here you can use different initial sizes of the square, then the assembled figures can be created in different sizes. It remains to finish the small details of the face of the beast - eyes, nose, mouth, mustache. You can stick strips on the forehead or pink ears.
Origami truck
Further we will consider how to make origami from paper for beginners. A very easy and quick version of the craft - this is a truck assembled from colored glossy paper, in which one side has one color and the back is the other. After folding, elements made in contrasting colors will look interesting.
How to make an origami truck out of paper, read on in a detailed step-by-step explanation.
- The rectangular sheet below bends one quarter of the width of the sheet.
- On the resulting strip, corners are bent down from two sides.
- The workpiece is flipped to the back.
- The upper side is tucked up to the level of the strip from the bottom.
- The front corner bends up to form a right triangle.
- The front corner bends down and back. It should be a right angle.
If you acted according to the instructions, then in front of you will be a truck lying on the table with a contrasting color wheels, body and windshield.
Now you know how to make origami from paper for beginners.
Preparing to work on a tulip
For the basis of crafts you need to take a square. You can draw it with a rectangular triangle, or you can fold A4 sheet so that the bottom short side lies clearly along the side line. The excess strip on top just cuts off.
This is our blank for origami tulip. In the same way, you need to prepare another square, but already from green colored paper.
Folding a flower step by step
First, we will figure out how to make the flower of origami from paper. The figure is folded diagonally. Then the extreme corners are alternately wrapped inward so that the corners peek out slightly beyond the opposite sides. It remains to raise the lower corner up to the formation of an even line at the base of the flower. If the folds are made clearly and correctly, then the contours of the tulip are obtained. Even such an origami can already be used in creating a bouquet on a card for mom or grandmother on March 8 or birthday.
If you make a flower on a stalk made of thick paper, then such flowers can stand firmly on the table. How to make an origami stalk from paper, read below.
The green square is located at the corners to the side. Then the opposite edges are turned inward so that the upper sides of the rhombus appear clearly along the central fold of the craft. Then the workpiece is folded in half, and the lower part of the stem bends up. The corner should peek out from behind the stem. The lower base should be flat so that the flower assembled together does not fall sideways, but is in a vertical position.
How to do the job correctly, you already understood. To insert the stem into the flower, you need to make a small cut from the bottom and insert the upper corner of the stem firmly inward.
Origami "Heart"
You can make an original heart out of paper for Valentine's Day. This origami is made of red, preferably double-sided paper. A step-by-step explanation and a photo in the article will help to complete the craft efficiently and quickly. The square leaf is bent first diagonally from top to bottom, then from left to right. Bends are made so that the center lines are clearly visible. This will help to do the job correctly.
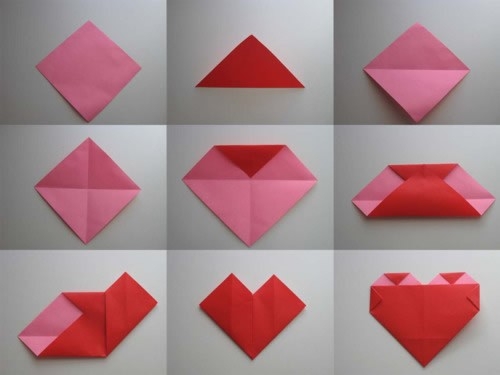
The top corner is wrapped up to the central connection point of all folds. The lower corner rises to the height of the upper straight line. Carefully align all folds. To form an origami heart from paper, the sides are alternately bent so that they connect exactly along the center line. It remains to bend all four corners inward. Make sure that the folds form symmetrical straight lines parallel between pairs of corners. Turning the craft on the reverse side, you will get the original heart. You can just give it to a girl by saying pleasant words to your beloved, or you can (if you have finally decided to connect your destiny with this beloved one) put the desired ring in the inner pocket. Such a marriage proposal will be remembered for a long time.
Paper cup
Be sure to learn how to fold such simple cups. This skill is useful in life when you forgot to buy disposable tableware for a picnic. You can fold an origami glass from any paper, but only a dense sheet will hold the liquid for a long time. You will have to drink quickly, without holding the drink in the container so that the paper does not “float” when wet. The diagram clearly shows all the stages of folding origami.
We will not repeat ourselves, since the reader is already well versed in reading the schematic image of the stages of work on the figure of an object, animal or toy. Have a good start!