On the Ascension Day of the Lord, Orthodox people prepare not only Easter cakes and paint eggs for a solemn feast and for consecration in the church. Many handmade lovers decorate their home with beautiful Easter eggs. You can make interesting crafts with your own hands, which will be wonderful objects for decorating an apartment and a festive table.
Types of crafts
For the manufacture of crafts using different materials: paper, cardboard, satin ribbons and fabric, threads and strips of paper, there are craftsmen who make beautiful jewelry even from ordinary curly pasta. In this article, we will consider in detail several interesting ideas for making Easter eggs with our own hands with detailed instructions.
Such decorative elements can be put in a basket with which people go to bless Easter cakes in a church, on a table, hang on a wall or under the ceiling in the form of a garland, or simply put on a shelf or a bedside table and admire their work.
In order to craft Easter eggs crafts with your own hands, you need to think over the type of work in advance, purchase materials and adhesives, depending on its structure.
Children's crafts
In kindergarten and at school, teachers can offer children to paint an Easter egg, cut out of paper, with gouache paints or decorate with applique. This is a decorative kind of fine art that develops the imagination and creativity of kids. If at a younger preschool age, teachers without fail present a drawn sample or several options for the child to independently choose, then in older groups and especially in elementary school, work is done independently.
You can use a floral ornament, as well as geometric lines and shapes. Then bright works are hung out in the group room and the interior of the room takes on a festive hue. Parents before the holiday can offer their children to decorate Easter eggs with their own hands at home. At the same time, the child will do useful work and will not distract his mother from preparing a festive dinner.
Paper Volumetric Eggs
For such decoration you will need multi-colored paper, an adhesive pencil, a thin satin ribbon for the selected shade and a template that is drawn in advance by hand. To make even and symmetrical Easter eggs with your own hands out of paper, you must either be able to draw well, or use a printout of the shape of an egg from a computer. The template is best cut from thick cardboard. Then the colored paper is folded into several layers and outlined with a simple pencil template. Then several parts are cut along the contour at once.
Paper eggs will look beautiful if you make them out of paper in several shades of the same color, you can add a white sheet. Further, each segment is bent along in half and the bend with fingers is well-ironed. When many blanks are ready, you can begin to glue them together.
One half is smeared with an adhesive pencil and half of the second element is glued to it. The central fold should be clearly aligned so that the Easter eggs look neat. The more elements stick together, the larger and denser the finished egg will be. In the end, when the glue dries, a hole is made in the upper part of the jewelry with a needle and a thin satin ribbon is inserted. For beauty, they tie a bow, selected in the color scheme of the used paper. Even a preschooler can make such Easter eggs with his own hands, only parents need to help him cut an even pattern.
Quilling Egg
Now many masters test their abilities in this technique. This fascinating activity is based on the torsion of strips of paper, which in a large assortment can be found in any stationery store. At first it is better to try your hand at flat pictures. The basis for making an Easter egg with your own hands (photo below) is a foam blank, which is purchased at a sewing accessories store. You will also need thick PVA glue, quilling strips, a hook and a pattern ruler.
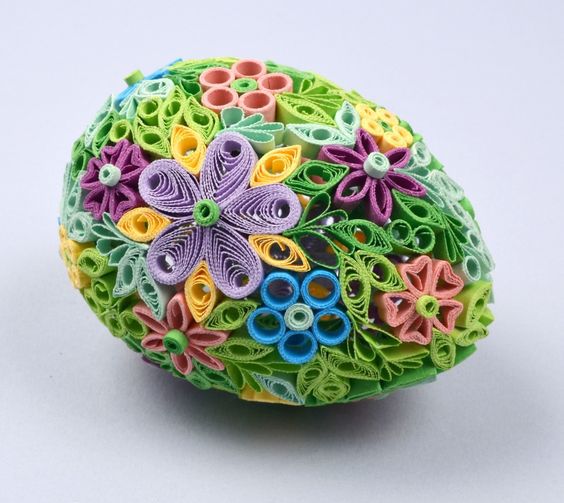
The whole pattern of quilling stripes is represented by flowers consisting of petals and round midpoints. Start work with a large element, placing it in the center of the egg. Petals are wound loose. After making several turns, the edge of the strip is trimmed and glued to the last turn. Then pressing with two fingers gives the figure a certain shape. This can be the shape of a leaf with one sharp edge or pointed at both ends, the flower also looks beautiful, in which on one side the corner bends inward, like on a pink flower in the photo on the right.
The centers represented by the tightly wound strips around the hook can be glued both to the polystyrene itself and to the flower on top. When all large parts are glued, voids are filled with green leaves. They are placed in a free order and can be of any shape and size.
Easter eggs from felt
With your own hands, you can decorate the room with figures from a material convenient for sewing - felt. It is soft, elastic, the edges do not crumble, it is not necessary to bend the fabric. It can also be glued, performing the drawing using the application method, or it can also be stitched with threads. To make such jewelry, you need to buy several sheets of felt, thread, satin ribbons and a filler (cotton or synthetic winterizer).
Two felt eggs and a middle from the filler are cut according to the template. It needs to be cut a few millimeters less so that wrinkles do not form on the craft. Then on each side (you can only on the front) sew on or stick a small pattern. It can be flowers, Easter rabbit figures, butterflies or any other element cut from felt of a different color. You can use embroidery elements. Then the front, back and the filler are folded into a stack and the edges are sewn together with an edge seam.
If you want to hang such decorative elements on hooks, then when making an edge seam, be sure to insert a loop of satin ribbons.
Crafts from threads
In this chapter we will tell you how to make an Easter egg with your own hands out of yarn. You will need a foam base, which is lubricated with glue. It is better to use a thick PVA or glue gun. Winding starts from the top.
You can combine the threads so that the egg is multicolored. In the course of winding, a thin layer of glue must always be applied with a brush to fix the threads on the form. After drying, such decorative elements can be folded into a small basket and put on a shelf.
Egg of thread: option number 2
To make a transparent light egg from threads, and even with sweets in the middle, you need to inflate a balloon to the size of an egg and tie it with a knot or thread. If you are preparing a surprise for your child filled with sweets, you can insert a few small sweets in the middle of the ball before inflating, but only in wrappers. Then we get to work with threads. PVA glue is poured into a small container and the threads are soaked in it from all sides.
Then a thread is taken and in a chaotic manner, wound around the ball to the desired shape. Then the ball is suspended until the threads completely dry. When everything is dry, they pierce it with a needle and carefully pull it out through the holes between the threads.
DIY kanzashi egg
Easter eggs made of satin ribbons with flowers made using the kanzashi technique are very stylish and original. The base is foam or wooden. You also need to have a glue gun, satin ribbons thin for wrapping eggs and wider ones for flower patterns, scissors, beads or pebbles, glue "Titan".
First, a thin ribbon wraps the shape from the top in a circle. The first drop of hot glue is applied to the top of the egg. The remaining surface is coated with "Titanium". The main thing is not to rush so that the layers of turns are equally spaced around the entire circumference. The edge of the last turn is best secured with a glue gun.
Then we decorate the Easter egg from ribbons with our own flowers. Perform work on each element separately using tweezers. Squares of equal length are cut out from a wide ribbon - according to the number of petals. Then they are folded in half with tweezers and one corner is cut to make a rounded triangle. This trimmed edge must be sealed with a glue gun. After drying, the petal is turned on the other side. It turns out a convex element. Having collected several petals, we arrange a flower on the egg. Beads or half beads can be glued to the middle, rhinestones and pebbles are also used for decoration.
Pasta eggs
Easter eggs from pasta look original . It’s not difficult to make them yourself, you just need to pick up some interesting pasta. It can be spirals and short ribbed horns, shells and bows. Before pasting, put the pasta into varieties in different containers, it will be more convenient to make a drawing.
The shape of the egg can be both wooden and foam. It is carefully smeared with a thick layer of PVA glue and quickly, until the glue has dried, the elements are attached in turn. You can create a stand so that the egg is in an upright position. Paint a decorative pasta egg with a spray in golden color. Other paints can be used as desired.
Using papier-mâché technique
For such crafts use the already tested method with inflating a balloon. The rubber surface of the inflated ball is coated with vegetable oil. The first layer of paper is simply glued by wetting it in water. Next, pieces of paper are placed on the paste in several layers (5-6).
To properly fill the entire surface of the egg, it is recommended to use various kinds of paper, for example, the first layer from the newspaper, the second from the old school notebook in the box. The upper outer layer is preferably made from pieces of white paper so that after painting the newspaper or notebook cells are not visible. Where the ball assembly is located, the paper does not stick, leaving a small hole so that the deflated ball can be pulled out.
Please note that papier-mâché needs a couple of days to dry, so you need to start decorating this decoration in advance. After the ball has dried and deflated, the hole is sealed with several pieces of white paper. It turns out the finished product, which remains only to paint.
Conclusion
The article provides descriptions of making Easter eggs with your own hands in different techniques. Having familiarized with them, you can choose jewelry for young children, and for beginner lovers, and for professional craftswomen. Imagine and create for the joy of loved ones!