Iris folding is an application in the technique of folding pictures from pieces of colored paper, invented in Holland. Translated from English, this art is called "rainbow stripes." Crafts look very original and effective, but in order to learn how to create beautiful pictures or postcards, you need to understand the principle of work.
Some people think that making them is very difficult, so they hesitate to try. In fact, even older preschoolers can create work in the technique of iris folding. You need to be able to act according to the scheme that the teacher or parents can draw at home, skills in working with scissors and paper, accuracy and perseverance.
In the article, we will try to explain in detail the rules of work: how to draw independently the layout of the strips, the order of their gluing and the design of the crafts in the style of iris folding. Occupation is very exciting and developing. In the process of work, children learn to navigate in space, remember the sequence of laying out, learn numbers, fix colors, learn the qualities of products chosen for work.
DIY material
As a basis, it is best to take color or white cardboard. The strips themselves for folding the ornament can be selected very different. Masters use colored or glossy paper, sheets with a printer's pattern, some use satin ribbons, wrapping paper, and thin tissue. Crafts look beautiful even from read newspapers, music books, magazine leaves. The upper part of the iris folding picture covering the glued strips should also be dense. If additional elements are planned to be placed next to the image, then they are glued at the very end, when the main work is completed. To work on the craft, PVA glue, scissors with sharp edges for cutting contours, scotch tape or stationery clips to hold the strips, a simple pencil, carbon paper for transferring the scheme (optional) are useful. With experience, you can draw diagrams right in place.
Principle of work
The technique of gluing strips of iris folding involves preliminary work. First you need to think about which item will be shown in the picture, take as an example a simple circle or an egg. Then, the contours of the selected figure are drawn on a sheet of cardboard, and an oval is cut.
The resulting hole serves as a "viewing window", in which all the beauty of the iris folding will be visible. The card consists of two leaves connected together. On the bottom of the craft, a diagram is laid out and strips are laid out in the order of the numbers. At the edges they are attached with tape or glued PVA. The most difficult part of the job is drawing up a drawing. Let's consider in more detail how to correctly execute it.
How to draw a figure
In principle, you can break the craft into any sectors. For children, the iris folding is the easiest, that is, the strips are placed with a slight shift along the diagonal, alternating colors. Most often, a square or small rectangle is drawn in the center of the diagram. Then the whole part is divided into sectors and in each a few parts are drawn under the ruler. Elements of a triangular shape look beautiful, but you can use both rectangles and trapezoid. Each sector is signed with numbers corresponding to the order of sticking strips. Separately, on a leaflet they write out what color each sector should have. So doing crafts is much easier. Next, we will look at a few examples of iris folding for beginners, so that beginners can understand it more clearly.
Simple craft for kids
As a New Year's card in a kindergarten or elementary school, you can invite the children to make a Santa hat. To draw such a card is easy, you need to start from the middle of the cap, before folding. The lines diverge in different directions according to the type of rays of the sun. Stripes of rectangular shape are cut, and each is folded in half along the long side.
Gluing is made from top to bottom, strips are laid out along the lines of the scheme with alternating elements of plain and color. When the whole drawing is sealed by numbers, the work is turned over and the top sheet of cardboard with a cut out hole of a similar shape is superimposed. Decorated with a pompom and a strip of cotton wool. The voids are sealed with snowflakes or stars made of foil.
Easter egg
This is more difficult work, therefore the Iris folding master does it more carefully. The layout of the stripes is taken already standard for this type of art, that is, a square in the center and triangles located in a spiral around it. The strips are collected by folding in half from three types of thick paper of different colors. The main part of the structure is assembled from maroon and light pink paper. The numbers on the diagram are signed, starting from the edges, in the same way the crafts are collected. They are placed on one strip on all 4 sides, then one more is glued on top of each. Thus, the entire area of open space is filled. The center is sealed with a pink square.
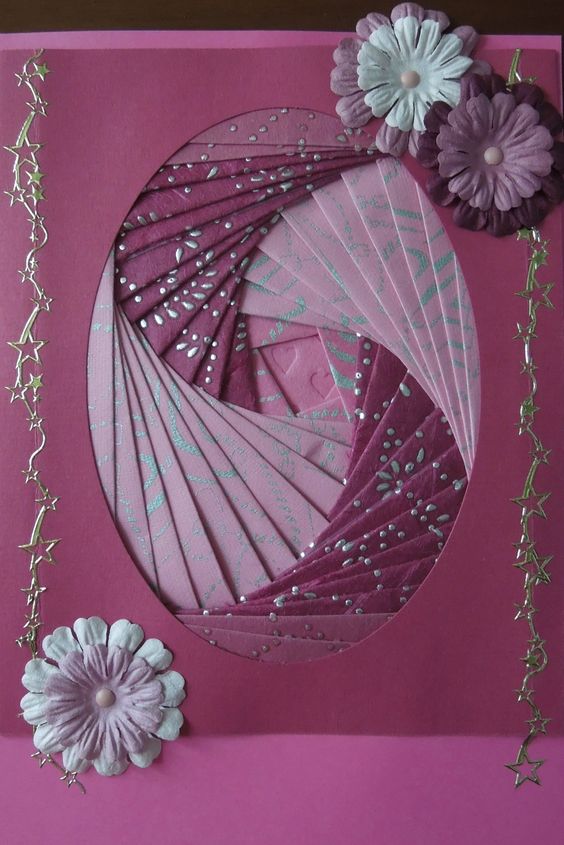
A postcard using the iris folding technique will be unfinished if we simply close the craft with the top leaflet with a hole. It is necessary to decorate empty corners. In our sample, three-dimensional flowers are attached diagonally, and stars are drawn on the sides. A child can make an Easter card for his beloved teacher, and adults in this way will decorate the room for the holiday.
Christmas tree
The original Christmas tree will look great both in the form of a postcard, and as a wall picture. The standard scheme of iris folding is laid on the base.
First, lay strips bent in half around the central part. They always have folds inward, and they should overlap the previous part by 3 mm, then the joints of different types of paper will not be visible. The pattern of the stripes is usually laid out clockwise. Note that on the branches of a Christmas tree, strips of paper pass through several parts. In the diagram, this must be taken into account and denoted by one digit. The width of the paper used is selected by eye. If the part is wide, then the segment is cut larger, and vice versa. Lastly, the middle is sealed with dark green paper.
When the whole scheme is filled, the top layer is closed and the craft is decorated with small details - a star on top and a barrel of corrugated paper from below.
Greeting card for mom on March 8
To create such an interesting postcard, you need to take lilac and golden ribbons instead of paper strips. Having drawn the contours of the dress, they draw a layout of thin strips of fabric, starting with the bodice and straps. Then they draw lines diagonally from the top of the dress to the middle of the hem. The remaining space is occupied by stripes drawn in the form of rays from the opposite side of the hem. When sticking the tape itself, proceed in the same way. Bonding from above begins, the bodice of gold color is laid out. Then they attach lilac strips from the bodice down to the PVA. Last of all, they are engaged in the design of the lower part of the dress, gold and lilac stripes alternate. A bow is attached at the junction of the rays. Cutting the outline of the craft on thick white paper, make a wavy edge from the bottom.
The craft is simple, but due to the beautiful arrangement and alternation of elements it looks spectacular.
Outline of another dress option
You can arrange a similar job as a gift for your grandmother, only draw up a different diagram and take colored paper with small flowers instead of fabric, and for the alternation of stripes plain.
Even the younger student will easily draw the diagram, since the lines are all even and straight. Attach the details in the order indicated by the numbers on each sector.
Kitten outline
Drawing begins on a diagram of an elongated animal shape with a central rhombus, then the vertex corners of the given figure connect the lines. It turns out already a larger quadrangle, another one is similarly drawn. Then the body is divided by a semicircular line into two parts, which are also divided into sectors. When everything is drawn, you need to take a strip of paper and attach it to the parts of the circuit. It immediately becomes clear that the line of the ears reaches the tip of the tail. Therefore, put the number 2 in two sectors. The same thing happens if you put a strip on the legs. The numbers 12 and 13 are noted in two elements, respectively.
After affixing the gluing sequence, on a separate sheet you need to write out all the numbers and indicate the colors chosen for the design of each sector. Consider what happens as a result of a similar version of iris folding.
Sitting cat
Work was done according to the scheme of two colors of thick paper. It is pure white and with a pattern. To highlight the plain colors of the stripes, the upper background is glued from black cardboard.
Traditionally, for this technique, work is carried out from the edges and ends with a central square element, all parts are placed clockwise. You can complement the work with glued eyes and nose. You can attach a mustache on a black background.
"Valentine" for a loved one
On Valentine's Day, which is already traditionally celebrated by many in our country, a heart is presented to loved ones. If you liked the technique of folding paper strips in a spiral, then try to make a gift in the iris folding. Read the master class.
We pick up pink, red and burgundy colored paper for the heart. We will use the standard scheme, namely with the square in the middle. The difference between this work and the rest is that the central square at the end is not sealed, since the background paper has a burgundy color, the middle remains empty. The craft also looks beautiful due to the displacement of the lower and upper bases. Glue flowers in the corners.
As you can see, the work is not too complicated, but fascinating. Therefore, be prepared for the fact that, having collected the picture once, you will want to make postcards again and again. Good luck and success!