In anticipation of the holidays, it's time to think about how to present the selected gift in an original way. After all, the best will be the one that is selected and decorated with soul and great love. For this reason, a huge number of needlewomen are already interested in the question of how to make a basket of cardboard with their own hands. Because in them you can beautifully present sweets, flowers and gifts. And also to arrange celebrations, holidays and even weddings. Therefore, in the material presented below, we investigate the technology of this particular amazing subject.
What is necessary for work
The implementation of a cardboard basket begins with the preparation of materials and tools with which we will realize the idea. At the same time, it is not necessary to cook something inaccessible or very expensive. A simple list of stationery is almost always available in every home. So, to make the studied craft, you should prepare:
- a set of color or white cardboard;
- scissors;
- a simple pencil;
- a ruler;
- paper tape;
- PVA glue.
However, this is only a basic set of tools and materials. Each instruction on how to make a basket out of cardboard suggests its own components. We are sure to tell the reader about them.
Square basket frame
The simplest is the model that we will study in this section. In fact, it is an ordinary box, only without the upper wall. To do this, draw a square of the desired size on the cardboard. Draw a square around each side. Only four. Then we cut out the resulting cross, gently pushing through the joints and raising the side walls of the basket. Now it remains only to glue them with paper tape on the inside. Complete the finished frame with a pen and decorate as you wish. So easily you can make a basket of cardboard with your own hands.
Rounded faceted basket bottom
Another variant of the product being studied is more interesting. It is a little more complicated than the previous one. However, the technology is quite accessible for beginners. The main thing is to make the calculations correctly. We will talk about this later. So, how to make a round-shaped basket from cardboard:
- First of all, it is important to note that in order to build an idea it is necessary to prepare a compass.
- Then we draw a circle on the cardboard sheet.
- We draw a vertical and horizontal line, drawing a cross in the center.
- The four resulting zones are divided by two additional lines.
- The result is a circle divided into 8 sectors.
- Now it is necessary to draw faces on it, connecting the points marked in the diagram in green.
- Cut the bottom of the future basket.
How to make the sides of a basket
Next you need to draw a side face. If you want to make a basket of cylindrical shape, draw a rectangle of the desired length from the face outlined on the bottom (1). For a trapezoidal basket, prepare a face of the corresponding shape (2). Both options are depicted in the diagram proposed above.
We collect the basket, carefully glue the seams with paper tape. We start from the side faces, and then connect them to the bottom. We complement the finished base with a pen and decorate at our discretion. Moreover, it is important to note that even a mini-basket can be made using this instruction. It is only necessary to reduce the initial circle.
Heart shaped basket
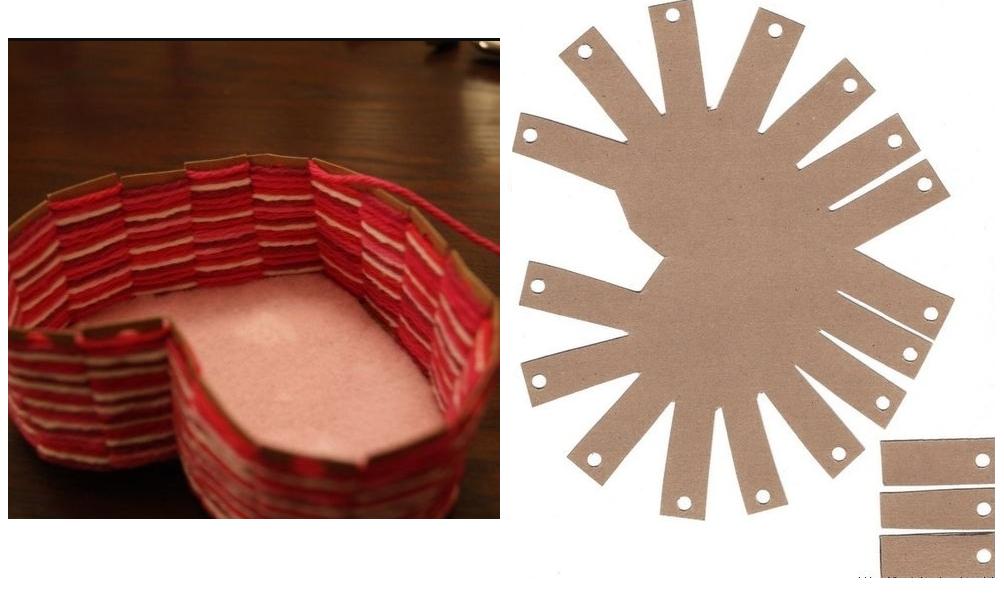
Very interestingly, the following original work is done. However, you should first prepare a sewing needle with a large eye, knitting threads of your favorite color and a piece of felt of a suitable shade. After that, print out the template shown above on a computer, carefully cut it out and transfer it to cardboard. Add three additional parts to the base, attach them with paper tape. We fix on both sides. We cut out from felt a heart equal to the bottom in size. Raise the sides up, put a felt heart on the bottom. Then proceed to the most interesting. We take the prepared yarn, grease the tip with glue and hide it under a felt heart. Next, we wrap each vertical face once with a thread, moving in a circle. Our task is to wind the product in such a way as to completely hide the template. Finally, we can only draw the upper edge of the basket of thread and cardboard. To do this, we put a knitting thread into the needle and carefully pass along the entire perimeter with a seam “over the edge”. It is important to get into the holes of the cardboard.
Color cardboard basket
If you do not want to mess with pasting and decorating crafts, you can make a simpler, but the same original and effective version. We will study its execution technology further:
- First of all, we prepare a sheet of cardboard of our favorite color, a simple pencil, a ruler, scissors and glue.
- After that, we put the cardboard face down in front of us.
- We measure the lateral side and postpone this distance vertically.
- Cut the resulting square.
- We divide it into nine smaller identical squares.
- On the upper and lower middle we outline the middle and draw triangles.
- Cut out the figure shown in the photo.
- We divide the two upper and two lower squares into three parts.
- Cut out the figure shown in the photo above.
- Now we can only collect the original craft from color cardboard as shown in the instructions. Finally, glue the triangle, and on top of it a small circle, masking all the flaws. Then we supplement our basket with a handle.
Wicker basket
The following craft looks no less original and unusual. You can perform it from colored cardboard, old magazines or newspapers, brown or colored paper. The technology is pretty simple:
- The first step is to prepare at least fifty strips. Each is thirty centimeters long and four wide. Fold everything in half and proceed to creativity.
- We spread the first six strips in front of us.
- Perpendicular to them we lay out the same amount.
- We twist the stripes as shown in the photo above.
- Thus, it is possible to form the bottom of the basket. Now we bend 16 strips, lifting the walls of our craft from colored cardboard. And between them we also miss new ones, making out the sidewalls. Then bend the vertical stripes inward and glue it well. An interesting and original basket is ready!
Parchment paper basket
Another great idea offers an interesting way to decorate. Moreover, you can decorate them with absolutely any basis. The main thing is to purchase parchment or baking paper at the store. After that, we form the frame you like and add to the handle. Then cut the paper into strips about four centimeters wide. Each one is slightly creased, and then twisted into a flagellum. Lubricate the sides of the frame with glue. And we begin to carefully lay out the prepared harnesses, trying to arrange them as close as possible to each other. Thus, we draw the bottom of the basket and then decorate the handle. We make out the internal part of the original product at our discretion. If desired, the craft can be made of white cardboard and then do not bother with additional work.
Baskets in one piece
Very interesting are the models that require a minimum of effort from the needlewoman. Therefore, we also could not ignore them. And we offer readers two patterns by which it is easy to complete the original craft. Moreover, experienced craftswomen note that it is possible to make a basket of colored or white cardboard. And then leave it in its original form, that is, do without registration. Or prepare a frame, and then decorate it with fabric drapery, colored paper, beads, beads, ribbons and other decorative elements. In addition, readers who have a color printer at home can simply print an interesting template with a bunny. Cut it, assemble and glue an interesting mini-basket. A small souvenir can be presented in it.
Flower basket
The studied products are notable for the fact that needlewomen use cheap improvised materials for their implementation. However, the baskets are still very cute and in no way inferior to the store options. In this section, we offer readers to study the instructions for making a children's basket:
- First of all, we should draw a circle - the bottom of crafts.
- Then divide it into eight sectors as we did when executing a faceted basket.
- Round each resulting detail, turning the entire template into a flower.
- Now we just have to cut out the resulting figure, paint it of our own free will.
- And then glue the corners of the sides and decorate the cardboard basket made according to the template as you like.
Ribbon Basket
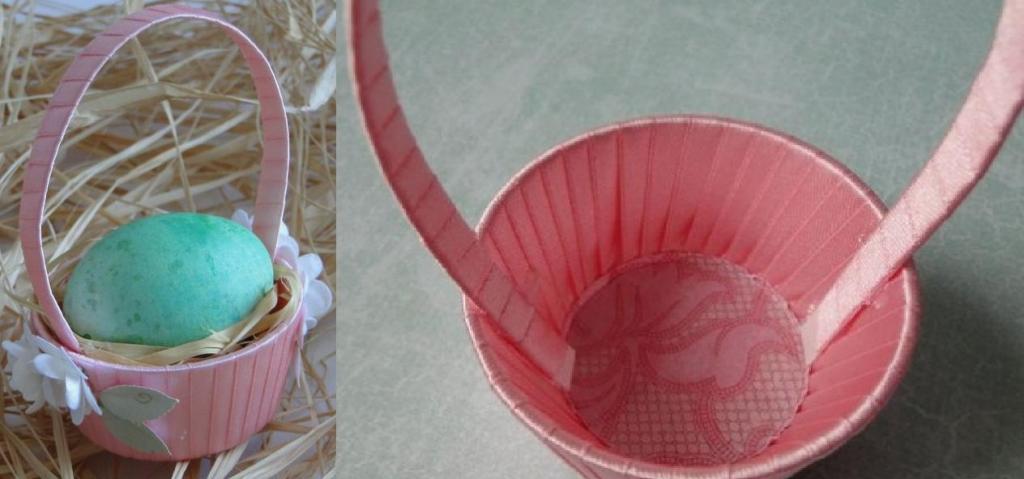
And another interesting craft is also performed quite simply. You just need to prepare a strip of cardboard. Its length is equal to the circumference of the desired basket, and the width, respectively, of its height. After that, using a ruler, draw a line, departing from the bottom edge of one centimeter. We make cuts on it without going beyond the limiter. Then twist the strip and glue the two edges. We carefully bend the lower parts and also glue them together. We leave the basis of our future basket of cardboard and ribbons for several hours so that it dries well. At this time, you can prepare the bottom and the handle of the desired size. When the specified time has passed, take a satin ribbon of the color you like and glue the tip from the inside. And then we start wrapping the sides of our basket. Having designed the entire base in this way, we cut off the excess part of the tape and glue the tip from the inside. Next, we wrap the prepared handle, we also attach it from the inside and put the bottom in the basket.
We hope our tips for making cardboard baskets will help the reader to create truly spectacular and original DIY crafts. Good luck!