Celery is famous for its unique beneficial properties. He is a good assistant in the treatment of diseases such as anemia, disorders of the nervous system, diseases of the cardiovascular system and gastrointestinal tract, kidney and liver failure, and skin diseases. Celery normalizes metabolism in the body and prevents early aging. This plant is known as the most powerful aphrodisiac, as it enhances passion and sexual desire, and also stimulates male sexual potential. By the strength of these properties, celery is not inferior to expensive foreign drugs - aphrodisiacs. Only the seeds of this wonderful root crop are mere pennies. How to properly grow root celery from seeds will be described in detail in this article. But first, we will figure out what kind of root crop to choose.
What type of celery is preferred?
There are three types: petiole, root and leaf. The type of celery does not affect its beneficial properties. The roots are rich in various mineral salts (salts of magnesium, calcium, sodium, potassium), as well as vitamins (C, B, B 2 , PP, K). A feature of celery is the presence of an aggressive smell caused by the essential oils in its composition. This property is not to everyone's liking, so you should opt for growing species with the lowest content of essential oils. So, leaf celery is the most fragrant, and root, on the contrary, the least.
Varieties of Celery Seed Varieties
The choice of celery should be very responsible. It is necessary to take into account the growing conditions and the desired result. Breeding in recent years has made a huge breakthrough in its development. An incredible number of new species of animals and plants were bred. Celery breeders also did not deprive attention and brought several improved varieties. How to grow root celery without a beard? What is a beard at all? The fact is that sometimes celery begins to form numerous small roots. To prevent this from happening, you need to choose the right variety, correctly dive seedlings and water the plant well. Still on sale there are seeds of old varieties of celery like Gribovsky and Apple. However, keep in mind that the fruits of these varieties do not grow more than 200-300 grams, and they also have a complex root structure. We advise you to pay attention to the variety Diamand and similar, which give a very large (up to 800 g) and accurate crop. Also positive reviews have such varieties as Maxim and the Parisian giant. How to grow celery at home? Celery seeds require prior preparation before planting. To do this, they are filled with water and changed it every 6-8 hours about 3-4 times. Celery grows long enough. But thanks to this treatment, you can speed up the process of seed germination by about 7 days.
How to plant root celery
In the southern territories, the process of planting celery is maximally simplified. Celery grows for about 200 days, which warm edges can provide him with interest. For residents of colder regions there is also a way out: planting seedlings. For residents of cold territories, this, of course, does not cause much difficulty, since the practice of growing seedlings here applies to many other crops. It is best to start preparing seedlings in February. As mentioned earlier, the seeds are pre-soaked and then planted in separate cups or cassettes. We advise you to drop 3-5 seeds in each hole and, when digging in, do not zeal, so that it is easier for the sprouts to break into the light. After the seedlings sprout, select the strongest bores and remove excess ones. How to grow seedlings of root celery?
Rules for growing seedlings
Since celery grows for at least 150 days, growing it causes gardeners a lot of trouble. Growing celery with seedlings allows you to collect a decent harvest of this plant. The best period for planting root celery seedlings is the end of winter. Keep in mind that seedlings need approximately 2.5 months to grow. Seedlings for leaf celery are usually planted in early spring. However, it is worth noting that it can be grown without seedlings, planting seeds immediately in the ground. Celery seeds have a very high content of essential oils, which greatly inhibit the process of germination. Sometimes the period of seed germination, especially if there is insufficient moisture in the soil, lasts up to 20–25 days. In this regard, before planting, it is necessary to pre-treat the seeds and germinate them.
Seed germination
For petiole and root celery seeds, two effective methods of preliminary preparation are usually used. In the first case, they are subjected to a bubbling process - treatment in water with a temperature of 20 ° C, saturated with air for 24 hours. After bubbling, the seeds are disinfected with a one percent solution of potassium permanganate for about 45 minutes at a temperature of 18-20 ° C. Then the seeds are washed well in clean water and finally can be used for sowing. In the second embodiment, the seeds are also disinfected with a one percent solution of potassium permanganate for about 45 minutes. Then it is washed in clean water and again soaked in the Epina solution for about 18 hours at a temperature of 18-20 ° C. The Epina solution is prepared in the proportion of 4 drops of the drug per 1 glass of water. After processing with this solution, the seeds are ready for sowing. It is necessary to strictly follow the sequence of actions in both cases. In order to germinate the seeds, they are carefully distributed on moistened tissue and left at room temperature.
Seedling Care
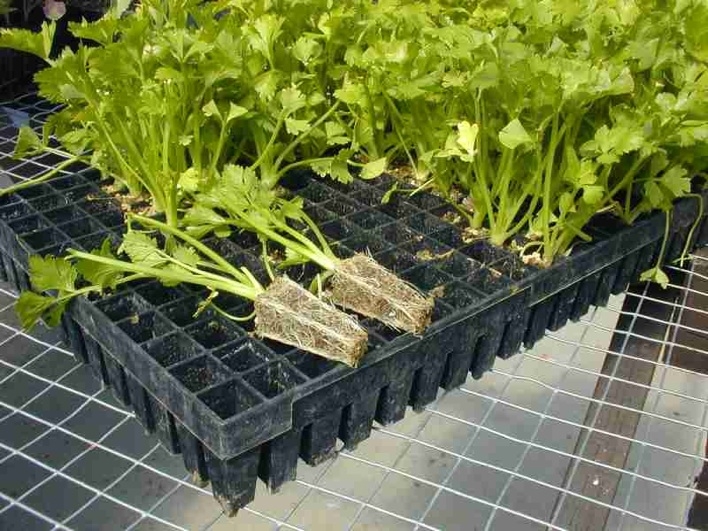
At home, it is most convenient to place seedlings on the windowsill. For planting seedlings in the sowing trays, a soil mixture is prepared from turf soil, lowland peat and humus, mixed with coarse river sand in a ratio of 1: 3: 1. To increase the nutritional properties of this mixture, urea (1 tsp. Per bucket) and wood ash (1 glass per bucket) are added to it. After the seeds have sprouted, they are sorted out, choosing those that are with one seedling. Then they are mixed with sand and laid out in sowing trays with moistened soil mixture. It is optimal to spread the seeds in a row, observing the distance between the rows of 3-4 centimeters. To grow faster, they need free access to air. Therefore, the seeds are only slightly sprinkled with a sieve with moistened sand. The tray must be covered with foil and put in a warm place. It is necessary to monitor the soil moisture in the tray and spray it with a manual spray gun with warm water in a timely manner. Water should not be cold, and excessive humidity is unacceptable, as young stems can turn black. Until the sunrises appear, the film is not removed, and the trays are in very warm places (22-25 ° C).
When sprouts appear on the surface, the film must be removed and the tray should be moved to a very lit, but cool (no more than 16 ° ) place, as a rule, this is a window sill. Over a month, seedlings grow very slowly. After about 25-30 days, the seedlings need to be thinned out so that there is a distance of at least 4-5 centimeters between them. Or seedlings can be transplanted into separate pots (6 × 6 cm), cups, as well as in a greenhouse or greenhouse. An important condition is that the soil should be more than 10 centimeters thick. The seedlings need to be transplanted carefully, to avoid exposing the roots and burying the growth point, as this can greatly slow down the growth of the plant. Handle the main root with extreme caution; do not damage it. This can lead to the formation of an unaesthetic ramified root system on the fetus. When transplanting seedlings into a greenhouse or a greenhouse, it is necessary to observe the distance between the rows of 5-6 centimeters and 4-6 centimeters between plants.
After planting, the plants are watered and covered with moistened paper to darken for 2-3 days. At this stage of growth, the optimum temperature is 15-16 ° C during the day and 11-12 ° C at night. Further, the soil is regularly loosened between rows, watered and fed. For the first time after transplantation, complementary foods are used in about 10-12 days. To prepare a solution for feeding, 1 teaspoon of nitrophosphate is diluted in 10 liters of water. 2-3 tablespoons of the resulting solution are watered on one plant. To ensure that the leaves of the plants are not pale, use urea, feeding it 2-3 times with an interval of 10-12 days. Inaccurate feeding with urea can lead to burns on the leaves, so after each procedure, wash off the urea residues from the leaves with clean water using a watering can. Shortly before transplanting into the open ground, plants are accustomed to the street air, taking out trays into the street during the day and then at night. After about 2 months, 4-5 leaves appear on the plants, and they become ready for transplantation into the open ground.
Seedlings begin to be accustomed to open air about 5 days before planting, and a few hours before planting, plants are well watered. It is best to plant seedlings in the ground on May 5-6. If the weather is favorable, an earlier landing is also possible. The sooner you plant seedlings, the greater the likelihood that you will get a large and high-quality crop. However, for early-planted plants, there is a danger of strong flowering of plants, which will adversely affect the yield. Seedlings should not be in the trays for too long, but weak seedlings will also not be able to bring good fruit. Ready for transplanting is seedlings of 12-15 centimeters high, having 4-5 leaves and strong roots. The simplest way to grow root celery from seeds is described above.
Landing
As mentioned earlier, plants are considered ready for planting in the soil after about 2 months, when their height reaches 12-15 centimeters, and 4-5 leaves are formed on the stems. A few hours before planting in the beds, seedlings are well watered. Usually seedlings are planted on May 5-6. It is very important that it is not overexposed in trays or still fragile, this directly affects the quality of the crop. Immediately before planting, in order to make it easier to pull seedlings out of the trays, they are watered again abundantly. How to grow root celery?
Soil preparation
Before planting celery on the beds, it is necessary to prepare the soil. It should be very loose, soft and located in an open sunny area. It is undesirable that parsley, dill, carrots or parsnips were previously grown on this site. It is good to plant celery where cucumbers, tomatoes, legumes and cabbage used to grow. The soil for celery is prepared in the fall. To do this, it is dug up to a depth of 25-30 centimeters and fertilized with compost or humus (3-4 kg per 1 m) and double superphosphate (20 g per 1 m). In April, the soil is again loosened and filled with complex mineral fertilizers (35-40 g per square meter). How to grow root celery in open ground?
How to plant in the ground
For root celery, beds are formed so that between the plants and between the rows there is a distance of 40-50 centimeters. For leaf and stem beds, make every 30 centimeters, and between plants leave a space of 15-20 centimeters. It is allowed to plant celery among the beds of other vegetables, such as potatoes, onions, garlic, etc. In each hole for a seedling, the soil is mixed with a small amount of ash and humus. Each seedling goes deeper into the fossa to the cotyledonary knee, then the soil around it is pressed and well watered. The first few days after planting in open ground, plants must be protected from the bright sun with paper.
Growing celery in the ground

Care for petiole, root and leaf celery has some differences. But common to all types are soil loosening, mulching, weeding, watering and, in some cases, protection from pests and diseases. To prevent a sharp loss of moisture in the soil and the appearance of a crust on it, the beds are covered with sawdust, peat or mowed grass. Petiole and stem celery also need to be earthed up to 20 days before harvest. Thanks to the earthing up in root crops, the amount of essential oils with an unpleasant odor decreases, the bitter aftertaste weakens, the petioles are bleached. In order to obtain the largest root crops of the root celery, in mid-July the top of the root is cleared of soil, the lateral roots are removed, and the leaves are pressed to the ground as much as possible. Do not worry about broken leaves, this procedure benefits the root crop. When harvesting, the petiole and root celery are removed as a whole, and the root system of leaf celery can be preserved for house cultivation in winter. To do this, before the cold, the root system is dug out of the soil together with the soil and placed in a pot.
How to water
Good humidity is important for celery, so they are watered abundantly: 20–25 liters of water per week per square meter. The soil should not be overdried. On hot days, plants require daily watering. Water the celery to the root.
How to feed celery
To ensure a good crop, plants need to be fed 4 times over the summer. About how to feed seedlings, was described in detail earlier. 7 days after transplanting seedlings into the open ground, plants are fed with infusion of herbs. 20 days after planting in the soil, the soil is fertilized with infusion of chicken droppings or mullein. At the end of July, a plot with plants is filled with superphosphate (30 g per square meter).
If you follow all the growing rules described above, at the right time you will get a wonderful crop of healthy root crops. The question of how to grow root celery in the country, now should not seem difficult.