The problem of processing open sections of products is faced by all needlewomen. Consider, for example, how to crochet a neck in several ways. Also, we will step by step analyze the proposed patterns and patterns for finishing the edge.
Neck Design Options
The raw edge can be finished in one of several ways. We list the main options for crocheting a neck and decorating a product:
- Narrow border (no more than 0.5-1.5 cm). A thin edging or hem is ideal for light, delicate and children's things.
- Border turning into a collar (from 5-8 to 15-20 cm). It can be combined with any kind of product.
- Wide decoration (from 1.5 to 4-5 cm). Most often used in the design of the neck and edge of the sleeves of pullovers and jumpers from yarn of medium thickness.
Sometimes beginner needlewomen do not know how to crochet a neck beautifully. In this case, you can use patch collars. By the way, they are used not only to decorate wickerwork. An ordinary fabric dress can be easily turned into a festive outfit, decorated with a small accessory. Contrasting color details look especially stylish (photo 1) .Then the crocheting of the neck is not required at all. Schemes of such removable products are intended to operate from top to bottom. That is, at first several rows are knitted, the first of which will be the edge, and then, following the instructions, a small uniform expansion is performed.
Processing the bottom of the product, processing the armhole or sleeves and processing the neck with a hook in the same style
The most harmonious look is the same finish of open sections. Agree that cutting and attaching fabric strings is a rather time-consuming process. And the use of other technologies (embroidery, macramé) is also quite problematic. Therefore, very often one of the most common types of needlework - crochet - is used to decorate products sewn from fabric or made with knitting needles. The tying of the neck, especially on T-shirts, tops, dresses and other light (including fishnet and children's) products with an open armhole or short sleeves, is usually carried out the same way. The first row is usually made with single crochet. And only then you can fantasize to your taste using different tricks. Then the product will look stylistically finished, neat and beautiful. Let's start with the simplest pattern “Crayfish step”, with the help of which the neck is crocheted most often. Schemes in this case will not be required, since it will be very simple to perform work according to the text description.
The implementation of the pattern "Crab step"
How to crochet a neck so that the edge is smooth and does not stretch? Use not simple columns for this, but a pattern unusual in its technology. The work in this case will be performed in the opposite direction - from left to right, therefore the name of the mating is associated with cancer backing away. So, reaching the edge of the canvas and completing the last loop of a number of single crochet columns, do not turn the product to the opposite side. Insert the hook into the last element of the base, directing it from the front (turning clockwise 90 °), and pry the working thread pre-stretched to the left through the hole. Two loops have formed on the instrument, knit them. Then, moving back, perform the "step of the dog" to the end of the row. The edge of the product will be in the form of scars obtained from overlapping threads. This neck finish can be carried out as the main threads to match the product, and finishing.
Description of schemes for finishing the neck
Consider a few simple, but rather elegant ornaments that are performed on top of a preliminary row of single crochet columns (in the diagrams - a chain of air loops).
Designation ** - rapport, that is, the repetition of the same elements to the end of the row.
Pattern One:
1 p. - * 2 pillars. from 1 nak., 1 air. P.*;
2 p. - * arch of 4 air. n. on top of the post., 1 post. without nak. in air P.*;
3 p. - * fan from alternating 5 pillar. with 1 yarn and 4 air. n. in one arch of the last row, then 1 pillar. single crochet. to another arch *.
Pattern Two:
1 p. - * pillar. with 1 double crochet *;
2 p. - * 4 column fan. with cover., 3 air. P.*;
3 p. - * per post. last row 2 pillar. with 1 yarn, 3 air p., pico from 3 air. item, 3 air. item, 2 pillar with 1 yarn *.
Pattern Three:
1 p. - * pillar. without nak., 3 pico from 3 air. n., pillar. without nak., 5 air. p. over 3 loops of the last row *;
2 p. - * pillar. without nak. in arches from air. item, 9 air. p. over the pico group *;
3 p. - * 9 pillars without nak. over air. item, 1 pillar without nak. in the pillar. last row *.
The simplest and at the same time elegant way to finish the product with the Fan pattern
Any edge will look neat when using this rather simple ornament. It is not necessary to be a super-skilled worker and know all the tricks how to crochet a neck. It is enough to learn how to carry out only a chain of air loops, a column with a crochet and without it. The ornament consists of three rows, but if desired, you can repeat them several times. The result is a wider openwork border.
1 p. - On the edge of the canvas, perform arches of 5 air. loops (on the base we skip 3 loops) and a pole. single crochet;
2 p. - repeat the previous row, knitting a pillar. in the air arches;
3 p. - alternate the pillar. single crochet (with a similar pole. previous row) and a fan in an arch made of 5 columns: 1 single crochet, 3 with 1 double crochet, 1 single crochet.
Two ways to knit corners
What are the features of the edge processing with the above pattern? In the implementation of turning lines and corners. Tying can be done in two ways:
1. In the case when it is planned to perform only the main ornament without repetition, you can rely on the above photo. Then at the very corner will be one of the scars.
2. If you want to make the lace border wider, it is worth changing the technology a little. To do this, when performing 1 row at the very corner, make an arch from the air. loops and single crochet stitches (preceding and finishing it), knit in one loop of the base (at the very corner). Then, as a result of the serrated fan, there will be no corner fan. It will appear after repeating 1-3 rows.
Therefore, you should immediately decide how to crochet the neck - make it in the form of a narrow embossed edge or a wide border. And only after that plan your future work. Otherwise, the neck will be tightened and with a concave corner connecting it to the bar of the product.
"Second life" of the neck. Repair old things
Very often, jerseys lose their original appearance and shape during socks. In this case, the neck of the dress can be crocheted. At the same time, the appearance will be fresh and attractive. Bind as follows:
- With sharp scissors, cut the trim, trim or collar;
- if necessary, mark the edge with wide stitches, tucking the fabric inwards by 0.5 cm;
- if the fabric has a fine knit, an upwind with basting can be omitted;
- knit the first row with single crochet columns, pulling the fabric down a little, they can be alternated also with 1-2 air loops (especially when using contrasting yarn), departing from each other by 3-5 mm;
- Repeat the work in a circle until the desired width of the knitted inlay (usually 2-2.5 cm) is reached.
Openwork rim
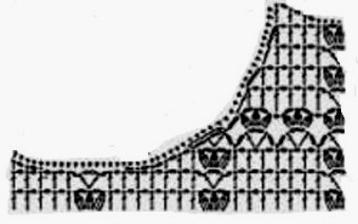
We will analyze one of the options for tying the neck, relying on the proposed scheme:
1 p. - a chain of ordinary air loops;
2 p. - alternating pillar. without nak. and arches from 3 air. loops;
3, 4, 5 p. - knitting in the arch: 2 pillar. with nak., 2 air. hinges (3 row), 3 air. hinges (4 row), 4 air. loops (5th row), and in a pole. base - 1 pillar. with nak .;
6 p. - knitting in the arch 9 pillar. with 2 nak., alternating them with 1 column. with 1 nak. at the base;
7 p. - knitting in the first pillar. base 9 pillar. with 2 nak., alternating them with 1 air. a loop, in the spaces between them - the implementation of 2 arches of 4 air. loops;
8 p. - over arches of 9 pillars. with nak. 4 arches of 3 air hinges, and over arches from air. loops - tying a pole. with 2 nak.
You can interpret the proposed pattern somewhat, finishing the work after completing the 5th row. Another, more compact openwork option - knitting 5-8 rows with a mandatory arched toothed edge.
How to crochet a neck in the shape of an openwork coquette?
In some cases, finishing the open edge is done in reverse order. This means that at first the openwork coquette is knitted, and then the whole product. This option is most often used in the manufacture of models with round trim parts. If the coquette should be square for easier connection with the main canvas, increase in four places. As a result, we get corners adjacent on one side to the armhole, and on the other, to the upper horizontal lines of the ledge and back. At the same time, many products differ not only in the technology for performing various parts - openwork yoke and the main canvas made of dense ordinary viscous - various materials are often used. Now it is very fashionable, for example, to make a lace yoke at a silk blouse. Or trim a knitted cardigan with a lattice collar.
Crochet neckline
Such a knitted border looks very fashionable. But, unlike a knitted fabric, it is rather problematic to crochet the fabric. What recommendations should be followed to get a beautiful neck?
- Use a knitting tool with a pointed tip for easier piercing of the web.
- It is desirable that the structure of the thread and fabric coincide (for example, woolen yarn is more suitable for drape and a similar fabric).
- Pre-treatment of the edge with an inner hem is required.
Of course, not all needlewomen succeed, and not everyone knows how to crochet a neck beautifully. But surely the tips and descriptions of patterns and patterns given in this article will help to make the decoration of products stylish, original and neat.