Mink coats have virtually no wear. Wearing such an expensive thing for more than one season, every time I want to refresh the image by introducing relevant accessories into it. Mink mittens will become a stylish, fashionable and irreplaceable thing in the cold. In addition, beautiful warm mittens are quite suitable for beauties, regardless of the type of preferred outerwear.
A great occasion for needlework
Many girls are fond of needlework and design fashion accessories for themselves, including imagination and creative thinking. And if a fashionista cannot yet rank herself as a needlewoman, then mink mittens are a great start for mastering a creative path. In addition, at home in the closet grandmother's collars or an old hat, hopelessly out of fashion, is gathering dust. If you pay a visit to a fur atelier, then you can certainly stock up on leftovers from sewing products or fur tails. To the delight of the craftswomen, there is now no shortage of materials.
We make mink mittens with our own hands on a knitted basis
In order to get started, we stock up on all the necessary materials and tools. We will need:
- 16 mink tails in black.
- Knitted basis.
- Comb for fur.
- Sharp blade.
- A needle with three faces.
- Pin.
All accessories and materials are ready, now you can proceed to the first stage of sewing. To begin with, the tails are rubbed with hands and combed with a comb along the pile. Next, carefully cut each with a blade into separate strips. This must be done slowly and ensure that the size of the strips is the same and the width is exactly 5 mm. Our mink fur mittens will be constructed using a strip of knit stitch loops.
Sew strips to the cuff
We start the sewing process directly. For this, we take as a basis thin knitted mittens with large loops. The color of the base can be the most diverse, because any shades will be combined with black stripes. Indent from the cuff itself, which should not exceed 4 cm. Craftswomen prefer to draw a straight line with a remnant along the ruler. We carefully sew the tip of each strip to the beginning of the drawn line so that there are no gaps between the parts. No need to say that the fur side should look out. This is clear to everyone. After the prepared strips are sewn to the entire outlined cuff, you can proceed to the next stage of needlework.
Do-it-yourself mink mittens: tying method
Now it is the turn of the most interesting and fascinating process - threading strips into a knitted base. Take a pin in our hands and fix it on the non-sewn end of any fur strip. Then we begin to thread the pin through the loops through one, thereby as if tying the blank with fur. Having reached the end of the row, remove the pin, remove the excess and sew the tip to the top of the mittens. And so the binding method will work row by row until it covers the entire area of the mitten. It remains to tie only the thumb, as well as the cuff, but already across the product.
The final stage
When we sewed on strips, fur hairs could hide inside the product or be taken. Now you need to take the needle and use it to gently pull the villi out, then use the frequent comb to give the mitten extra fluffiness. Knitted mink mittens will look great if they are additionally decorated with tassels, patterns or beads. Do the same with the second mitten. When the work is completed, we can safely say that no one in this district will find such a pair. And how much pride a fashionable woman will have if she ventured into needlework for the first time.
Patterned mittens
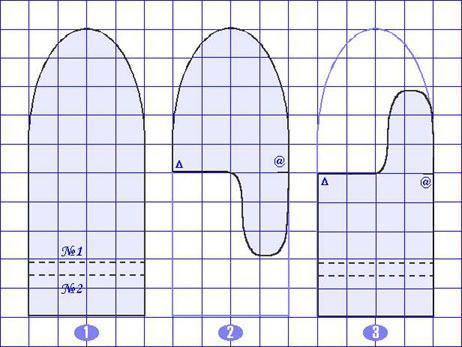
Another way to sew mink mittens is to make a product based on a pattern. This method is suitable for those who have a single piece of fur, such as a back or collar. A finished pattern can be found in the needlework magazine, and you can also build it yourself. To do this, place a palm on the paper and outline it. 5-7 cm is usually added to the cuff. Now the palm of the hand outlined on paper is transferred to cardboard, increasing the edges by 1.5 cm.
The pattern of mittens from the mink provides a gap for the thumb, which is left on one of the parts. It is carried out as follows. Perpendicular segments (4 and 5 cm) are drawn through points located 1 cm above the wrist and 1 cm from the edge of the future mitten. The resulting segments should intersect at a point located approximately in the middle. It will be the center of the future hole provided for the thumb. And the ends of the segments themselves are connected by smooth lines into an oval. Separately, by applying to the sheet, observing the allowance (0.5 cm), the thumb is drawn.
Cut the skins
A pattern of mink mittens is applied to the skins of the skin and is surrounded by a bright felt-tip pen. It is necessary to take into account the location of the pile and before cutting, make sure that the hairs are located towards the wrist. Cutting is done with a blade or a small sharp knife, while the pile is nevertheless gently pushed.
Stapling step
At the edges, the parts are sewn manually with a buttonhole stitch. A seam over the edge is also used. Mink mittens do not require perfect furrier training from the craftswoman, however, the accuracy and accuracy of the stitches will not harm anyone. Better if the stitches are placed as close to each other as possible. When the stitching step of the parts is completed, the mitten is turned upside down, and an oblique ribbon is sewn to the edge. A pattern of mink mittens from a mink will serve the craftswoman once again for making the lining. It can be made from thin knitwear, flannel or cotton fabric. The edges of the lining can be sewn both manually and on a sewing machine. The finished lining is not turned out so that the seams do not touch the fingers. It remains only to insert the stitched lining details into the fur, putting them on the arm. Mink mittens are ready!
Fur mitts with curved edges and loops
The initial stage of manufacturing mittens with folded cuffs is practically no different from the previous method. The mittens pattern is transferred to cardboard. Outline it from the wrong side of the fur, cut it out using a blade. The lining is cut out immediately, but sewn separately from the mittens. The parts are swept away by folding them with their faces facing each other. True, a line is made on the lining parts, retreating half a centimeter from the edge. This is done so that the lining does not collect inside the mitten. To make beautiful mink mittens, you will need a ribbon as a finishing detail. Do as follows. Cut the tape into 8-12 small pieces of a length of not more than 3.5 cm. The wrists of the fur parts are turned out and loops from the pieces of tape are sewn at the same distance from each other, and directly onto the fur. As many pieces are taken for the second mitten. Loops are easy to do. To do this, the ends of the piece overlap each other.
The edges of both fur and lining cuffs are folded inwards and sewn by hand or using a sewing machine. If you use the latter for processing, you need to know that not every device can cope with fur parts. A floating shuttle on a typewriter indicates the possibility of stitching extremely thin fabrics. In this case, in order to avoid breakage, it is better not to try your luck and grind the parts manually. Then the mitten is turned inside out, a lining is laid on top, a line is laid along the entire perimeter of the product. It remains to unscrew the product and loop the decorative cord through the loops . Well, a pattern of mittens from mink fur may be needed even if the girlfriend or sister will appreciate the work of the craftswoman.
About the benefits of fur mittens
Winters in many Russian regions are notable for their severity. Especially outside the central region. Women love to warm their hands in fur products. Not without reason, for centuries, couplings have been in fashion. And, it seems, the fashion for fur products will never go away, experiencing more and more bursts. From a purely aesthetic point of view, fur looks spectacular, and from a practical point of view - a warm accessory brings many benefits. Not a single beautiful woman agrees to walk with weathered skin of her hands, but only warm fur gloves are able to save from seasonal troubles. In fur salons there is certainly an extensive selection of accessories so beloved by young ladies. But sometimes the prices seem too high. And at home, the skin of an animal or an old fur vest, which in some places lost its presentation, was accidentally littered. So why not do needlework and craft cute, exclusive mittens?