More recently, a relatively new device, an infrared sauna, has appeared in various sports clubs and fitness centers. This modern design, a visit to which is considered very beneficial for health, resembles a real bath. It looks like an infrared sauna, rather, like an ordinary shower. One of its undoubted advantages is that it can be installed in almost any room. Many install such saunas, even in small city apartments. Since the design of the infrared bath is very simple, it is easy to assemble, including with your own hands.
How it works
Actually infrared is called a completely harmless thermal radiation. This is exactly what comes from a heated stove or a working heater. That is, an infrared bath, in fact, can be called simply dry thermal. The main element of such a sauna is a heater of a special design, powered by a conventional household network. After switching on, this device becomes a source of electromagnetic radiation with a wavelength within the infrared spectrum. Such equipment is usually installed in a cabin made of natural wood or some other environmentally friendly material.
Infrared heaters for a bath - devices are relatively inexpensive and can be purchased today in almost any specialized hypermarket. The main feature of this equipment is that it transfers heat directly to the human body without heating the air. To better understand the principle of operation of such heaters, you can simply imagine a room into which the sun shines through a window. Those objects on which its rays fall will be very hot. At the same time, the temperature of the air in the room will change only slightly.
What tools and materials will be needed
The easiest way, of course, is to buy a finished infrared sauna in the store. Mounting such a design yourself is not particularly difficult. The finished bath with infrared rays is simply installed in the right place in the apartment and connected to the mains. These saunas look very prestigious, but at the same time they are expensive. With your own hands, meanwhile, you can make an equally beautiful infrared bath and spend much less money.
The materials for assembling such a sauna will need to be purchased as follows:
pine beam 5 0x 5 0 mm for the frame of the sauna box;
lining (linden or pine);
fire protection solution;
steel corners;
wooden slats 60x25 mm;
8 mm tempered glass for a door;
Of the tools you will need: a screwdriver, tape measure, a hacksaw, a building level, a large ruler.
What you need to do first
Baths and infrared saunas are being installed, as already mentioned, not only in private houses, but also in city apartments. In the latter case, it is impossible to mount such a design just like that, of one’s own free will. First you need to get permission in organizations such as:
Such permissions are usually issued only when:
according to the project, the size of the sauna is not less than two times smaller than the room in which it will be installed;
the distance between the walls of the cabin and the bathroom is at least 5-7 cm.
How to make a project
Of course, before proceeding with the assembly of the sauna, you should decide on its dimensions and the number of heaters. In urban apartments , an infrared bath is usually installed , designed to serve one person. In a country house, you can assemble a model and more.
Heaters for home saunas can be used in two types:
When purchasing infrared heaters for a bath, among other things, you should pay attention to their power. For a small sauna, two corner models and three front ones of 400 watts each will be enough. Install these devices as follows:
two at the corners on the front wall of the cab ;
two behind the back of the person receiving the procedure;
one under the bench (for legs).
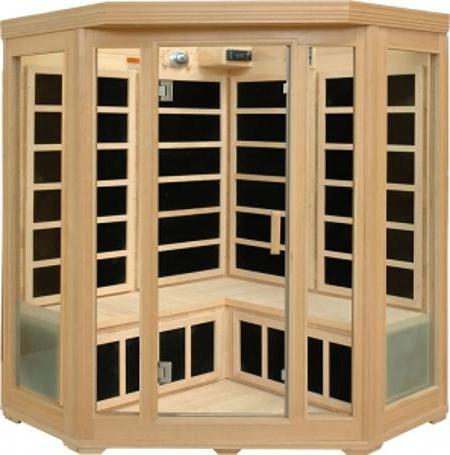
In bathrooms of small apartments, a corner infrared bath is often mounted . In this case, four heaters are hung in the cabin - two on the walls on both sides of the door in front of the receiving procedure, one in the back in the corner and one under the bench.
Whatever design the infrared bath has , all heaters should be located on the same level from the floor. The exception in this case is only the device under the bench. There is no need to insulate an infrared sauna . Indeed, in this case, the heat acts directly on the human body and practically does not spread through the cabin.
Having decided on the design of the infrared bath and its configuration, it is necessary to make its drawing. Perform this procedure is worth all the rules. That is, indicating the dimensions of the elements, methods of attachment, etc. Of course, the drawing should be made in three projections.
Electrician
The infrared bath in the apartment does not require water and sewage . But the electrical wiring to reach the booth, of course, have to. In no case can you simply connect the heaters to a power outlet. For the infrared bath, you need to conduct a separate cable from the shield.
Cab assembly
Mounting an infrared bath with your own hands is quite simple. The frame is made as follows:
Collect the bottom harness. The beam can be connected using the “half-tree” method or with the help of corners. The latter method is considered more convenient.
Mount the corner posts. Their length should be 20-25 cm less than the height of the ceilings in the room. It is impossible to raise racks to the very top. The ceiling of the sauna must be own. You can also mount the racks on the corners.
After the racks are installed, you can begin to assemble the upper harness.
At the next stage, the racks are connected to each other with wooden slats. If desired, you can further strengthen them with jibs. With a ceiling height of 2.5 meters, two such reinforcing tiers will be sufficient.
Mount the lining. Nails should not be attached to the crossbars. This will greatly spoil the appearance of the structure. To fix the lamellas, it is best to use special countersunk fasteners.
The roof of the cabin can also be made of lining. Below the floorboard is usually stuffed. When assembling the cab, care should be taken to ensure that there are no gaps in it.
Sauna Doors
This design element of the cabin can be made as solid wood or glass. In the first case, the door frame is first assembled. Then it, like the frame, is sheathed with lining. Each leaf should be hung at least two loops.
The glass door for the infrared sauna can also be made independently. In this case, the design will look even more presentable. Assemble such a door as follows:
mount the floor rail;
install glass on it and make a mark on it in the region of the upper trim;
produce cutting using a glass cutter;
the second glass is cut in exactly the same way;
mount the upper guide;
lead glass into the rails.
Installation of heaters
Infrared radiation in the bathhouse should fill its entire space completely. Therefore, an operation such as the installation of heaters should be carried out with the exact observance of the required technology.
Such appliances are usually suspended vertically in the sauna. Indeed, in such a bath they most often sit, rather than lie. Heaters are hung behind a person at a distance of about 60 cm from each other. A gap of about 7-12 cm should remain from the top edge of all appliances to the ceiling of the cab.
Optional equipment
It is best to connect infrared heaters to the network through a special control unit with a remote control. Such a device is quite expensive (in the region of 9-30 thousand rubles). But if it is available, it will be much more convenient to use a shower cabin in the future. Using the remote control, for example, you can adjust the time for taking procedures, the power of the heaters, etc.
Infrared floors
This type of thermal radiation can, of course, be used not only in dry saunas. It found its application in ordinary baths. In such structures, for example, infrared floors are often mounted. In this case, a special film with carbon strips soldered into it is laid on the ceiling. This design works from a regular household network. Infrared floors are placed in the bath primarily to increase the comfort of taking water procedures. Mounting such structures is relatively simple. And therefore, you can install them, including with your own hands.
If desired, a film with carbon plates can also completely replace the heaters in the infrared sauna. In this case, the material does not fit the floor, but the walls of the cabin.
How to make a shop
The dimensions of this design will depend on the width of the cabin itself. To build shops you will need:
You can fasten the elements of the bench with each other on self-tapping screws or nails. Although the air temperature in the infrared sauna usually does not exceed 50 degrees, it is worth drowning the nail caps into the wood. Before proceeding with the assembly of the bench should make its drawing. This will avoid unnecessary errors.
Mount the bench in the following sequence:
cutting lumber according to the drawing;
in the legs make insertions under the cross-beams “in half-tree”;
fasten the legs and cross members;
screw the seat to the resulting structures;
the struts are fixed at one end to the seat and the other to the lower cross members.
What you need to know
It is not necessary to varnish the wooden elements of the infrared bath. Processing timber and boards with a solution of fire protection will be quite enough. Although the air in such a sauna does not heat up too much, the varnish will necessarily begin to release harmful substances during its use.
DIY installation of a finished booth
As you can see, assembling an infrared sauna on your own is not so difficult. But, of course, it’s easier to still get a finished model. Installation of factory infrared baths is as follows:
Unpack boxes with accessories. It is better to perform this operation at the place where it is supposed to put the sauna.
Lay the back panel vertically on the bottom.
Lay the side panels to the right and left.
Install backrests and seats.
- Gather a booth.
Mount the front panel.
Screw fuses under the heaters.
Install the ceiling lamp.
Mount handles on the door.
Infrared baths: the benefits and harms of visiting
What, in fact, explains the huge popularity of such designs? And although infrared saunas are small in size, they certainly take up a lot of space in an apartment or house. Yes, and assembling an infrared bath (even with your own hands) is relatively expensive. So what makes people install such structures in their homes?
The popularity of the infrared bath is explained primarily by the fact that its visit is considered very beneficial for health. The body of a person in such a cabin warms in depth a few centimeters. This is precisely the main benefit of the infrared bath . For comparison: in a typical sauna, the body warms in depth only a few millimeters.
Doctors, however, are advised to use an infrared sauna, like a regular bath, for healing purposes, however, only for prevention. At the same time, according to experts, in no case should people visit such a bath:
with fungal skin lesions;
with infectious diseases;
with all types of malignant tumors;
during any illness in the acute stage;
with serious kidney disease.
It is also not recommended to visit an infrared sauna for people who have received joint injuries (the first two days).