A distinctive feature of technological approaches to modern construction can be called optimization. It manifests itself in everything - from reducing the volume of materials to the exclusion of large-scale work related to the connection of special equipment. As a result, the cost of implementing the facility is reduced, and the quality characteristics of the structure are maintained at the appropriate level within the framework of the standards. The pros and cons of optimization are most clearly reflected in the construction of a frame house. With his own hands, a skilled craftsman can build a low-rise country house without unnecessary costs and with minimal effort. The instructions below will help you cope with this crucial task.
General information on frame housing construction
The technology was formed in Canada and gradually won the love of builders from the CIS countries. The houses obtained in this way are mistakenly characterized as cold and unstable. These and other qualities will depend on compliance with the instructions, but, of course, a number of flaws on the background of traditional brick and panel houses are still found. However, there are many advantages, some of which have already been mentioned.
So, what are the features of such housing? We have to deal with an easily erected structure, which is based on a combination of wood and metal. Of course, the technology for the construction of frame houses with their own hands is quite arbitrary, since the help of partners will significantly facilitate many processes. For example, this applies to the foundation and installation of pile structures. The following is the binding and extension of the main frame. The roof is made like a classic rafter system, although there may be deviations from this concept.
It is important to note that the technology does not imply the lack of alternative solutions at every stage of construction of a frame house. With your own hands, you can perform the cladding and the roofing in different ways, not to mention the insulation work. The same applies to the selection of building materials.
Foundation device
Perhaps the most crucial stage, since the wooden frame will rest on the base without additional support for solid walls. In this sense, even the classic Russian log cabins due to the optimal load distribution along the log walls are not so dependent on the foundation. On the other hand, the construction of a frame house with your own hands can be realized without the use of massive slab and tape "pillows" due to the light load.
The optimal solution is to abandon monolithic casting in favor of a pile-columnar structure. The configuration of the placement of the supporting elements can be any, but the distance between the points of driving should be about 80-100 cm. As for the landing parameters, the diameter of the well is 20 cm and the depth is up to 150 cm. Particular attention is paid to the choice of piles. You can use only metal columns with an anti-corrosion coating with a thickness of at least 10 cm. If you plan to build a two-story frame house with your own hands, it is better to use an asbestos casing pipe. The core in it will be poured with concrete, which will increase the durability of the structure.
The most important part of the work at this stage is the introduction of piles. In professional construction, they are either hammered or screwed with special equipment. To independently solve this problem will allow the lever system. A metal loop is welded onto the top of the screw pile. A metal pipe is inserted into it, the ends of which from two sides are pushed by two workers. Thus, provided that sufficient cargo is placed at the top of the structure, a support of 100-150 cm can be introduced.
Create a bottom wireframe
From the moment the foundation is erected, about 7-10 days must pass so that you can proceed with further actions. During this time, piles installed in concrete wells shrink and gain strength. The finished configuration of the foundation is demonstrated by the photo below. The phased construction of a frame house with his own hands from this moment goes into the stage of preparation of the lower floor. This part of the structure will simultaneously act as a coating for the foundation and a bearing base for the floor with the frame.
The harness is done with the help of thick bars, and for their installation in advance you need to provide a grillage. This is a system of T-shaped metal staples mounted on piles. There are different ways of fastening, the choice of which is determined by the design of the columns and fastening nozzles - for example, without the help of a specialist, you can use welding or twisting along pile threads.
Along the perimeter of the foundation on the bearing points of the grillage, a strapping of the bars is formed. This is the first level at which a step-by-step instruction for the construction of a frame house with your own hands involves the installation of insulating flooring. Between the grillage staples and the wooden beams, there must be a substrate of hydro-protective material - it is desirable that this be a two-layer roofing material with antiseptic impregnations. At the ends of the bars, grooves are formed for angular joints between each other. Points of convergence are fixed with nails with a length of at least 150 mm.
Installation of wooden logs
The entire lower design of the strapping, turning into the ceiling of the house, resembles a regular crate in the device. The foundation is the previously laid large bars, and the logs completely cover the foundation with a grillage like a sheathing. The fastening of the coating elements can be carried out both by means of a groove joint and by means of hardware. If possible, it is worthwhile to apply the anchor fixing scheme with your own hands. The construction of a frame house on 16-mm anchor bolts allows you to directly connect the logs, timber and grillage, which gives the design reliability and durability.
Preliminarily, care should be taken to integrate fasteners into solid-state bases. For example, if the grillage was made with concrete casting, then the base is drilled. After this, the anchors are installed at a distance of 150-200 cm from each other. It is advisable to use rigid fasteners in critical areas of the beam, but the "empty" sections of the crate can be sheathed in a lightweight scheme.
For logs, boards of the format 150x50 mm are used. Usually, the step-by-step construction of a frame house with your own hands involves the separation of the stages associated with the creation of overlap on the logs and the formation of a rough flooring. But if we are talking about a small area, then at the same stage it is possible to lay a floor covering made of bars pretreated with protective agents (from fire, decay, deformation, etc.). The rough board is sealed with wedges and metal brackets, and then nailed to the lags.
Installation of uprights
As already mentioned, frame houses lack reliable support at levels above the foundation with a grillage. That is, the walls themselves with future cladding in this quality are not nearly comparable with brickwork or logs. Therefore, to maintain structural geometry, do-it-yourself construction technology for frame houses requires the installation of vertical support posts. They eliminate the distortions of the building, increase the rigidity of the walls and minimize deformation from shrinkage.
For the installation of supports, bars are also used, the size of which will be enough to fit the column into the groove. They are laid around the perimeter and in the center of the house. It is advisable to draw up such a layout so that the racks are fixed exactly at the points of the future wall arrangement. When choosing the load-bearing boards, one should also not forget about lowering the ceiling, since they should be hidden over the entire height by decorative flooring. These nuances are calculated at the stage of the device lag. The prefabricated structure of the racks should look like in the photo below. The stage of construction of a frame house with their own hands in terms of preparing the foundation for this ends. Then you can proceed to the creation of the "skeleton" for the walls, ceiling and roof.
Top strapping
From the lower level, the frame on the bars goes to the ceiling. Use similar materials with uprights, lags and supporting bars. The result is a symmetrical design with the same groove and bolt joints. The upper beams are laid by means of carved niches in wooden supports and fixed in them with nails. On each rack, the bar is fixed with the introduction of a nail of at least 10 cm.
Then the resulting harness must be strengthened on the sides. This will not be temporary, but continuous support with the help of cuts. They are also installed symmetrically to the upper and lower harness. From reinforced vertical posts and horizontal beams, you can go to the ceiling. As the instructions for building a frame house do-it -yourself note , for this task, bars of 50x15 cm format are used. They are placed at a distance of 50 cm from each other so that they pass along the perimeter of the strapping beams and repeat the contours of future walls. In other words, you can install ceiling bars on the supporting elements. As for mounting, coupled with groove fixation, it is recommended to use steel brackets with corners.
Installation of the rafter system
The roof will be gable, so the layered rafter frame will be the best option for the device of the supporting structure under the roof. The support element will be Mauerlat - the same power beams that can follow the contours of the ceiling beams, but only around the perimeter. It is imperative to provide for a central beam, which will be on the same level with the ridge.
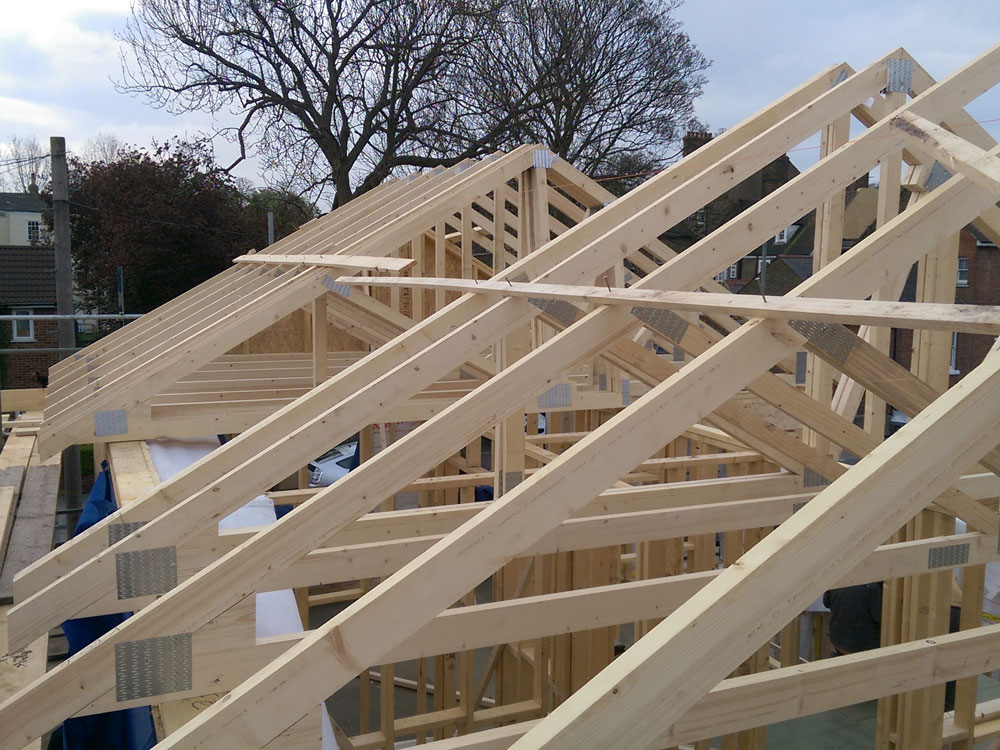
A series of racks are mounted on the base of the central Mauerlat through grooved joints. In the future, they will become bearing segments for the ridge, but so far they should be fixed already with temporary slopes in the form of small-format boards. All fastening operations are also carried out using nails, anchors and metal corners with your own hands. The phased construction of the frame house suggests that after the construction of the central rack, the installation of rafters should be carried out. At least for them you can lay a skate beam. However, many roofers recommend pre-creating an internal support system from girders, crossbars and other supports. For example, it makes sense to perform a bunch of solid bars of two opposite Mauerlat. You can also apply slopes relative to the central rack and side supports.
As for the rafters, they are laid in rows on both sides along the slopes. The connection is made through the grooves in the Mauerlat, after which it is possible to fasten the beams with nails. The distance between the rafters will depend on the total roof area - from 50 to 100 cm on average. But in any case, do not forget about the load on the main frame. Beams weigh a lot, and with the roof the mass is almost doubled.
Roofing
Hard and solid materials to protect the frame house is undesirable precisely because of the heavy load. But a lightweight metal profile as such is not the best option for a residential building in principle. Roll flooring on a lightweight rafter frame made of wood is also not suitable. But you can give preference to thin tiles or metal tiles.
Of course, the roofing is not only formed by the flooring. This is a multi-layer “pie” in which insulating materials are involved. For their proper placement, it is necessary to arrange in advance a small-format crate under the slings of the roof of the frame house. With your own hands, the construction of a supporting structure for laying insulation can be done from thin bars. The rafter leg in this case will fulfill the function of power beams, to which the elements of the crate are attached.
For insulation, mineral wool or polystyrene foam is used. It is better to use slabs cut to the size formed between the slings of the cells. Further, the "filling" is closed with a waterproofing agent from the same roofing material or a film with vapor protection. The finished substrate is again covered with a layer of an even smaller counter-battens, on which the roof will be laid. The fixing of the flooring elements is carried out by an electric screwdriver using suitable sized bolts or self-tapping screws. At the end of the fastening, all mounting points are sealed with roofing sealant.
Facade cladding
The walls are formed by rigid tile materials made of wood. A solid board is rarely used, but wood-particle panels in combination with wind-insulating materials are quite suitable for a residential building. For example, the construction of a frame-panel house with your own hands can be implemented with OSB boards. Usually manufacturers of home sets offer ready-made sets with combined partitions. There are more resistant and durable materials in the form of a metal facade tile or even clinker brick. But such a cladding gives a considerable load on wooden carriers, so it will be important to make preliminary calculations on the weight of the cladding.
Particular attention is paid to the lining functions. It must be insulated, moisture resistant, vapor tight and physically protected. A simple budget option like wood-based solid panels is good for its natural texture and environmental friendliness. But such a finish will have to be regularly treated with protective agents, paints and impregnations.
Installation is carried out on the basis of a finished frame with a metal crate. The installation of the panels starts from the corner of one wall and goes to the other. If you plan to build a frame house with your own hands in a cold region, then insulation is placed before each element of the skin. It is covered with a sealing substrate or waterproofing. Physically, the structure can be strengthened from the side of the crate using reinforcing brackets.
Arrangement of the basement and blind areas
One of the disadvantages of frame houses is their high sensitivity to water. Direct contact of the foundation with the liquid can lead to irreversible deformational changes in the framework. Therefore, it is important to make a quality blind area - this is the indentation at the bottom of the wall, which is an isolated area. The basement gap will directly depend on the height of the piles passing to the grillage with the initial overlap. On average, the optimal height is 40-50 cm.
Before the device, the blind area should be removed with a layer of soil with turf up to 20 cm deep. As the instructions for building a frame house with your own hands indicate, the basis of the waterproofing trench should be performed as a drainage pillow. The traditional method involves backfilling with sand and gravel aggregate up to 10 cm high. Modern methods are increasingly using a bitumen molten solution. They should cover the backfill to form a reliable hydrobarrier. The final layer will be concrete pouring, compatible with bitumen polymer in terms of characteristics. In this case, the base must not be completely sealed. It is necessary to leave several holes with a diameter of about 15 cm around the perimeter.
Interior decoration
The premises also have a considerable amount of work associated with warming and finishing surfaces. For flooring, you can use material based on the same wood - the board, laminate or parquet is optimal. Moreover, provided that the rough floor is well insulated, a warm floor system with electric mats or infrared heating elements can be organized.
For the northern regions, it is worth performing warming with thick plates, shown in the upper photo. With your own hands, the construction of a frame house with effective thermal insulation can be realized without special costs through bulk heaters. Expanded clay, granular foamglass and wood sawdust belong to such. Filling the foundation niche to the level of grillage with such an insulator will significantly increase the total amount of stored thermal energy in the house.
As for wall decoration, natural wood paneling, as well as plasterboard panels with subsequent painting, are more often used. For installation, you will need to create a battens from battens or a metal profile. Mineral wool or expanded polystyrene is also added to empty segments. . , , . .
Conclusion
, . , . , , , . . , .