Beadwork is an art accessible to everyone. Any needlewoman can easily make a wonderful bouquet of violets in just a few hours, having learned two simple techniques - a frame with a central row and continuous looping loops.
Basic tools and materials
Hand-made flowers from beads are always pleasing to the eye - they look so alive that you want to smell and touch them. Each needlewoman can make such a miracle. Beaded violet for beginners will not seem like a complicated product. You need to use the minimum set of tools and materials that can be purchased at any needlework store:
1. Beads of several types (matte, shiny, small, large). Minimum number of colors: green, yellow and any other at your discretion (red, blue, pink, purple).
2. Wire of different thicknesses. For stringing beads, its diameter should be no more than 0.2 mm, and for the legs that will give the product stability, the diameter of the wire can be several times larger.
3. Scissors or wire cutters.
4. Floral ribbon or green silk thread for wrapping flower legs.
5. Metal or glass balls, clay or clay, which are placed on the bottom of the pot.
6. If you are thinking about how to make violet from beads, which will be an exact copy of a living flower, get a small vase and spray on top the finished product with moss or ground.
Technique "parallel weaving"
The famous crocodile keychain is just the product from which needlewomen usually begin to learn the art of beadwork, but few people realize that luxurious violets from beads can be made using the same principle. The weaving pattern is extremely simple and does not require special skills.
By this principle, you can make petals and flowers. First you need to string three beads and run the wire so that one bead remains from the bottom and the other two from above. Keep up the good work, each time increasing the number of beads in a row. The petal should take the form of an inverted isosceles triangle. The final row is made of beads of a different color for contrast, and continue to string a few more beads on the free ends of the wire and stretch them to one bead, which was laid at the base.
Technique "frame with a central row"
To make large bouquets of beads, the craftswomen came up with a method thanks to which it is sometimes difficult to distinguish an artificial product from natural flowers. A frame with a central row (RCC) allows you to bend the finished petal as you like - it all depends on the strength of the wire, from which roses and smaller flowers , like violets from beads, can acquire any shape. The weaving pattern is not as simple as it seems at first glance, but having mastered it, you will perform even the most unusual products.
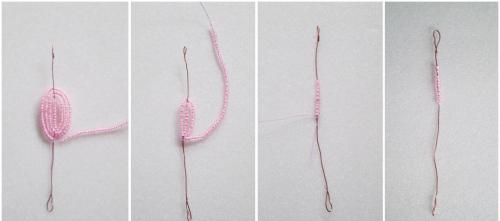
- A wire of the required length is cut off, a small loop is made at one end of it; several beads are strung on the free end, which will make up the beginning of the skeleton of the central row.
- Pick up the blank so that the loop is at the bottom. Tie a knot at the upper end, and string beads on the free end, which will subsequently braid the central row.
- Pull the wire with the beads up, tighten the loop. Try to keep the petals pointed.
- After completing the previous step, pull the wire with the beads down. Perform several loops as required by the product.
Green leaflets
Thanks to the RCC, you can make anything: plants, butterflies, dragonflies and much more. It all depends on the number of beads in the center row and entwining loops. Violet leaves are made with pointed ends - to achieve this effect, the wire must be kept at an angle of 45 degrees. This is indicated in the second figure. On the front side, the wire will not be visible, and the product will look alive. For the manufacture of large petals, the central row is made of a large number of beads, while there should be little twisting loops. By the same principle, you can make not only the petals, but the violets themselves from beads, the scheme of which can be performed both in the NOP and in the RRC.
Technique "continuous entwining loops"
Any flower can be made in several ways, and beginners in beadwork should learn the simplest of them. The technique of continuous entwining loops (NOP) is the most simple, but using it you can make real masterpieces. By the way, it is also used to make violets from beads: the weaving scheme allows you to make a magnificent bouquet that will look like it is alive. It is necessary to string several beads on a strong wire, depending on the size of the product, and twist at the base to make a vicious circle. In a similar way, all other loops should be performed, increasing their size from row to row.
Beautiful violets from beads: a photo with step by step instructions
To make the composition, you will need basic knowledge of the techniques of KCR and NOP. For a bouquet of nine violets, you will need about twenty meters of wire and at least four colors of beads: green, yellow, two shades of blue, pink or purple.
Step 1. In order for the finished product to resemble a living flower, you need to make buds. Put 6 green beads on the wire, fix them at the base. There should be 5 such loops - this is the sepal.
Step 2. Similarly, the bud itself is made of beads of blue, purple or pink color, depending on the type of violet. The base is worn over green loops and curled.
Step 3. The yellow center is performed according to the same principle.
Step 4. The violet flower consists of ten petals made using the NOP technique. The first row is made of seven beads, the second - of fifteen, the third - of twenty. Once the flower is ready, stick the yellow center in the center - so your first bead violet will be completely ready. A step-by-step photo shows a great combination of light and dark colors, so you can do the same if you wish.
Step 5. The green petals are made using the KCR technique: a frame of five beads wrap around several loops.
Step 6. Make the remaining violet flowers and buds. On a small pot, they should turn out no more than nine pieces.
Step 7. For stability, twist all the legs of the flowers: the bouquet will consist of one large steady legs.
Step 8. But the bottom of the pot you can put metal or glass balls, floral clay or plasticine. Gently stick the bouquet and shape the violets.
Useful tips for needlewomen
Get several shades of beads of the same color to make the flower look like alive.
Use different types of beads: matte, shiny, translucent - this is how the product looks more impressive.
Try to choose a wire that matches the color of the beads: make the legs of the flowers only from green wire, the petals from blue, red or copper, depending on what color the violets from beads will be.
A weaving pattern is something that inexperienced needlewomen need to follow, otherwise the product may turn out to be crooked.
Buy only high-quality beads, mainly of Czech origin, because transparent beads painted inside or out will soon fade and the product will lose its original appearance.
Wipe dust off the flowers with a small brush at least once every three months.
For quick stringing in the manufacture of large products, use a spinning wheel for beads (spiner). If you get incredibly beautiful violets from beads, photograph them with fresh flowers and be surprised at how similar they are.
Always wrap a leg of flowers with a floristic ribbon or silk thread, masking the wire under it as much as possible.
Unleash your imagination!
Having learned how to make violets from beads and other flowers, you can use them not only for their intended purpose, putting them on a windowsill, but also as a decoration for hairpins or elastic bands for hair. You can also make a beautiful necklace, an arm bracelet or a miniature pendant. Terry beaded violet will look especially impressive as a trinket or bag fastener. Having learned all the techniques of beadwork, you can easily fulfill any of your dreams and look great, because products made with your own hands are worth its weight in gold and will never lose its relevance.
How to make a violet from beads yourself?
If you really liked the flower, but you did not find step-by-step instructions for manufacturing, it will be easy for you to come up with a scheme. Products with large petals are made mainly according to the KCR technique, small ones - according to the NOP. Mentally disassemble your favorite flower into parts and count how many leaves, petals, buds, legs, middles are in it. Pick a few shades and evenly distribute them on the surface of the product. Now imagine how the flower will shimmer in the sunshine, start your creativity and expect great results!