DIY gift - what could be better? In particular, such surprises are pleasant to the closest and dearest people. An origami paper tie, along with a fancy tiny shirt, will be a great gift for Father's Day or for your brother or grandfather's birthday . This sign of attention can be an independent souvenir, as well as a cute postcard or a container for a cash or sweet prize.
Necessary materials
A cute origami tie with a shirt can be given with or without. There are a lot of men's holidays, where this craft will come in handy: February 23, Builder's Day, Father's Day, Railway Worker's Day, and so on, not to mention the numerous birthdays, anniversaries, and other memorable dates. To create this premium little thing you need only 2 pieces of paper and very little time.
You just need to follow the instructions, step by step, and you will have a unique and original gift in your hands. For a shirt, you need a sheet of paper (8.5 cm x 11 cm), and for a tie you will need a square sheet of paper (5 cm x 5 cm). Dimensions are approximate, depending on the dimensions of the craft they can be varied, but without violating the aspect ratio.
Making a shirt:
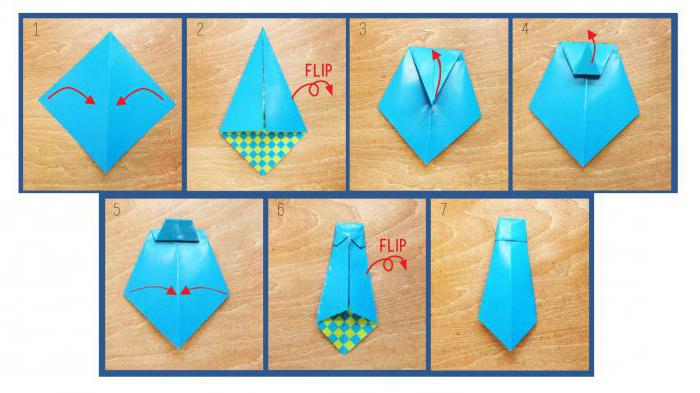
- Step 1: Take a piece of paper and fold it in half, carefully ironing the crease. Then sweep back.
- Step 3: Take the top inner edge of each casement and fold it outward, creating a semblance of the English letter “V”. It will be sleeves.
- Step 4: Turn the paper over to another groan, as well as vertically.
- Step 5: Take the top edge of the paper and fold it down about 2-2.5 cm. This is the first part of the collar.
- Step 6: Turn the project back to the other side. Take the top left and right corners and fold them so that they meet in the center. You now have a collar.
- Step 7: The shirt is almost ready, it remains to bend the bottom edge of the paper (with the letter "V") up.
- Step 8: It remains to carefully tuck the lower edge directly under the collar. It's done, now you have a miniature origami shirt! If you do not make a V-shaped fold, then the shirt will turn out without sleeves.
It's time for a tie
To complete the work, add an elegant tie made of paper (origami). How to make it? Follow the instructions.
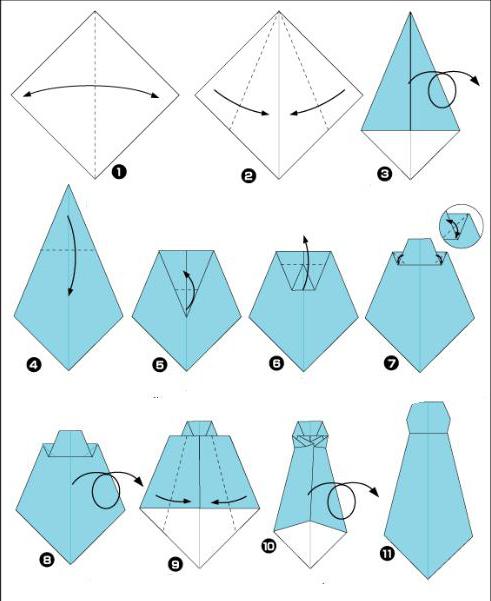
- To make an origami tie, take a square piece of paper and fold it in half to get a diagonal crease.
- Take two opposite corners and roll them in such a way to the center to make a triangle.
- Then flip the sheet to the other side.
- Bend the top corner almost to the middle of the whole figure.
- Now we bend the tip of the vertex of the folded angle upwards at a certain distance (in the figure this is indicated by a dashed line).
- A figure resembling a trajectory folds up along a dashed line. This is a tie knot. By bending its sides, you can make it square. As you like more.
- We smooth the lower corners of the trapezoid at the top of the figure.
- Turn the sheet over to the other side.
- Take the outsides and fold them to the central fold.
- Turn the design back to the other side.
- You now have a cute origami tie. It will not be superfluous to add any decorations in the form of buttons, stickers, patterns or appliqués.
It remains to fix the origami tie to the shirt and that's it, the souvenir is ready. If this is a postcard, you can write a congratulation on it and give it as a present. If the original idea was to make a container for a cash gift, then the folded bill can be hidden in the folds of a tie or shirt.