Knitting is not only useful, but also a very interesting hobby. It allows you to decorate the house with a thing that will be one of a kind. Even if the knitter takes someone’s workshop as a basis, her thing will still turn out different. After all, you can always use a different color and type of yarn. And if you combine the remnants of tangles, you will be able to create an original and even creative product. You just need to want it!
In this article, some interesting crochet ideas for home. Detailed instructions, tips and diagrams will help even novice craftsmen to make a really spectacular and useful little thing.
Round potholder
For housewives who love to pamper their family with various goodies, this thing is one of the most necessary. It is not necessary to buy it, because you can make a tack yourself. For this we need:
- ball of knitting thread;
- comfortable hook (better equal to the thickness of the yarn);
- any filler.
When everything is ready, you can start crocheting a tack. To do this:
- Wrap the thread (2 turns) on the finger and gently pull it off. Did you get a loop?
- Tie it by making 4 single crochet and tighten so that the center closes.
- Knit further in a circle, periodically adding loops, making sure that you get an even circle. You don’t have to do too much. Enough 15 × 15 cm.
- Having reached the necessary parameters, tear the thread and tie so that the tack does not open.
- By analogy, tie the same circle.
- Put them together, not forgetting to put filler between them. And carefully tie.
- Make a loop to make it convenient to hang.
Simple square potholder
To complete this product, you will need everything that was described in the previous workshop. However, the principle of operation will be different:
- In this case, the crocheted tack is a straight long web, which then joins on three sides. Therefore, the first thing to do is determine the width, that is, the number of starting loops.
- Then just knit the desired number of rows, tear and fasten the thread.
- Fold the canvas in half, make a layer of filler, tie and add a loop.
If desired, both versions of crafts can be decorated with applique. The main thing is not to do too voluminous. Otherwise, using the tack as intended will be inconvenient.
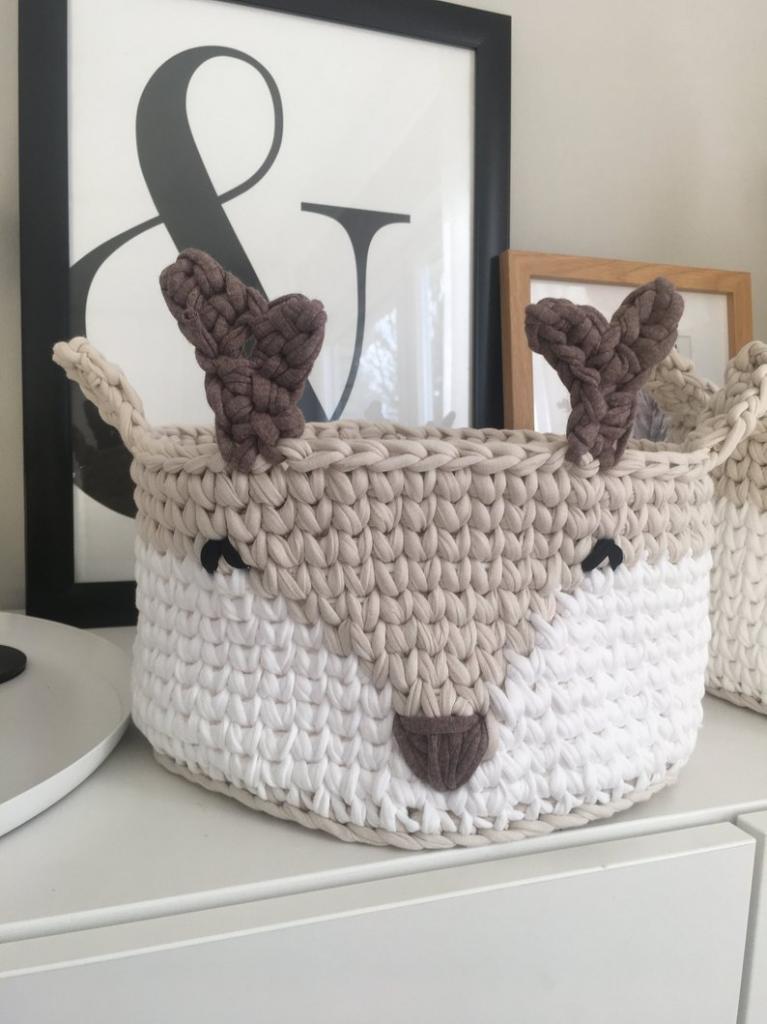
Fancy basket
Experienced needlewomen are convinced: if you learned how to knit circles, then you can do whatever your heart desires. And if this statement is rather controversial regarding the performance of knitted clothes, then in the case of crafts for the home - the true truth.
Doubt it? Then we propose to consider a simple master class that will explain how to crochet a basket. Before moving on to creativity, it is worth preparing:
- knitting threads or twine;
- size-appropriate hook;
- clothesline or tow (meter depends on the desired size of the craft).
As you can see, all materials and tools are quite accessible. Perhaps you have already guessed the principle of work? If not, then the instruction is specifically for you:
- The first step is to decide what shape your basket will be. It is immediately worth noting that the round is much easier and faster. If the choice fell on her, then the first step will be to prepare a bottom-cup, similar to a tack, only larger. If you are interested in crocheting a basket with a square base, you should start by forming a square. The length of the side must be determined independently. It is also important to clarify that your task is to tie a rope or cord. That is, you make a single crochet in such a way that you grab the rope. At the same time, depending on the thickness of the thread, it will either simply close or be visible as an interesting design decision.
- Having prepared the bottom, proceed to knotting the walls of the basket. To cope with the task is very simple. Indeed, in this case, you need to knit in a circle, without increases and decreases. Regardless of whether you have a round bottom or a square.
- Having risen to the desired height, add handles. To do this, determine their location and width, then knit the desired number of air loops. As a result of the described manipulations, you will get holes. This is the handle!
- As we study crochet technology (interesting ideas for a home are easy to implement with this tool), it’s important to mention decor. There are several ways to make a basket unique. For example, tie a flower or embroider it with beads and glass beads. You can also draw a muzzle.
Round napkin
As you know, beauty, style, originality lie in the details. That is why you can refresh the atmosphere by making a few lace napkins. If you are still an inexperienced needlewoman, then you can limit yourself to performing a motley or striped circle, connected with ordinary single crochet columns. You can also use various textured or multi-colored threads. Most needlewomen prefer gradient yarn. It does not cause difficulties at work and helps to create an original little thing.
Openwork napkin
Worked out on a simple option? Then you can move on to a more spectacular! If you have mastered the basic skills of work or the previous option seems too simple to you, we offer a scheme and description of a beautiful crochet napkin.
Mat
Almost all needlewomen, having mastered the technology of the studied skill, the first thing they do is to do rugs. In most cases, the work is original, but somewhat monotonous. Basically, craftswomen make striped round or rectangular products using the remains of yarn or clothes cut into thin strips.
However, more creative crafts for the home have recently gained popularity.
Crocheting the gizmo presented in the photo does not involve complex manipulations. After all, the basis of the work is mugs that are well-known even to beginners, simply of different sizes. You should start knitting a similar rug from the base, that is, from the rug itself. The length of its circumference depends on your wishes. The same can be said about the appearance of the rug. Who will it be - a bear, cat, bunny or other animal?
Pillow
Another interesting and undoubtedly useful little thing is a pillow. Are you interested in how to crochet for the home the little things presented in the photo at the beginning of the article? Then we offer step-by-step instructions. It begins by listing the necessary materials and tools. It:
- yarn of several colors (preferably pleasant to the touch and hypoallergenic);
- a hook corresponding to the thickness of the knitting thread;
- filler;
- needle with thread.
When everything is ready, get to work:
- Tie a round pillow. The principle of execution is similar to the tack that we studied earlier. Do not forget to properly fill and sew it.
- Now tie the trunk of the elephant. To do this, form a small circle and then knit in a spiral without increases and decreases. Having reached the desired length, in the next 10 rows, gradually increase the circumference by adding a few loops. Fill the part and sew.
- Tie the eyes and pupils, if desired, make a bow. Sew on.
- Tie 2 "skirts" (openwork or simple). These are ears. Sew them.
Ottoman
Based on the basket previously studied, you can crochet an interesting idea for the house, presented in the photo below.
This will require:
- yarn of several colors;
- a hook, the diameter of which is equal to the thickness of the thread;
- filler (you can use an old blanket or pillows).
The principle of crocheting for a home of creative crafts consists in the following actions:
- Prepare a circle of the desired diameter. Just in case, count the number of rows, because you will have to knit a similar circle at the end.
- Is the bottom circle ready? Then lift the walls, moving in a circle without increases and decreases.
- After you should gradually reduce the circumference, knitting 2 loops together. The main thing is to do it smoothly so as not to tighten the product.
- When there are 15-20 rows left, fill your ottoman well. And after that tie the little thing to the end.
- Tie the ears, eyes and pupils, make a muzzle. Again, you can take any animal as a basis.
Bag chair
Considering the topic "Crochet: interesting ideas for the home", you can not ignore the product, which is shown in the main photo of this article. After all, this is a favorite bag chair! It is remarkable not only because it is very convenient, but also because it is quite simple to execute. But we will not get ahead of ourselves, first we will prepare everything necessary for the creative process. It:
- yarn (since the craft is based on a pear, the color should be red, yellow or green, although a creative approach is also acceptable);
- a hook corresponding to the thickness of the thread;
- filler;
- cardboard, scissors and a pencil.
When everything is ready, you can proceed to implement the idea:
- First you need to draw on a cardboard and cut out a circle that will be equal to the desired size of the bottom of the chair-bag. You can skip this step, but then the product will be unstable.
- Then knit a circle of the same size, increase it by another 5-10 rows.
- Insert a cardboard bottom into it and then knit, making 5-7 increases in 10 rows.
- Then you should begin to reduce the diameter of the circle. To do this, in each row you need to do 4-5 decreases. But first, it is recommended to fill a bean bag chair.
- In the end, you need to go to the brown thread, tie a twig, moving in a circle, break the thread and tighten it well. Then a bit to crack the product, giving it the desired shape.
Glass coasters
In the modern world, few people cover tables in the living room or hall with oilcloth. However, placing glasses on a polished surface should also not be - this can lead to the appearance of stains. How to be
The final paragraph of this article, also devoted to the topic "Crochet for the kitchen and home," will help to cope with the problem. In it, you can consider the photo idea of the original coasters for glasses. They fit in a circle, like many other crafts described.